Renovating your home is an exciting journey, but it can quickly turn stressful if you don’t know where to begin—especially when it comes to flooring. Imagine spending hours laying planks only to realize they’re crooked or uneven. Starting your flooring installation in the right spot is crucial for achieving a flawless finish.
| Room/Area | Recommended Start | Why It Works | Pro Tip |
|---|---|---|---|
| Hallway | Longest wall (planks parallel to length) | Balances the entire house layout; fully exposed for centering | Build 3-5 rows first as a stable foundation |
| Living Room | Exterior wall near entry door | Creates natural flow; hides seams from main traffic | Snap chalk line from two walls for squareness |
| Kitchen | Wall parallel to cabinets | Seamless under appliances; stable against exterior | Leave 8-10mm expansion gaps at walls |
| Bedroom | Longest straight exterior wall | Maximizes plank length; easiest for solo DIY | Stagger seams 12+ inches from row 2 |
| Multi-Room House | Hallway radiating outward | Maintains continuity; uses hallway as reference | Dry-lay first row to check end cuts |
Why Starting Right Matters
Starting your flooring installation in the correct spot is more important than you think. A poor starting point can lead to a host of problems, from uneven layouts to wasted materials.
Risks of Starting in the Wrong Spot
- Crooked Floors: Starting from an interior wall or failing to align properly can result in uneven rows.
- Gaps and Buckling: Skipping acclimation or ignoring expansion gaps can cause the flooring to warp over time.
- Redoing Work: Incorrect placement often means tearing up and redoing sections, wasting time and money.
Benefits of Starting Correctly
- Time Savings: A well-planned start can make the installation process up to 20% faster.
- Durability: Proper alignment and spacing ensure the flooring lasts longer without issues.
- Aesthetic Appeal: Straight, even rows create a polished and professional look.
Top 5 Mistakes to Avoid
- Ignoring subfloor issues.
- Starting from an interior wall instead of an exterior one.
- Skipping acclimation for the flooring material.
- Choosing the wrong direction for plank installation.
- Forgetting to leave expansion space near walls.
Tools and Materials Needed
Before you start, gather the right tools and materials. Having everything ready will make the process smoother and more efficient.
Category: Must-Have Items Pro Tip
Measuring tape, chalk line, 4-ft level. Snap chalk lines for straight starting rows.
Cutting a miter saw, a utility knife, and spacers. Leave 1/4-inch gaps at walls to prevent buckling.
Installation: Rubber mallet, tapping block, knee pads. Acclimate materials for 48-72 hours before installation.
Safety/Prep: Dust mask, shop vac, and pry bar. Clean the subfloor thoroughly for better adhesion.
Budget Estimate: Expect to spend around $100-$300 on tools and materials for a DIY flooring project.
Preparing Your House for Flooring
Preparation is key to a successful flooring installation. Skipping this step can lead to uneven surfaces, poor adhesion, and other issues down the line.
Room-by-Room Preparation
- Clear the Space: Remove all furniture, rugs, and old flooring. Use a pry bar carefully to avoid damaging the subfloor.
- Inspect the Subfloor: Check for any damage, such as cracks or uneven spots. Sand down high areas and fill in low spots to ensure the surface is level. Aim for less than 3/16-inch variance over 10 feet.
- Test for Moisture: Use a moisture meter to ensure the subfloor has a moisture content of less than 12%, especially for laminate or hardwood flooring.
- Trim Door Bottoms: Check whether doors need trimming to accommodate the new flooring height.
- Acclimate the Flooring: Leave the flooring planks in the room for at least 48 hours to adjust to the room’s temperature and humidity.
Pro Tip: Start your preparation in a low-traffic area to test your process before moving to more visible spaces.
Choosing the Right Starting Point
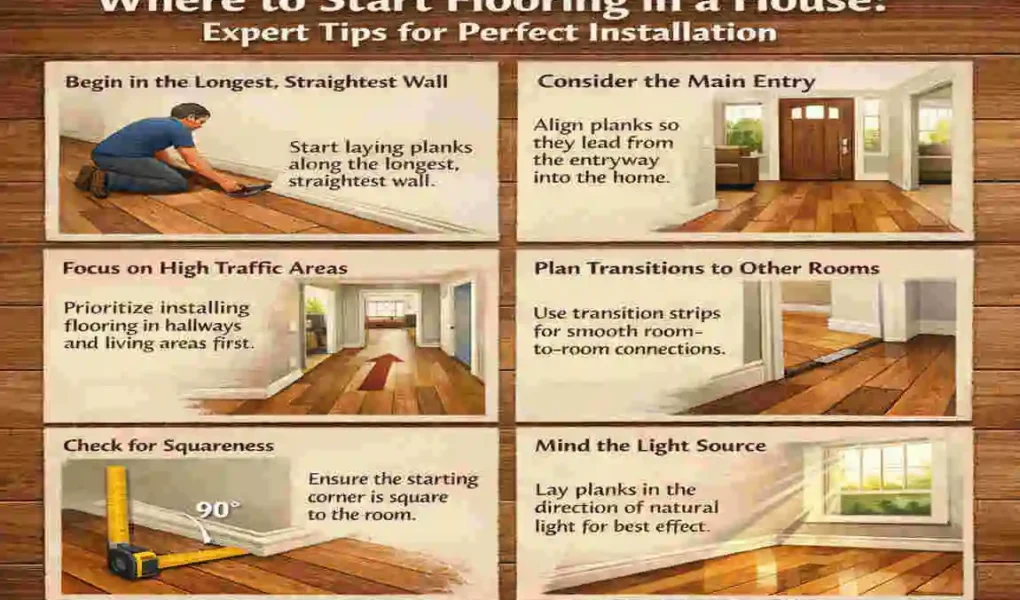
The question of where to start flooring in a house depends on the layout and type of flooring. However, there are some general rules to follow.
Exterior Walls First
The best place to start is usually along the longest, straightest exterior wall. Exterior walls are more stable and less likely to shift over time, providing a solid reference point for your flooring.
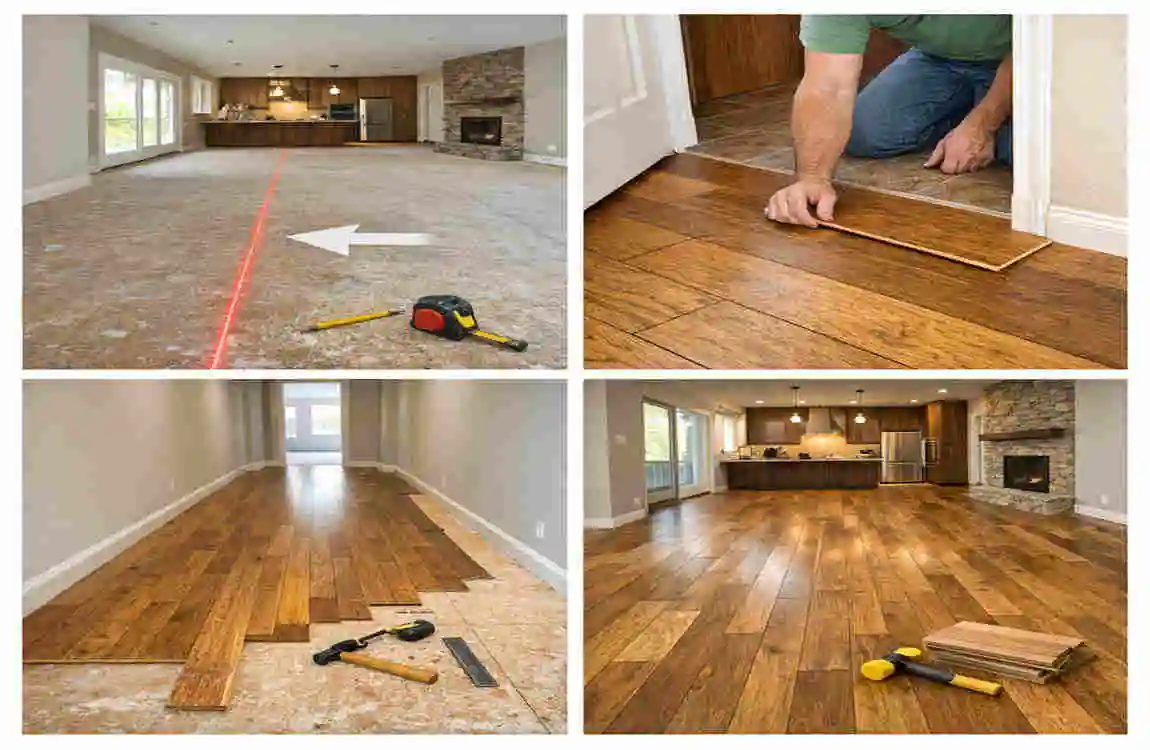
Layout Dry Run
Before installing, lay out a few rows of planks without securing them. This helps you visualize the pattern, check for alignment, and ensure seams are staggered by at least 12 inches. Use chalk lines to mark your starting point and guide your rows.
Room-Specific Advice
- Living Rooms: Start from the entry door and work toward the back of the room for a seamless flow.
- Kitchens: Run planks parallel to the cabinets for a clean look.
Common Rule: Use the longest straight wall in the room as your reference line.
Step-by-Step Installation Guide
Now that you’ve prepared your space and chosen your starting point, it’s time to install the flooring. Follow these steps for a flawless finish.
Lay the First Row
- Place the first row of planks with the tongue side facing the wall.
- Use spacers to leave a 1/4-inch expansion gap between the planks and the wall.
- Tap the planks gently with a rubber mallet to ensure a snug fit.
Stagger the Second Row
- Cut the first plank of the second row to 1/3 of its length to stagger the seams.
- Interlock the planks at a slight angle and press down to secure them.
Handle Obstacles
- Use an oscillating tool to cut around vents, pipes, or other obstacles.
- Measure carefully and test-fit the planks before securing them.
Maintain Multi-Room Continuity
- Use a “T” bridging method for hallways to maintain the direction of the planks.
- Ensure the planks align seamlessly between rooms.
Rip the Final Row
- Measure the width of the last row and cut the planks to fit.
- Use a pull bar to secure the final row tightly against the wall.
Add Transitions
- Install transition strips, such as T-molding, in doorways or between different flooring types.
Flooring Type Start Point Key Tool Time per 200 sq ft
Laminate/Vinyl Longest wall Rubber mallet 4-6 hours
Hardwood Perpendicular to joists, nail gun, 6-8 hours
Tile Center marks Leveling clips 8-10 hours
Flooring Direction Best Practices
The direction you lay your flooring can significantly impact the look and feel of your space.
Aesthetic Considerations
- Parallel to Light Sources: Lay planks parallel to windows or light sources to hide seams and create a seamless appearance.
- Traffic Flow: In open-concept homes, run planks from the front door toward the back for a sense of continuity.
Stability and Wear
- Perpendicular to Joists: For hardwood floors, lay planks perpendicular to the floor joists for added stability.
3 Ways to Decide Direction
- Measure the room’s length and width to determine the most visually appealing direction.
- Use painter’s tape to mock up the layout.
- Consider natural light and door swing for guidance.
Common Mistakes and Fixes
Even with careful planning, mistakes can happen. Here are some common pitfalls and how to fix them:
- Crooked First Row: Use the straightest wall as your guide and double-check alignment with a chalk line.
- Gapping from Humidity: Always acclimate the flooring before installation.
- Over- or Under-Cutting: Practice on scrap pieces before making final cuts.
- Skipping Underlayment: Always use underlayment to prevent noise and moisture issues.
Finishing Touches and Maintenance

Once the flooring is installed, it’s time to add the finishing touches:
- Install baseboards and seal the edges for a polished look.
- Sweep or vacuum weekly to keep the floors clean.
- Avoid excess water when cleaning to prevent damage.
Where to Start Flooring in a House – FAQ
Where should I start laying flooring in a house?
Start in the longest, straightest wall of the main room or a highly visible area (like the living room) to keep lines straight and visually appealing.
Should I start from the center or the wall?
Most flooring (like laminate or hardwood) starts from a wall. Tile floors are sometimes started from the center for symmetry.
Which room should I do first?
Begin with the main living area, then move to bedrooms and less visible spaces for a smoother, continuous flow.
Should flooring run in one direction throughout the house?
Yes, keeping the same direction makes spaces look larger and more cohesive.
Do I install flooring before cabinets?
Usually no—install cabinets first, then flooring around them (except for some floating floors or full remodels).