Have you ever walked into your living room, looked down, and let out a deep sigh? Maybe you are staring at a carpet that has seen way too many spills, or perhaps you are dealing with an outdated, scuffed-up vinyl floor that makes your entire house feel dark and dreary. Outdated floors can completely hinder your vision of a dream home. You want a space that feels fresh, modern, and inviting. But then you look at the quotes from professional flooring contractors, and your jaw hits the floor.
Do not let those massive installation quotes crush your renovation dreams. What if I told you that you could completely transform your space with your own two hands?
Welcome to your ultimate resource on how to install Dream Home laminate flooring. Dream Home laminate is widely celebrated for its incredible durability, complete waterproofing, and phenomenal budget-friendliness. Coming in at well under $3 per square foot for materials, it is the absolute perfect choice for homeowners who want luxury on a budget.
By taking the DIY route, you are putting the power directly into your own hands. Mastering exactly how to install Dream Home laminate flooring empowers you to achieve a pro-level makeover without the staggering cost of hiring professional crews. On average, skipping the contractors saves you an unbelievable $5 to $8 per square foot. If you are flooring a 500-square-foot living room, that is thousands of dollars staying right in your bank account!
Does the idea of ripping up your house sound intimidating? Take a deep breath. You absolutely can do this. Installing modern laminate flooring is essentially just putting together a giant, beautiful puzzle. The pieces are engineered to snap together with a brilliant click-lock system that requires no messy glue or heavy nail guns.
Are you ready to roll up your sleeves and give your house the gorgeous foundation it deserves? Keep reading to discover exactly how to achieve flawless results this weekend.
| Step | Action | Key Tips & Tools |
|---|---|---|
| Prepare Subfloor | Remove old flooring, clean, level (max 3/16″ variance over 10 ft), acclimate planks 48-72 hrs. | Vacuum thoroughly; use leveling compound. Tools: Broom, level, utility knife. |
| Install Underlayment | Roll out foam/vapor barrier, overlap seams 4″, tape. | Trim to walls; skip if pre-attached. Tools: Utility knife, tape. |
| Lay First Row | Start in corner, groove to wall, use 1/4″ spacers for expansion gap. Click tongue into groove. | Keep straight; tap gently. Tools: Spacers, rubber mallet, tapping block. |
| Add Rows | Stagger seams 16-24″, angle-lock planks, tap sides flat. | Mix boxes for color; cut ends to fit. Tools: Circular saw/jigsaw, measuring tape. |
| Cut for Obstacles | Measure twice, cut around pipes/doors (undercut jambs). | Jigsaw for curves. Tools: Jigsaw, pencil. |
| Finish Last Row & Edges | Rip planks lengthwise, install transitions/baseboards. | Pry bar for tight fits; wait 24 hrs before walking heavy. Tools: Pull bar, hammer. |
Why Choose Dream Home Laminate Flooring
Before you swing a hammer or fire up a saw, you might be wondering why you should choose this specific flooring for your major renovation. The market is flooded with options, but Dream Home laminate stands out for several incredible reasons.
First and foremost, the visual appeal is simply stunning. Modern manufacturing has come a long way, and these planks offer incredibly realistic wood and stone looks. They feature textured grains that actually feel like natural timber under your bare feet.
But beauty is only skin deep. What about durability? This flooring boasts a fantastic AC4 scratch resistance rating. In everyday language, this means the floor is tough enough to withstand the chaotic energy of heavy foot traffic, playful large dogs, and kids racing toy cars across the living room.
When you compare it to traditional hardwood, the benefits become even clearer. Hardwood is gorgeous, but it is notoriously expensive. Furthermore, real wood requires endless maintenance. You have to sand, stain, and seal it over the years. Dream Home laminate offers the same luxurious aesthetic for a fraction of the cost, and it never needs to be refinished. Just sweep it, mop it, and you are done.
When you compare it to standard builder-grade carpet or thin vinyl, the laminate easily wins out. Carpet traps dust, allergens, and odours. Thin vinyl can tear and peel up at the corners. Dream Home laminate, especially the Premium 12mm thickness options, feels incredibly solid and stable underfoot. It does not sound hollow when you walk on it in heavy boots.
Plus, this flooring often comes with a massive 25-year residential warranty, giving you total peace of mind. It is no wonder that over 70% of DIYers prefer laminate for their home renovations.
Check out this quick breakdown of how it stacks up against the competition:
Feature Dream Home LaminateTraditional HardwoodStandard Carpet
Cost per square foot $2 – $3 $8 – $12+ $3 – $5
Installation Time 1 – 2 days per room 3 – 5 days 1 day
Overall Durability High (AC4 rating) Very High Low
Maintenance Required Very Low High Medium
Tools and Materials Checklist
You cannot build a masterpiece without the right paintbrushes. Having the proper tools on hand before you begin will make your weekend project infinitely smoother. There is nothing worse than having to make a mid-project run to the hardware store because you forgot a simple tool!
Here is your essential checklist to get the job done right.
The Essential Tools:
- Tape measure: You will use this constantly. Measure twice, cut once!
- Circular saw or jigsaw: A circular saw is great for long, straight cuts. A jigsaw is an absolute lifesaver for cutting curved shapes around door frames and heating vents.
- Expansion spacers (1/4-inch): These little plastic wedges keep your floor away from the walls, allowing the wood to breathe and expand naturally.
- Rubber mallet: You need this for gentle tapping. Never use a metal hammer directly on your flooring!
- Tapping block: This specialised block protects the delicate locking edge of the laminate when you tap the planks together.
- Utility knife: Perfect for opening boxes and cutting your foam underlayment.
- Safety gear: Do not skip this! You absolutely need protective safety glasses and a good dust mask when operating your saws.
The Core Materials:
- Dream Home laminate planks: Always calculate your room’s square footage and buy 10% extra. You will inevitably make a wrong cut, and you need extra material for the very last row.
- Underlayment: If your specific planks do not already have padding on the back, you must buy a roll of foam underlayment.
- Vapour barrier: If you are installing your floor over a concrete basement, you need a plastic moisture barrier to stop groundwater from ruining your new floor.
- Transition strips: These metal or wood strips bridge the gap between your new laminate and the flooring in the next room.
Optional (But Highly Recommended) Gear:
- Thick knee pads: You’ll be crawling on your knees for hours. Do your body a massive favour and buy a comfortable pair of knee pads.
- Metal pull bar: When you get to the very last row against the wall, you will not have room to swing a mallet. A pull bar hooks over the end of the plank and lets you pull it tight.
Preparation Steps Before Installation
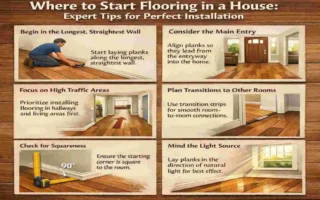
If you want to know the biggest secret behind how to install Dream Home laminate flooring like a seasoned professional, it all comes down to the preparation. If you rush this phase, your floor will look messy, feel bouncy, and potentially ruin itself within a few months.
First, we must talk about acclimation. This is the single most important step that beginners always forget. Wood and laminate products are living, breathing things. They expand in the heat and shrink in the cold. You must unbox your new planks and let them sit in the room where they will be installed for 48 to 72 hours. Ensure your home’s temperature is set to a normal living range, ideally between 65°F and 85°F.
Next, you need to inspect your subfloor ruthlessly. The subfloor is the bare wood or concrete beneath your old flooring. Your new laminate demands a subfloor that is flat, clean, and totally dry. Grab a long, straight level and slide it across the floor. You cannot have any dips or peaks larger than 3/16 of an inch over a 10-foot span.
If you are pulling up old carpet, you have to get on your hands and knees with a pair of pliers and pull out every single rusty carpet staple. If you have deep dips in a concrete floor, you must pour a self-levelling compound to fill them in.
You also need to prepare your doorways. You never want to cut your laminate into a complicated shape to fit around a door frame. Instead, you will take a handsaw or an oscillating multi-tool and cut straight through the bottom of the wooden door casing. This allows your new floor to slide perfectly underneath the door frame for a seamless, professional look.
Follow these exact numbered prep steps:
- Measure your room twice. Multiply the length by the width to get your square footage, and make sure you ordered that 10% extra for waste!
- Clear everything out. Remove all furniture, take down the doors from their hinges, and carefully pry off your existing baseboards.
- Vacuum the subfloor thoroughly. Even a tiny pebble left behind will cause your new floor to click and pop every time you step on it.
- Check your moisture levels. If you are installing over a wooden subfloor or in a crawlspace, ensure the wood moisture is well below 12%.
WARNING: Do not ever skip the acclimation period! If you bring cold flooring into a warm house and install it immediately, the planks will expand the next day. Because they have nowhere to go, the floor will buckle, lifting into a massive, bouncy tent in the middle of your living room.
Step-by-Step Installation Guide
Now that your room is perfectly prepped and your materials are acclimated, it is time for the fun part. This is the core of our guide on how to install Dream Home laminate flooring. Put on your knee pads, grab your tape measure, and let us start transforming your room!
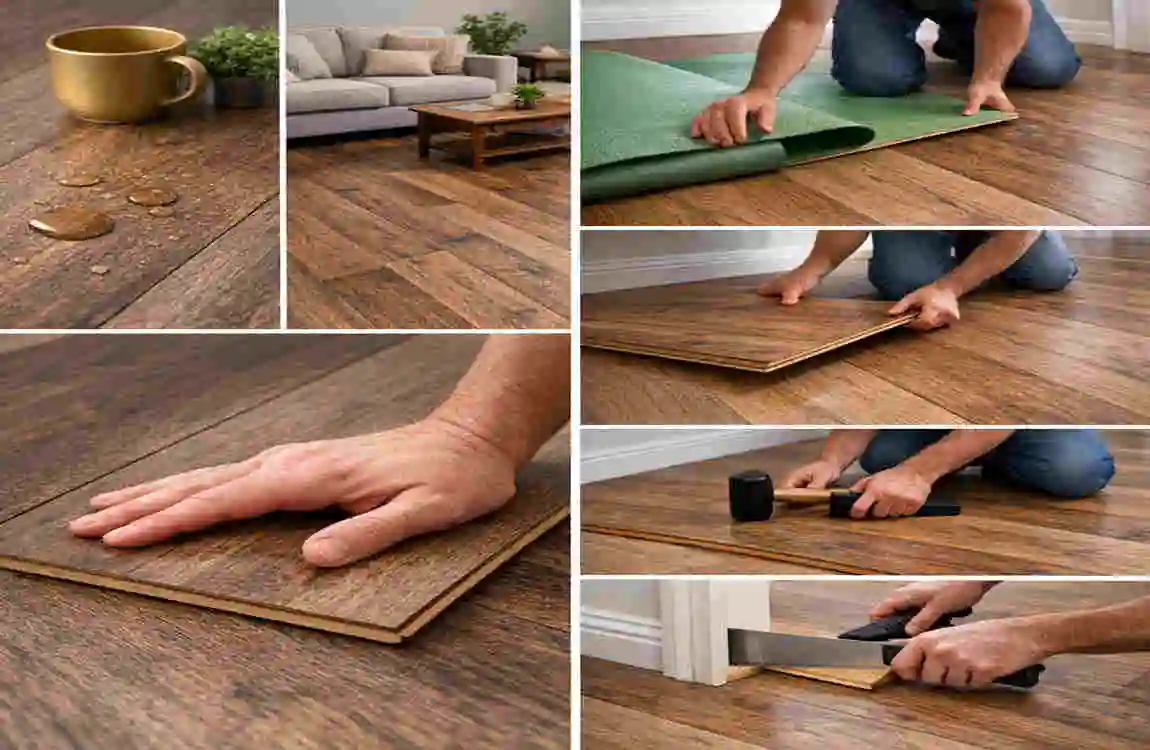
Lay Underlayment and Vapour Barrier
Before any wood touches the ground, you need to create a protective barrier. If you are working on a concrete subfloor, roll out a 6-mil plastic vapour barrier first. This stops underground moisture from wicking up and rotting your flooring.
Next, roll out your foam underlayment. This foam provides a crucial cushion that makes the floor comfortable to walk on and acts as soundproofing, so your house doesn’t echo like an empty warehouse.
Roll the foam out in long strips, starting from the longest wall. When you lay the second row of foam next to the first, butt the edges together. Do not overlap the foam seams! Overlapping creates a thick bump that will make your laminate sit unevenly. Use heavy-duty tape to seal the seams, creating a single, continuous sheet of protection. Use your utility knife to trim the foam so it sits flush against the walls.
Install First Row
Your first row is the foundation for the entire room. If this row is crooked, every single subsequent row will be crooked, too.
Start in the left corner of your longest, straightest wall. Take your very first plank and lay it down. You want the “groove” side of the plank facing the wall, and the protruding “tongue” side facing out into the room.
Remember our warning about expansion? You need to place your 1/4-inch plastic spacers between the plank and the drywall. Place them along the long back edge and at the short end against the side wall.
Now, grab your second plank. You are going to connect the short ends. Angle the tongue of the second plank into the groove of the first plank, and press it down flat. You should hear a satisfying click. If the seam is not perfectly tight, place your tapping block against the far end of the second plank and give it a gentle tap with your rubber mallet to close the gap.
Should you stagger the short ends in your first row? No. Keep the entire first row perfectly straight against the wall. This builds incredible stability for the rest of the room.
Lay Subsequent Rows
With your first row locked in tight, you are ready to build out into the open room. This is where you need to master the art of the “stagger.”
You never want the short seams of your planks to line up perfectly with the row next to it. If you create an “H” pattern where the seams align, you create a massive structural weakness that will eventually snap under the weight of your furniture.
Instead, you must offset your seams by at least 16 to 24 inches. To do this, do not start your second row with a full plank. Cut a plank in half, and use that half-piece to start the second row against the wall (do not forget your 1/4-inch spacer!).
To install the plank, use the angle-and-lock method. Hold the plank at a 30-degree angle, slide the long tongue into the long groove of the first row, and drop it down flat.
For the next piece, connect the short end to the plank you just laid first, keeping it slightly angled, and then slide it forward to lock the long edge into the previous row.
Handle Cuts and Obstacles
As you move across the room, you will run into obstacles such as heating vents, closet corners, and doorways. This is where your tape measure becomes your best friend.
Always measure twice and mark your cutting lines with a sharp pencil. If you need to cut a hole for a floor vent, trace the outline on the back of the plank and use your jigsaw to plunge-cut the shape. If you are dealing with odd angles around a fireplace hearth, use a mitre saw to get clean, precise angular cuts.
When you reach those doorways that you prepped earlier, you will need to slide the laminate under the wooden door casing. Because you cannot angle a plank upward if it has to slide under a door frame, you might need to use your utility knife to shave off the tiny locking lip on the groove. Apply a thin bead of wood glue to the joint, slide it flat under the door frame, and push them together.
Final Row and Finishing
You have crossed the vast expanse of the room and reached the final wall. It is incredibly rare for a room to fit a full-width plank on the final row perfectly. You are almost certainly going to have to cut your planks lengthwise (a “rip cut”).
Measure the distance from your second-to-last row to the wall. Subtract 1/4 inch for your required expansion gap. Draw a long line down your plank and rip it with your circular saw.
Because you are tight against the wall, you cannot use your tapping block. Take your metal pull bar, hook it over the raw edge of the plank by the wall, and tap the other end of the bar with your mallet to pull the final joint tightly closed.
Finally, it is time to cover up those 1/4-inch expansion gaps! Reinstall your baseboards, or install quarter-round moulding. Nail the moulding directly into the wall or baseboard. Never nail the moulding into your new floor, as the floor must be able to float and slide underneath it. Install your transition strips at the doorways to finish the look.
Post-Installation Care
Congratulations, you have successfully laid your new floor!
Before you drag that heavy sofa back into the room, give the floor 24 hours to settle. Remember, this is a floating installation. You did not use any glue or nails to hold it to the subfloor.
Sweep up the sawdust, wipe down the planks with a lightly damp microfiber mop, and step back to admire your incredible craftsmanship.
Common Mistakes and Troubleshooting
Even with the best guide in the world, mistakes can happen. DIY projects are a learning experience! Knowing the common pitfalls ahead of time will help you navigate around them smoothly.
If you want to know how to install Dream Home laminate flooring without pulling your hair out, avoid these eight major mistakes:
- Installing over an uneven subfloor: If your floor has dips, the laminate will flex every time you step on it. Fix: Grind down high spots and fill low spots with a leveling compound before starting.
- Forgetting the expansion gap: the ultimate sin of laminate flooring. If the planks touch the wall, they cannot expand in the summer humidity. Fix: Always use 1/4-inch spacers around every single wall and stationary object.
- Creating tight fits without spacers: If you wedge a plank tightly against a cabinet base, it creates a pinch point that will cause the floor to buckle.
- Poor seam staggering: Aligning your short seams creates a fragile floor. Fix: Ensure joints are staggered by at least 16 inches to create a strong, staircase-like pattern.
- Using a metal hammer directly on the plank instantly shatters the delicate locking tongue. Fix: Only tap on a dedicated tapping block.
- Trapping debris in the grooves: Sawdust in the locking mechanism prevents a tight seam. Fix: Keep a shop vacuum handy and clean the grooves before locking.
- Nailing baseboards to the floor: This pins the floating floor down. Fix: Nail moulding horizontally into the wall drywall only.
- Using a wet mop: Laminate is water-resistant, but puddles of standing water can seep into the seams. Fix: Use a damp microfiber cloth, not a soaking-wet mop.
House Makeover Ideas with Dream Home Laminate
Now that you know the technical side, let us talk about the design! Flooring is the massive canvas upon which the rest of your home’s aesthetic is built.
Imagine transforming your outdated kitchen. By utilising the waterproof properties of Premium Dream Home laminate, you can run gorgeous, wide-plank oak flooring right up to your cabinets without fear of water damage from the sink. The rich wood tones instantly warm up stark white cabinets and stainless steel appliances.
Take a look at your living room. By choosing a deep, cosy walnut tone, you instantly create a highly inviting, rustic atmosphere perfect for family movie nights.
One of the best modern design tricks is achieving a multi-room flow. Instead of chopping your house up with different carpets and tiles, install the same laminate seamlessly from your front door, down the hallway, and into the bedrooms. This uninterrupted visual flow tricks the eye, making your entire house feel significantly larger and more cohesive.
Pair your new, affordable flooring with a fresh coat of bright, neutral wall paint. For under $1,000 in total materials, you can completely redefine your house’s vibe. It is the ultimate weekend makeover.
Cost Breakdown and ROI
We promised you that mastering how to install Dream Home laminate flooring would save you a small fortune. Let us look at the hard numbers.
If you are renovating a large, open-concept 500-square-foot space, here is exactly what your DIY budget looks like:
Budget Item Estimated Cost (500 sq ft)
Dream Home Planks $1,200
Tools, Underlayment, & Spacers $200
Transition Strips & Moulding $100
Total DIY Project Cost $1,500
If you were to hire a professional crew to prep the floor, lay the underlayment, install the planks, and cut the trim, they would charge you roughly $2,500 for labour alone. Your total would soar to $4,000!
Beyond the immediate cash savings, this project offers an incredible Return on Investment (ROI). Upgrading from stained carpet to sleek, modern hard-surface flooring can easily boost your overall home value by 2% to 5%. When it comes time to sell, buyers obsess over clean, low-maintenance floors.
Quick FAQ Troubleshooting:
- Can I install this over my old tile? Yes, absolutely! As long as the existing tile is firmly attached, completely flat, and not cracking, you can float your new laminate right over it. Use a slightly thicker underlayment to hide any deep grout lines.
- What are the specifics of the Dream Home I need to know? Remember that Dream Home uses a specialised click-lock mechanism. You do not need to buy any wood glue or adhesives. The locking system is engineered to hold the floor together tightly using mechanical friction alone.