Did you know that upgrading your property’s exterior illumination is one of the most cost-effective ways to boost its overall curb appeal? Real estate experts often note that a well-lit exterior can increase a property’s perceived value by a staggering 20% to 30%. Furthermore, tackling this project yourself can save you a massive amount of money. By choosing the DIY route, you can easily save $500 to $2,000 on professional installation labor.
However, dealing with electricity can be intimidating. If you are standing in your yard wondering exactly how to wire multiple outdoor lights in your home, you have come to the perfect place. Wiring multiple fixtures together does more than make your house look pretty at night. It drastically enhances your family’s security, creates a warm, inviting ambiance for evening gatherings, and increases your property’s overall safety by illuminating dark trip hazards.
| Method | Description | Best For Home Use | Pros | Cons |
|---|---|---|---|---|
| Parallel | Connect all lights to the same power line; each gets full voltage. | Most homes (pathways, patios) | Independent operation; easy troubleshooting | Requires more wire connectors |
| Series | Lights daisy-chained end-to-end; voltage divides across fixtures. | Simple strings (short runs) | Less wire needed | One failure dims all lights |
| Daisy Chain | Branch sequentially from main cable using splitters. | Multiple yard zones | Flexible layout | Voltage drop over distance |
| Hub/T-Connection | Star from central junction box near house. | Even coverage around home | Minimal voltage drop | More upfront planning |
Benefits of Multiple Outdoor Lights

Why should you go through the effort of installing several light fixtures instead of just relying on your single porch light? The benefits are truly transformative. When you strategically place multiple lights around your property, you create a layered, professional look that a single bulb cannot achieve.
First and foremost, multiple lights boost your home’s curb appeal. Instead of a single harsh glare by the front door, you can gently wash your brick exterior with light, highlight your favorite garden trees, and create a welcoming glow along your front walkway.
Secondly, energy efficiency plays a huge role. Modern low-voltage LED systems use a fraction of the electricity that old incandescent floodlights used to consume. You can run ten small LED pathway lights for less energy than it takes to power one traditional porch bulb.
Finally, security and safety are paramount. A well-lit yard is a major deterrent to potential intruders. Furthermore, illuminating your pathways and driveways prevents your guests from tripping over uneven pavement or hidden garden hoses in the dark. You can even integrate these systems with smart timers and motion sensors so the lights only turn on exactly when you need them.
Comparing Your Options: Single vs. Multiple Lights
To help you visualize the difference, take a look at this comparison table:
Feature Single Porch Light Multiple Outdoor Lights
Area Coverage: Very limited; leaves dark corners; full yard and home exterior coverage.
Cost Efficiency: Higher energy costs per illuminated zone. Lower overall energy cost using modern LEDs.
Security Level Basic (easily avoided by intruders). Enhanced (eliminates hiding spots).
Aesthetic Appeal Flat, harsh, and uninviting. Layered, warm, and professionally designed.
Safety First: Essential Precautions
Before you even think about picking up a pair of wire cutters, we need to talk about home exterior electrical safety. Water and electricity are a deadly combination, which means outdoor wiring requires strict adherence to safety protocols. Do not skip this section!
Your primary defense against electrical shock is the GFCI (Ground Fault Circuit Interrupter) outlet. Any outdoor electrical setup must be plugged into or wired through a GFCI-protected circuit. This clever device constantly monitors electrical current. It will instantly shut off power if it detects even the slightest irregularity, such as water entering a wire.
Always turn off the power at your main breaker panel before working on any existing wiring. Never trust a wall switch to keep you safe. Once you flip the breaker, use a non-contact voltage tester to double-check that the wires are truly dead.
Furthermore, you must use materials rated specifically for outdoor use. Indoor wire will quickly rot and short out if buried in the dirt. You must use outdoor-rated cables, typically 12/2 or 14/2 gauge UF-B (Underground Feeder) cable for line voltage, or specific landscape wire for low-voltage setups.
Golden Rules for Outdoor Electrical Safety
- Always kill the power: Shut off the main breaker before touching any wires.
- Test before you touch: Use a voltage tester on every single wire.
- Use GFCI protection: Never plug outdoor lights into a standard, unprotected outlet.
- Check local codes: Call your local permit office to see if your project requires an inspection.
- Call 811 before you dig: Ensure you don’t hit buried gas or water lines when trenching.
- Wear protective gear: Use insulated gloves and safety glasses.
- Use outdoor-rated materials: Only buy wires and boxes labeled for “wet locations.”
- Seal your connections: Use silicone-filled wire nuts to prevent moisture corrosion.
- Bury cables deeply: Follow local codes for trench depth (usually 6 to 18 inches).
- Know your limits: If you feel overwhelmed, stop and call a licensed electrician immediately.
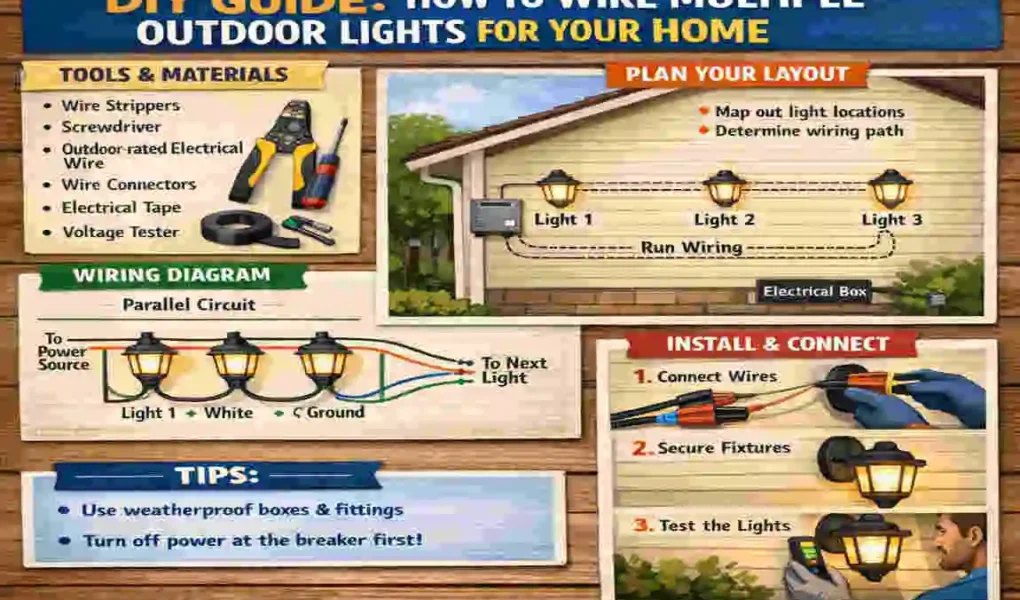
Tools and Materials Needed
To ensure your installation goes smoothly, gather all your supplies before you begin. Stopping halfway through the project to drive to the hardware store is frustrating and wastes valuable daylight.
Here is a quick, scannable list of the tools you will need to complete this job like a pro:
- Wire strippers and cutters: For cleanly removing the plastic insulation from the wires.
- Non-contact voltage tester: Your best friend for confirming the power is truly off.
- Screwdrivers and a power drill: For mounting the transformer and assembling the fixtures.
- A flat-edged spade shovel: For digging narrow trenches in your lawn.
- Weatherproof junction boxes: If you are hardwiring a line-voltage system.
- Electrical tape and zip ties: For securing and organizing your cables.
Next, you need to purchase your specific lighting materials. If you are doing a standard low-voltage landscape lighting project (which we highly recommend for DIYers), your shopping list will look like this:
Estimated Shopping Cost Breakdown
Material Needed, Purpose, Estimated Cost
Low-Voltage Transformer Converts 120V household power to safe 12V/24V power. $50 – $150
Direct Bury Cable (12/2 or 14/2) delivers power from the transformer to the lights. $30 – $70 (per 100 ft)
Waterproof Connectors: Silicone-filled wire nuts for safely joining cables. $10 – $20
LED Light Fixtures: The actual pathway, spotlight, or floodlight units. $20 – $60 (each)
Smart Timer / Plug Automates your lighting schedule. $15 – $40
Planning Your Outdoor Lighting Layout
A successful electrical project starts with a solid plan. You cannot just buy a box of lights and start sticking them into the dirt randomly. You need to map your home’s exterior zones to ensure even, beautiful coverage without overloading your power supply.
Start by walking around your house at twilight. Pay attention to the areas that feel too dark or unwelcoming. You generally want to focus on three distinct zones: pathways for safe walking, architectural features (like brick columns or large trees) for visual drama, and entryways for security.
Next, locate your power source. For most DIY low-voltage systems, you will plug your transformer into an existing GFCI outlet located on your porch or near your garage. If you do not have an outdoor outlet, you will need to hire an electrician to install a main panel spur before you can proceed.
Calculating Your Wattage Load
This is a crucial step. Your transformer has a maximum capacity, and you cannot exceed it. Look at the wattage of the light bulbs you plan to use. If you buy 10 LED pathway lights that each consume 5 watts, your total load is 50 watts.
As a general rule of thumb, you should never load a transformer past 80% of its total capacity. So, for a 50-watt load, you would want a transformer rated for at least 60 to 75 watts to ensure it runs cool and lasts for years.
Layout Steps for Success
- Sketch it out: Draw a rough map of your yard on a piece of paper.
- Mark the fixtures: Put an “X” exactly where you want each light to go.
- Measure the distances: Use a tape measure to determine exactly how much wire you need to run from the transformer to the very last light. Add 10% extra for slack.
- Choose your wiring run: Decide if you will use a “daisy-chain” method (running one single wire from light to light) or a “home-run” method (running separate wires from the transformer to different zones).
Step-by-Step Wiring Guide
Now we reach the heart of the project. This tutorial is broken down into easily understandable segments. Take your time, read each step carefully, and remember that patience is the key to a professional-looking installation.
Choosing Your Wiring Method
When wiring multiple outdoor lights in a home, you have two primary electrical options: series or parallel wiring. For almost every home application, we strongly recommend parallel wiring outdoor lights.
In a series circuit, electricity flows through one light to the next, much like old-fashioned Christmas tree lights. If one bulb burns out, the entire string goes dark. Furthermore, the lights at the end of the line will be noticeably dimmer than the lights at the beginning.
In a parallel circuit, the main power cable runs alongside the lights, and each fixture taps directly into that main line independently.
Wiring Method: The Pros: The Cons
Parallel Wiring (Recommended) Every light gets full voltage. If one bulb dies, the rest stay on. Requires slightly more wire and extra connection points.
Series Wiring Uses slightly less wire overall. Voltage drops quickly. One broken light ruins the whole yard.
Low-Voltage vs. Line-Voltage Systems
Before you dig, you must choose your system type.
A Line-Voltage system runs on your home’s standard 120-volt current. These are incredibly powerful and bright, typically used for massive security floodlights. However, 120 volts is lethal. Wiring these requires deep 18-inch trenches, thick PVC conduit, and advanced electrical knowledge. We generally advise that line-voltage projects be left strictly to licensed professionals.
A Low-Voltage system, on the other hand, uses a transformer to step your home’s deadly 120-volt current down to a completely safe 12 volts or 24 volts. If you accidentally hit a 12-volt wire with your shovel while gardening, you will get a tiny, harmless shock. Because of this massive safety factor, low-voltage landscape lighting is the absolute best choice for DIY homeowners.
Installing the Transformer
Your journey begins at the power source.
- Find the perfect spot: Locate your exterior GFCI outlet. You want to mount your transformer on the wall right next to it. Ensure the transformer is mounted at least 12 inches above ground to protect it from heavy rain, puddles, and snow buildup.
- Mount the box: Use your power drill and weather-resistant screws to attach the transformer box to your siding or brickwork securely.
- Leave it unplugged: Do not plug the transformer into the wall outlet yet! You want no electricity flowing while you are working with the yard cables.
Running the Main Cable from Your Home
Now is the time to get your hands dirty and move the power out to the yard.
Take your spool of outdoor-rated direct-bury cable (typically 12/2 or 14/2 landscape wire). Connect one end of this main cable directly to the output terminals on the bottom of your transformer.
Next, you need to dig a shallow trench from the transformer out to your light fixture locations. Because you are using a safe, low-voltage system, you do not need to dig a massive, deep ditch. Use your flat-edged spade to slice a narrow V-shaped trench about 6 to 12 inches deep into your lawn or garden beds.
If your cable has to cross over a concrete pathway, try to find an expansion joint to tuck the wire into, or use a piece of protective rigid PVC conduit if the wire needs to run above ground near the house foundation.
Once your trench is ready, unroll the cable and lay it flat at the bottom of the ditch. Do not pull the wire completely tight! You want to leave a little bit of slack so the ground can naturally freeze, thaw, and shift during the winter without snapping your wire. If your yard has multiple zones (like a front path and a side garden), you can use a waterproof splitter connection right near the house to branch your main cable into two directions.
Connecting Multiple Fixtures
This is where the magic of parallel wiring happens. We are going to connect the fixtures directly to the main line you just laid in the trench.
- Place the lights: Push the sharp ground stakes of your LED fixtures firmly into the soil at the locations you marked during your planning phase.
- Prepare the main cable: Go to the first light fixture. Using your wire cutters, carefully split the main cable down the middle for about two inches, separating the two insulated wires. Use your wire strippers to remove about 1/2 inch of plastic insulation from both wires, exposing the bare copper.
- Prepare the fixture wires: Your light fixture will have two smaller wires protruding from the bottom. Strip half an inch of insulation off these as well.
- Make the connection: You are now going to splice the fixture into the main line. Take one bare wire from the fixture and twist it tightly together with one bare wire from the main cable. Take the second wire from the fixture and twist it together with the second wire from the main cable.
- Seal it up: Standard indoor wire nuts will rust and fail within weeks outside. You must use specialized, waterproof connectors that are filled with dielectric silicone grease. Push the twisted copper wires deep into the grease-filled cap and twist them tightly.
- The Tug Test: Give each wire a firm tug. If they slide out of the cap, your connection will loosen and eventually fail. Redo it until it’s rock-solid.
You will repeat this exact daisy-chain process for the next light, and the next, moving down the line until all 10 to 15 of your lights are securely attached to the main buried cable.
Adding Switches and Timers
You do not want your beautiful new lights burning electricity all day long when the sun is shining. Adding control mechanisms is the final step of the wiring process.
Most modern low-voltage transformers come with a built-in photocell (a light sensor). This sensor detects when the sun goes down and automatically turns the transformer on and off again at dawn.
If you want more control, you can wire a PIR (Passive Infrared) motion sensor into the line. This is fantastic for security floodlights mounted above a garage. You wire the sensor directly between the transformer and the first light fixture.
Alternatively, you can plug your transformer into a smart plug that connects to your home’s Wi-Fi network, letting you set precise schedules right from your smartphone.
Common Mistakes to Avoid
Even seasoned DIY enthusiasts can trip up when working with electricity. If you want your system to last for decades without flickering or failing, avoid these common pitfalls.
- Overloading the Circuit: This is the most dangerous mistake. If you put 300 watts of old incandescent bulbs on a transformer only rated for 150 watts, the transformer will overheat, melt, and potentially start a fire. Always calculate your load and upgrade to LEDs.
- Ignoring IP Ratings: Outdoor fixtures have an IP (Ingress Protection) rating. A fixture rated IP44 is only splash-proof and will die in a heavy rainstorm. You want to buy fixtures rated IP65 or higher, which means they are completely sealed against heavy jets of water and fine dust.
- Poor Waterproofing at the Joints: As mentioned earlier, skipping the grease-filled connectors is a recipe for disaster. Moisture in the soil will aggressively corrode bare copper wire. Within a year, your lights will start flickering and eventually die completely.
- Burying the Wire Too Shallow: If you only bury the wire two inches deep, the next time you aerate your lawn or aggressively rake your mulch, you are going to slice right through your main power line. Dig deep!
- Ignoring Voltage Drop: In low-voltage systems, the electricity gets slightly weaker the further it travels down the cable. If your cable is over 150 feet long, the lights at the very end will look dim. To fix this, use a thicker gauge wire (like 12-gauge instead of 16-gauge) for long runs.
Troubleshooting Wiring Issues
You flipped the breaker, plugged in the transformer, and… nothing happened. Do not panic! Electrical troubleshooting is just a matter of logical deduction.
If your lights are flickering, it almost always means you have a loose connection. Go back to your wire nuts, dig them up, and perform the tug test again. Flickering can also be caused by extreme voltage drop on very long wire runs.
If you have absolutely no power, check your source. Did the GFCI outlet trip? Press the “Reset” button on the outlet. If the GFCI keeps tripping whenever you plug the transformer in, you have a dead short somewhere in your buried cable, likely where two bare copper wires are accidentally touching.
Use this handy diagnostic tree to isolate the problem:
The Problem: First Step to Check. Second Step to Check. Likely Solution
The entire system is dark. Check the house breaker and GFCI outlet. Ensure the transformer timer isn’t set to “Off”. Reset the breaker or adjust the timer dial.
Only one light is dark. Check the bulb. Check the wire splice at that specific light base. Replace the LED bulb or redo the grease connector.
The last three lights are very dim. Check total wire length. Check the wire gauge thickness. Upgrade to a thicker 12-gauge cable to prevent voltage drop.
Enhancing with Smart Features
Once you have mastered the basics of wiring multiple outdoor lights in your home, you can easily move on to adding smart features.
Modern homes thrive on automation. Instead of relying on a clunky mechanical dial on your transformer, consider upgrading to a smart WiFi transformer hub. These devices connect directly to your home’s internet router.
By downloading the manufacturer’s app, you can group your lights into “zones.” You can tell your pathway lights to turn on at sunset and dim by 50% at midnight to save energy, while instructing your driveway security lights to remain at full brightness until dawn. You can even link these hubs to your Amazon Alexa or Google Home, allowing you to turn on your beautiful yard lights with a simple voice command while you cook dinner!
Cost Breakdown and Maintenance

Let’s look at the bottom line. As we discussed in the introduction, taking the DIY route saves a small fortune.
For an average-sized suburban yard, purchasing a high-quality 100-watt transformer, 100 feet of heavy-duty 12/2 cable, waterproof connectors, and 10 stylish brass LED pathway fixtures will run you anywhere from $200 to $800 in total. Compare that to a professional landscaping quote that can easily exceed $2,500 for the same setup!
To protect your investment, perform an annual maintenance check every spring. Walk your property and gently wipe the glass lenses of the fixtures with a damp cloth to remove dried mud and hard water stains. Check the base of each light to ensure the winter frost hasn’t pushed the stakes out of the ground. Finally, briefly inspect exposed wires near the transformer for any signs of chewing from local rodents.
Frequently Asked Questions (FAQs)
Still have a few lingering thoughts? Here are the most common questions homeowners ask when taking on this illuminating project.
Can I wire multiple outdoor lights in a home to one single switch? Yes, absolutely! By using the parallel wiring method we discussed, all the lights connected to your main transformer cable will turn on and off simultaneously when the transformer receives power. You can plug that transformer into an outlet that is controlled by an indoor wall switch.
Do I need an electrician to install low-voltage lights? In most municipalities, you do not need a licensed electrician or a building permit to install a low-voltage (12V) plug-in landscape system. However, if you are installing 120V line-voltage security lights or need a brand-new outdoor outlet installed to plug your transformer into, you must hire a professional.
How many lights can I put on one wire? It depends entirely on the wattage of your bulbs and the capacity of your transformer. If you have a 100-watt transformer, and each LED light uses 5 watts, you can safely connect up to 16 lights (leaving a 20% safety buffer so you do not max out the transformer).
What happens if it rains heavily on my newly wired lights? If you used proper IP65-rated outdoor fixtures and sealed all your underground splices with silicone-grease wire nuts, heavy rain will not affect your system. The grease prevents the water from ever touching the bare copper.
Is it safe to bury electrical wire without a PVC pipe? Yes, but only if you are using low-voltage current and a cable specifically labeled as “Direct Bury” (like UF-B). The thick plastic sheathing on these cables is designed to withstand rot and soil acidity. However, using a PVC pipe is still a great idea in areas where you frequently dig with sharp shovels.