
Imagine you’re turning your dark, unfinished basement into a cozy family room or home office. You look up and see a mess of exposed pipes, wires, and low-hanging joists, making the space feel cramped and uninviting. What if there were a simple way to hide all that without losing easy access? That’s where a drop ceiling comes in. If you’re wondering what a drop ceiling in a basement is, it’s essentially a suspended system that hangs below your existing ceiling, creating a clean, finished look while concealing utilities.
Have you ever dealt with a basement that feels more like a dungeon than a usable room? Many homeowners face this issue during house remodeling. Low ceilings and visible plumbing can kill the vibe. A drop ceiling solves these problems by dropping a grid of tiles just a few inches below the joists. It not only hides the chaos but also allows you to pop out tiles for quick repairs. Plus, it’s a budget-friendly option compared to other finishing methods.
What Is a Drop Ceiling?
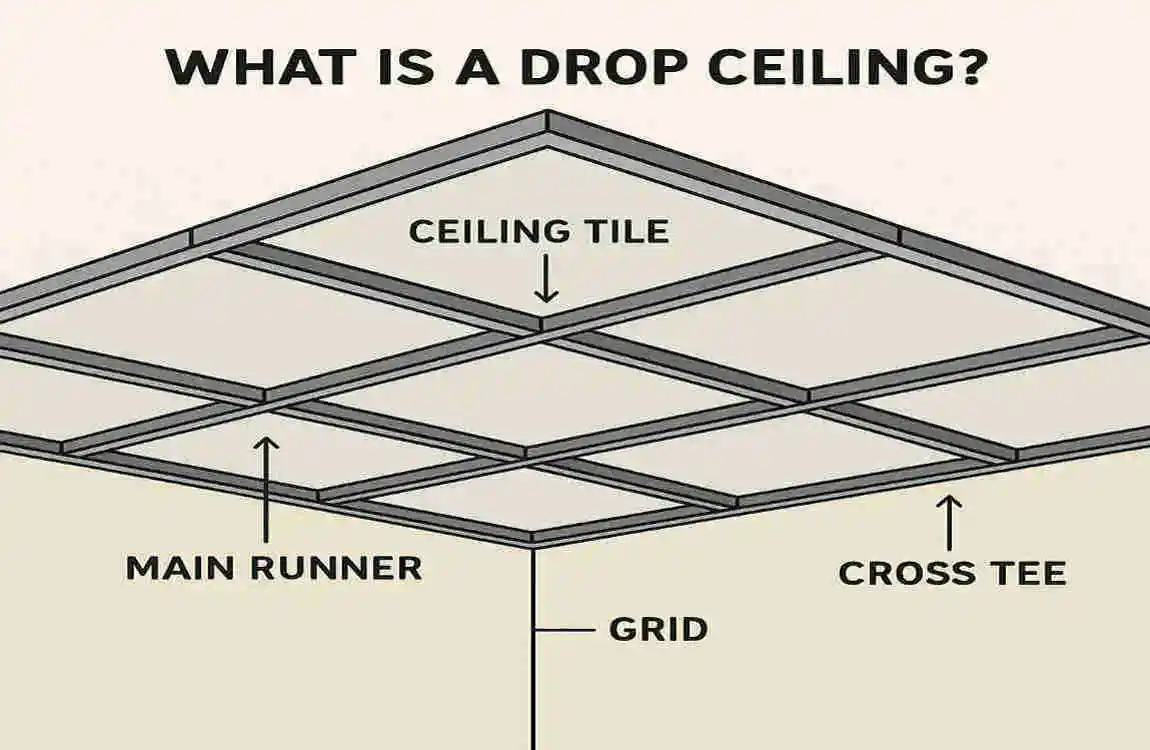
Let’s break it down. A drop ceiling, also known as a suspended or acoustic ceiling, is a secondary ceiling that hangs below the original one. In a basement, it typically drops 3 to 12 inches from the joists, creating space to hide things like HVAC ducts, plumbing pipes, and electrical wiring. You install a metal grid framework, then fit lightweight tiles into it. It’s like giving your basement a fresh lid without major construction.
Why does this matter for your home? Basements often have irregular surfaces and unsightly utilities. A drop ceiling smooths everything out, making the area feel more polished and livable. It’s not just functional—modern versions can look stylish too.
Core Components of a Drop Ceiling
The magic starts with the grid system. Main tees are the long runners that span the room, supported by wires or clips from the joists above. Cross tees snap into the main tees, forming a sturdy grid pattern. These pieces are usually made of lightweight metals, like aluminum or steel, to make them easy to handle.
Around the edges, wall angles provide perimeter support. You screw these into the walls at the desired height, keeping the entire system level. They’re crucial for stability and give the ceiling a clean border.
Then come the ceiling tiles themselves. These are panels that drop into the grid slots. Common materials include mineral fiber for sound absorption or PVC for moisture resistance. Sizes vary, but 2×2 or 2×4 feet are standard, making them simple to install or replace.
A Brief History and Evolution
Drop ceilings aren’t a new invention. They gained popularity in the 1960s for office buildings, where they hid fluorescent lights and air vents while reducing noise. Over time, they’ve evolved from basic white tiles to trendy options that mimic wood or metal finishes.
In home settings, especially basements, they’ve become a go-to for remodeling. Today’s versions feature waterproof materials, making them perfect for damp areas. If you’re updating an older home, a drop ceiling can modernize the space without tearing everything apart.
Visualizing the Setup
Picture this: Your basement ceiling starts as a tangle of beams and pipes. You add the grid, dropping it just enough to cover the mess. Tiles slide in, and suddenly, you have a smooth surface ready for lights or fans. It’s transformative—try sketching your own layout to see how it fits your space.
Why Choose Drop Ceilings for Basements?
Basements come with unique hurdles. Think about low headroom—many are under 8 feet tall—or the constant threat of moisture from floods or leaks. Exposed utilities, such as ducts and wires, not only look messy but can also complicate maintenance. That’s why drop ceiling basement finishing is such a wise choice. It tackles these issues head-on, turning a problematic area into a functional gem.
Why not just use drywall? Drop ceilings offer advantages that make them ideal for basements. They provide easy access, better insulation, and a quicker install. Let’s explore the benefits in detail.
Tackling Basement Challenges
Low ceilings can make a basement feel claustrophobic. A drop ceiling minimizes height loss while hiding imperfections. If your joists are uneven or damaged, this system covers them up without costly repairs.
Moisture is another big enemy in basements. Traditional ceilings might warp or mold, but drop ceilings use tiles that resist water. If a pipe leaks, you replace affected tiles—no need to rip out the whole ceiling.
Exposed utilities? They’re out of sight but not out of reach. Need to fix wiring? Lift a tile, and you’re in. This accessibility saves time and money during repairs.
Key Benefits in Action
One standout perk is soundproofing. Basement drop ceilings absorb noise, making them great for home theaters or playrooms. Tiles with acoustic properties reduce echo and block sounds from upstairs.
Thermal insulation is another win. The space between the drop ceiling and joists acts like a buffer, helping regulate temperature. This can lower your energy bills, especially in chilly basements.
Cost-wise, drop ceilings shine. They’re often 20-50% cheaper than drywall alternatives. Materials are affordable, and installation is straightforward, even for DIYers.
Aesthetically, you have options. Modern tiles look like wood planks or tin panels, elevating your basement’s style. It’s an easy way to match your home’s decor during remodeling.
Comparing Drop Ceilings to Alternatives
To help you decide, here’s a quick comparison:
Feature Drop Ceiling Drywall Ceiling
Cost per sq ft $2-5 $3-7
Install Time 1-2 days 3-5 days
Utility Access Easy (lift tiles) Difficult (cut holes)
Height Loss 4-12 inches 1-3 inches
As you can see, drop ceilings win on accessibility and speed, though they sacrifice a bit more height. If headroom is tight, weigh your options carefully.
Pros and Cons
Every home improvement has upsides and downsides. Drop ceilings are no exception. Let’s weigh them out so you can see if this fits your basement project.
The Pros That Make It Worthwhile
Installation is a breeze. Many homeowners tackle basement drop ceiling installation themselves over a weekend. No need for heavy tools or extensive skills—follow basic steps.
They’re flood-resistant too. If water invades your basement, tiles can be removed and dried or replaced. This beats dealing with soggy drywall that requires full replacement.
Hiding imperfections is a huge plus. Uneven joists or old wiring disappear, giving you a flawless finish. It’s perfect for older homes where surprises lurk above.
The Cons to Consider
On the flip side, they reduce headroom. Dropping 4-12 inches might not work in very low basements, which can make the space feel smaller.
Some people think drop ceilings look dated. Older styles can scream “office building,” but newer designs avoid this pitfall.
Dust can accumulate on the grid and tiles. Regular cleaning is key, especially in basements used as living spaces.
When to Skip Drop Ceilings
Avoid them in high-end designs where you want a seamless look—drywall might be a better choice. If your ceiling is already under 7 feet, the height loss could be a deal-breaker. In those cases, consider boxing in utilities with drywall for a custom fit.
Types of Drop Ceiling Tiles for Basements
Choosing the right tiles is crucial for drop ceiling basement finishing. They determine durability, style, and performance in a moist environment. Let’s look at your options.
Material Choices
Mineral fiber tiles are a classic pick. They’re lightweight, fire-rated, and excellent for sound control. Ideal if noise is a concern in your basement.
PVC or vinyl tiles stand out for moisture-prone areas. They won’t absorb water, making them perfect for basements with humidity issues. Easy to clean and long-lasting.
For a Premium vibe, go with wood or faux wood panels. These mimic natural grains, adding warmth to your space. They’re pricier but elevate the remodel.
Styles to Enhance Your Space
Flat tiles offer a clean, modern look. They’re versatile and straightforward for any basement setup.
Coffered styles add depth with recessed patterns, creating an elegant feel. Great for game rooms or home bars.
Textured options add visual interest, such as subtle waves or patterns. They hide minor grid lines and add personality.
Recommendations for Basements
Opt for moisture-resistant tiles to combat dampness—brands like Armstrong offer reliable choices. Measure your space first to ensure a good fit. If you’re unsure, test a sample in your basement to see how it looks.
Here’s a quick list of top picks:
- Budget-Friendly: Basic mineral fiber for quick installs.
- Durable: PVC for wet-prone areas.
- Stylish: Faux wood for a high-end finish.
Step-by-Step Installation Guide
Ready to roll up your sleeves? Basement drop ceiling installation can be a rewarding DIY project. We’ll break it into clear steps. Remember, safety first—wear gloves and eye protection.
Tools You’ll Need
Gather these essentials: a tape measure for accuracy, a chalk line for marking, a drill for securing, tin snips for cutting metal, and a level to keep everything straight. A laser level is a game-changer for precision.
Don’t forget ladders, wire cutters, and safety gear. Having everything ready saves trips to the store.
Planning and Measuring
Start by measuring your room’s dimensions. Plan the grid layout so border tiles are no larger than 24 inches— this ensures a balanced look.
Determine the drop height. Aim for at least 4 inches below joists to hide utilities, but check for headroom. Mark the perimeter with a chalk line.
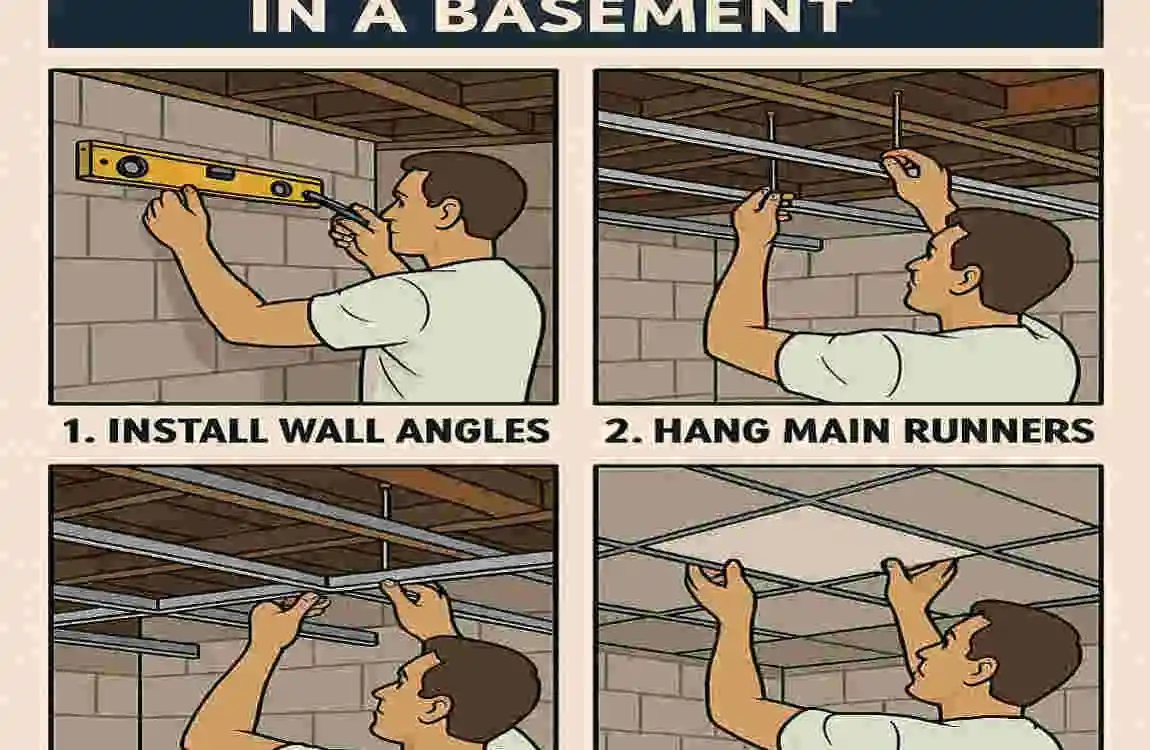
Installing the Framework
Attach wall angles around the room, 4 inches below the joists. Screw them into wall studs for stability.
Hang suspension wires or QuickHang clips from the joists. Space them every 4 feet along the main tees’ path.
Set the main beams into place and connect them to the wall angles. Snap in cross tees to form the grid. Use your level to square everything up—adjust as needed.
Adding Tiles and Finishing Touches
Cut tiles to fit border areas using a utility knife. Slide them into the grid slots, starting from the center and working out.
Incorporate lights or HVAC vents by cutting precise openings. Secure any loose parts and double-check for level.
DIY Tips and Pro Advice
Use a laser level for hassle-free alignment. If your basement is large, consider hiring pros to avoid mistakes—test-fit pieces before final installation.
Common pitfalls? Uneven grids lead to sagging—always verify measurements. If utilities are in the way, plan around them early.
With patience, you’ll have a professional-looking ceiling. Imagine the satisfaction of stepping back and admiring your work!
Cost Breakdown and Budgeting
Money matters in any remodel. Let’s talk numbers for drop ceilings.
Average costs run $3-7 per square foot installed. Materials alone are $1-4, with labor adding $2-3 if you hire help.
Factors influencing price include room size—bigger areas mean more materials—and tile type. Fancy wood-look options cost more than bare fiber.
Lighting integrations also bump up expenses. Plan for extras like recessed lights.
To save, go DIY on the grid. Shop bulk tiles online or at home stores for deals. Compare quotes if outsourcing.
Maintenance and Updates
Keeping your drop ceiling fresh is easy. Regular care extends its life.
For cleaning, vacuum tiles gently to remove dust. If stains appear from leaks, replace individual tiles—it’s quick and cheap.
Upgrades are simple. Swap old tiles for modern wood-look ones without changing the grid. This refreshes the space instantly.
With proper maintenance, expect 20+ years of use. Address moisture issues promptly to avoid problems.