When it comes to wiring a small house, getting it right is crucial for both safety and efficiency. In this comprehensive guide, we’ll walk you through everything you need to know about how to wire a small house in 2025. From understanding the basics to exploring modern techniques, you’ll gain the knowledge and confidence to tackle this important project.
Proper electrical wiring is the backbone of any home, and small houses are no exception. A well-wired house ensures that your appliances and devices function smoothly, while also minimizing the risk of electrical hazards. By learning how to wire a small house, you’ll be able to create a safe and efficient living space that meets your needs.
Understanding the Basics of Electrical Wiring in Small Houses

Before we dive into the specifics of wiring a small house, let’s take a moment to understand the basics of electrical wiring.
Key Concepts and Terminology
Electrical wiring involves the installation of circuits, breakers, outlets, switches, and various types of wiring. A circuit is a path through which electricity flows, while a breaker is a safety device that interrupts the flow of electricity in case of an overload or short circuit. Outlets and switches are the points where you connect your appliances and control the flow of electricity, respectively.
Components Involved
When wiring a small house, you’ll need to work with several key components:
- Circuits: These are the paths through which electricity flows in your home.
- Breakers: These safety devices protect your home from electrical overloads and short circuits.
- Outlets: These are the points where you plug in your appliances and devices.
- Switches: These allow you to control the flow of electricity to specific areas of your home.
- Wiring Types: There are various types of wiring, such as Romex, THHN, and armored cable, each suited for different applications.
Differences from Larger Homes
Wiring a small house differs from wiring a larger home in several ways. Small houses typically have fewer circuits and a smaller electrical load, which means you must plan your wiring layout carefully to ensure sufficient capacity for your needs. Additionally, small houses often have less space for running wires, so you’ll need to be strategic about how you route your wiring.
Planning Your Small House Electrical Wiring Layout
Before you start wiring your small house, it’s essential to create a detailed plan. This will help you ensure that your wiring is safe, efficient, and meets your needs.
Importance of Designing a Wiring Plan
A well-designed wiring plan is the foundation of a successful electrical wiring project. By taking the time to plan your wiring layout, you’ll be able to:
- Ensure you have sufficient capacity to meet your electrical needs.
- Minimize the risk of electrical hazards.
- Make it easier to troubleshoot and maintain your wiring in the future.
Determining Electrical Load and Power Requirements
The first step in planning your wiring layout is to determine your electrical load and power requirements. This involves calculating the total amount of electricity that your appliances and devices will consume, as well as the maximum power that your electrical system can handle.
To determine your electrical load, you’ll need to:
- Make a list of all the appliances and devices that you plan to use in your small house.
- Look up the wattage or amperage of each appliance and device.
- Add up the total wattage or amperage to get your total electrical load.
Once you know your electrical load, you can determine your power requirements. This will depend on factors such as the size of your main service panel and the number of circuits you plan to install.
Mapping Out Main Service Panel Location and Branch Circuits
With your electrical load and power requirements in mind, you can begin mapping out the location of your central service panel and branch circuits. The main service panel is the central point where electricity enters your home, and it’s where you’ll install your breakers and connect your circuits.
When choosing a location for your main service panel, consider factors such as:
- Accessibility: The panel should be easily accessible for maintenance and repairs
- Safety: The panel should be located away from water sources and other hazards
- Space: The panel should have enough space around it for proper ventilation and to accommodate future expansions
Once you’ve chosen a location for your main service panel, you can start mapping out your branch circuits. These are the individual circuits that supply electricity to various areas of your home, such as the kitchen, bathroom, and living room.
When mapping out your branch circuits, consider factors such as:
- Room usage: Different rooms will have different electrical needs, so plan your circuits accordingly
- Appliances: Make sure that you have enough capacity on each circuit to handle the appliances and devices that you plan to use
- Lighting: Plan your lighting circuits carefully to ensure that you have enough light in each room
- Future expansions: Leave room for future expansions, such as adding new appliances or renovating your home
Factors to Consider
When planning your small house wiring layout, there are several factors to keep in mind:
- Room usage: Different rooms will have different electrical needs, so plan your wiring accordingly
- Appliances: Make sure that you have enough capacity on each circuit to handle the appliances and devices that you plan to use
- Lighting: Plan your lighting circuits carefully to ensure that you have enough light in each room
- Future expansions: Leave room for future expansions, such as adding new appliances or renovating your home
Tools and Materials Needed to Wire a Small House
To wire your small house safely and effectively, you’ll need a variety of tools and materials. Here’s a list of the essentials:
Essential Tools
- Wire strippers: These tools are used to strip the insulation off of wires, allowing you to make connections
- Voltage testers: These tools are used to test for the presence of electricity, ensuring that it’s safe to work on your wiring
- Conduit benders: These tools are used to bend conduit, which is used to protect and route your wiring
- Screwdrivers: You’ll need a variety of screwdrivers to install your electrical boxes, outlets, and switches
- Pliers: Pliers are useful for gripping and twisting wires, as well as for other tasks
- Drill and bits: You’ll need a drill and various bits to drill holes for your wiring and to mount your electrical boxes
Types of Wires
When wiring a small house, it’s essential to select the appropriate type of wire for your specific needs. Here are some common types of wire:
- Romex: This is a type of non-metallic sheathed cable that’s commonly used in residential wiring
- THHN: This is a type of thermoplastic-insulated wire that’s suitable for use in conduit
- Armored cable: This is a type of cable that’s protected by a flexible metal armor, making it suitable for use in areas where the wire may be exposed to damage
Electrical Boxes, Breakers, Outlets, Switches, and Lighting Fixtures
In addition to wire, you’ll need a variety of other electrical components to wire your small house. These include:
- Electrical boxes: These are used to house your outlets, switches, and other electrical components
- Breakers: These are safety devices that protect your home from electrical overloads and short circuits
- Outlets: These are the points where you plug in your appliances and devices
- Switches: These allow you to control the flow of electricity to specific areas of your home
- Lighting fixtures: These are used to provide light in your home, and can range from simple ceiling lights to more complex fixtures
Personal Protective Equipment and Safety Gear
When working with electricity, it’s essential to use personal protective equipment and safety gear to protect yourself from harm. This includes:
- Insulated gloves: These gloves are designed to protect you from electrical shock
- Safety glasses: These glasses protect your eyes from debris and other hazards
- Hard hat: A hard hat can protect your head from falling objects and other hazards
- Electrical tape: This tape is used to insulate and protect your wiring connections
Step-by-Step Guide: How to Wire a Small House
Now that you have a plan and the necessary tools and materials, it’s time to start wiring your small house. Here’s a step-by-step guide to help you through the process:
Turning Off Power and Safety Precautions
Before you start working on your wiring, it’s essential to turn off the power to your home. This will help prevent electrical shock and other hazards.
To turn off the power, locate your main service panel and switch off the main breaker. Then, use a voltage tester to ensure the power is off before you begin work.
In addition to turning off the power, there are several other safety precautions that you should take:
- Always wear personal protective equipment, such as insulated gloves and safety glasses, to protect yourself.
- Never work on your wiring when you’re wet or in a damp environment.
- Keep your work area clean and clutter-free to minimize the risk of accidents.
- If you’re unsure about any aspect of the wiring process, consult a licensed electrician.
Installing the Service Panel and Grounding System
The first step in wiring your small house is to install the service panel and grounding system. The service panel is the central point where electricity enters your home, and it’s where you’ll install your breakers and connect your circuits.
To install the service panel, follow these steps:
- Choose a location for your service panel that’s easily accessible and safe.
- Mount the service panel to the wall using screws and anchors.
- Connect the main power feed to the service panel, following the manufacturer’s instructions.
- Install the grounding system, which will help protect your home from electrical faults.
The grounding system typically consists of a grounding rod that’s driven into the ground near your home, and a grounding wire that connects the rod to your service panel. To install the grounding system, follow these steps:
- Drive the grounding rod into the ground near your home, following local codes and regulations.
- Connect the grounding wire to the grounding rod using a grounding clamp.
- Run the grounding wire to your service panel and connect it to the grounding busbar.
Running Wires Neatly and Correctly
Once you’ve installed the service panel and grounding system, it’s time to start running wires throughout your home. This can be a challenging task, especially in a small house where space is limited.
To run wires neatly and correctly, follow these tips:
- Plan your wire routes carefully to minimize the length of your runs and to avoid obstacles.
- Use conduit to protect your wires and to make it easier to run them through walls and ceilings.
- Label your wires at both ends to make it easier to identify them later.
- Use wire ties and other cable management tools to keep your wires organized and neat.
Connecting Outlets, Switches, and Lighting Fixtures
With your wires run, it’s time to start connecting your outlets, switches, and lighting fixtures. This is where your wiring plan will come in handy, as it will help you ensure that everything is connected correctly.
To connect your outlets, switches, and lighting fixtures, follow these steps:
- Turn off the power to the circuit that you’re working on
- Strip the insulation off the wires, following the manufacturer’s instructions.
- Connect the wires to the appropriate terminals on the outlet, switch, or lighting fixture.
- Secure the outlet, switch, or lighting fixture to the electrical box using screws.
- Turn the power back on and test the outlet, switch, or lighting fixture to ensure that it’s working correctly.
Installing GFCI and AFCI Breakers
To ensure the safety of your home, it’s essential to install GFCI and AFCI breakers. GFCI breakers protect against ground faults, while AFCI breakers protect against arc faults.
To install GFCI and AFCI breakers, follow these steps:
- Turn off the power to the circuit that you’re working on
- Remove the existing breaker from the service panel.
- Install the GFCI or AFCI breaker in its place, following the manufacturer’s instructions.
- Connect the wires to the appropriate terminals on the breaker.
- Turn the power back on and test the breaker to ensure that it’s working correctly.
Testing the System and Troubleshooting Common Wiring Issues
Once you’ve completed your wiring, it’s essential to test the system to ensure that everything is working correctly. This involves turning on the power and checking each outlet, switch, and lighting fixture to ensure they’re functioning as expected.
If you encounter any issues during testing, there are several common wiring problems that you may need to troubleshoot:
- Short circuits: These occur when a hot wire comes into contact with a neutral or ground wire, causing a surge of electricity
- Overloads: These occur when a circuit is carrying more electricity than it’s designed to handle
- Ground faults: These occur when electricity flows through an unintended path, such as through a person or an appliance
- Arc faults: These occur when electricity jumps from one wire to another, causing a spark or arc
To troubleshoot these issues, you should use a variety of tools and techniques, such as a multimeter, a circuit tester, or a wire tracer. If you’re unsure about how to troubleshoot a particular issue, it’s always best to consult a licensed electrician for guidance.
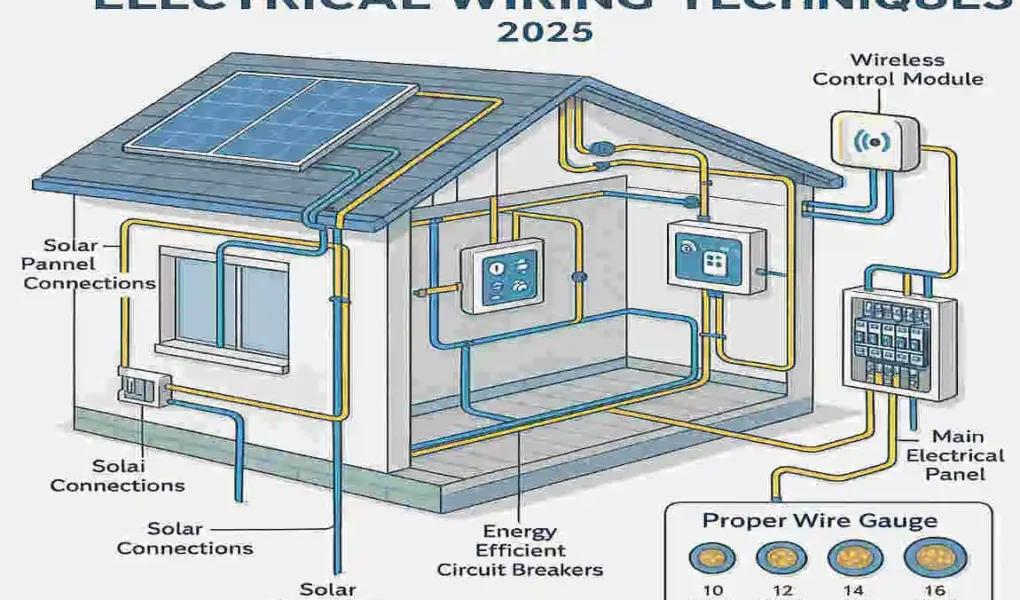
Modern Techniques and Innovations for Wiring in 2025
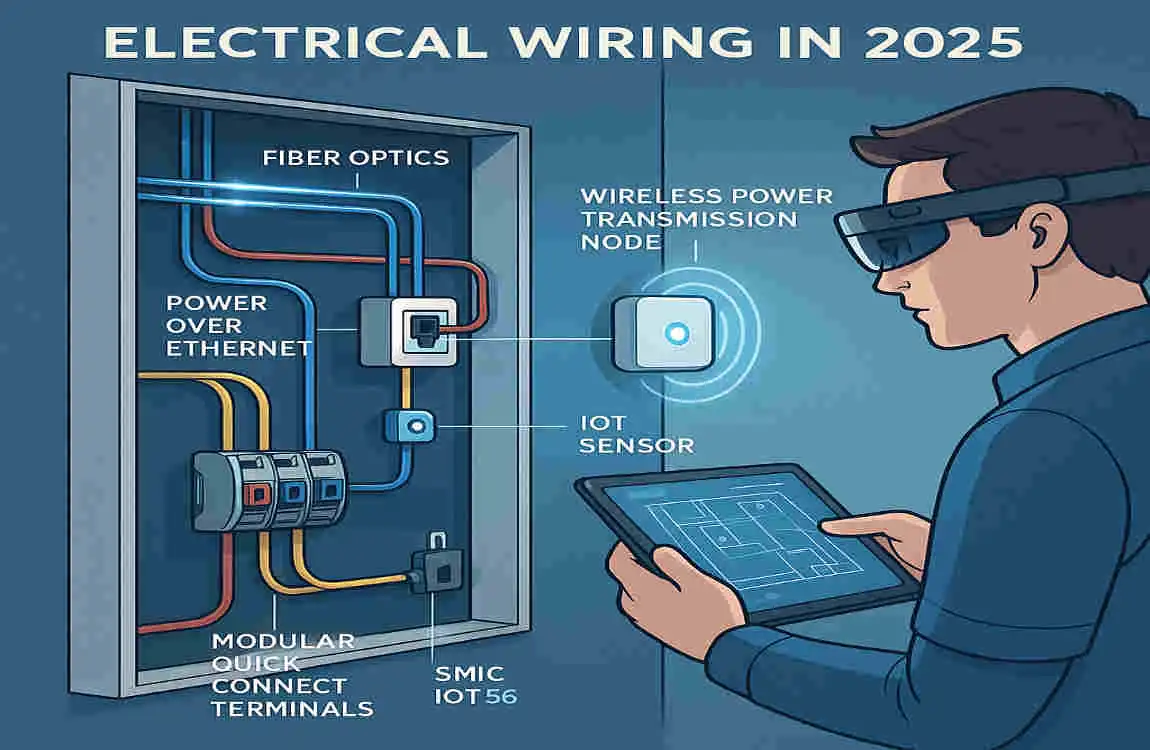
In 2025, several modern techniques and innovations will be available to wire your small house. These include:
Smart Home Wiring
Smart home wiring involves integrating automation and IoT devices into your electrical system. This allows you to control your appliances and devices remotely, using your smartphone or other connected device.
To incorporate smart home wiring into your small house, you’ll need to:
- Install a smart home hub, which will serve as the central point for your smart devices
- Choose smart devices that are compatible with your hub, such as bright lights, smart thermostats, and smart outlets
- Connect your smart devices to your electrical system, following the manufacturer’s instructions
- Set up your smart home system using the manufacturer’s app or software
Energy-Efficient Wiring Solutions
Energy-efficient wiring solutions can help you save money on your electricity bills while also reducing your environmental impact. These solutions include:
- LED lighting: LED lights use less electricity than traditional incandescent bulbs, and they last longer, too
- Energy-efficient appliances: Look for appliances with the ENERGY STAR label, which indicates that they meet strict energy-efficiency guidelines
- Smart power strips: These power strips can detect when your devices are in standby Mode and cut off power to them, saving you money on your electricity bill
Wireless Controls and Smart Breakers
Wireless controls and smart breakers are another modern innovation that you can use to wire your small house. These devices enable you to remotely control your electrical system using your smartphone or other connected device.
To incorporate wireless controls and smart breakers into your small house, you’ll need to:
- Choose wireless controls and smart breakers that are compatible with your electrical system
- Install the wireless controls and smart breakers, following the manufacturer’s instructions
- Set up your wireless control system using the manufacturer’s app or software
Advances in Circuit Protection and Fault Detection Systems
In 2025, several advances in circuit protection and fault detection systems have been made. These systems can help you detect and prevent electrical faults, keeping your home safe and your electrical system running smoothly.
Some of the latest advances in circuit protection and fault detection systems include:
- Arc fault circuit interrupters (AFCIs): These devices can detect and interrupt arc faults, which can cause fires and other hazards
- Ground fault circuit interrupters (GFCIs): These devices can detect and interrupt ground faults, which can cause electrical shock and other hazards
- Smart circuit breakers: These breakers can detect and interrupt electrical faults, and they can also provide you with real-time data about your electrical system
Common Mistakes to Avoid When Wiring a Small House
When wiring a small house, there are several common mistakes that you’ll want to avoid. These include:
Overloading Circuits and Improper Wire Sizing
One of the most common mistakes that people make when wiring a small house is overloading circuits and using improper wire sizing. This can lead to electrical hazards, such as fires and electrical shock.
To avoid overloading circuits and using improper wire sizing, make sure to:
- Calculate your electrical load carefully, taking into account all of your appliances and devices
- Choose the right size wire for your needs, based on the amperage of your circuits
- Install enough circuits to handle your electrical load, and avoid overloading any single circuit
Neglecting Local Electrical Codes and Inspection Requirements
Another common mistake that people make when wiring a small house is neglecting local electrical codes and inspection requirements. This can lead to safety hazards and legal issues, so it’s essential to follow all applicable codes and regulations.
To avoid neglecting local electrical codes and inspection requirements, make sure to:
- Research the electrical codes and regulations in your area, and follow them carefully
- Obtain any necessary permits before starting your wiring project
- Schedule an inspection with your local electrical inspector once your wiring is complete
Poor Wire Management Causing Hazards or Future Repair Difficulties
Poor wire management can cause hazards and make it challenging to repair your wiring in the future. This is especially important in a small house, where space is limited and wires can easily become tangled and disorganized.
To avoid poor wire management, make sure to:
- Plan your wire routes carefully to minimize the length of your runs and to avoid obstacles
- Use conduit to protect your wires and to make it easier to run them through walls and ceilings
- Label your wires at both ends to make it easier to identify them later
- Use wire ties and other cable management tools to keep your wires organized and neat
Avoiding Shortcuts and DIY Pitfalls
Finally, it’s important to avoid shortcuts and DIY pitfalls when wiring your small house. While it may be tempting to take shortcuts or to try to do everything yourself, this can lead to safety hazards and other issues.
To avoid shortcuts and DIY pitfalls, make sure to:
- Follow all safety precautions, such as turning off the power and wearing personal protective equipment
- Consult a licensed electrician if you’re unsure about any aspect of the wiring process
- Take your time and do the job right, rather than rushing through it and taking shortcuts
Safety Tips and Legal Considerations
When wiring a small house, it’s essential to prioritize safety and to follow all applicable legal considerations. Here are some tips to help you stay safe and comply with the law:
Importance of Adhering to the National Electrical Code (NEC) and Local Regulations
The National Electrical Code (NEC) is a set of standards that governs electrical wiring in the United States. It’s essential to adhere to the NEC, as well as any local regulations that may apply to your area.