Hey there, homeowner! If you’ve ever stepped into your basement and felt that chill creeping up through the floor above, you’re not alone. Basements can be tricky spots in any house—they’re often damp, drafty, and forgotten when it comes to home improvements.
Think about it: Your basement isn’t just storage for old holiday decorations or a makeshift gym. It’s part of your home’s foundation, and how you handle it affects everything upstairs. Insulating an unfinished basement ceiling involves adding materials that trap heat, block noise, and mitigate moisture. But is it always a smart move? We’ll explore that in detail.
Why does this matter to you? Well, according to the U.S. Department of Energy, uninsulated house basements celling can account for up to 30% of a home’s total heat loss. That’s real money slipping away every winter.
Understanding Unfinished Basement Ceilings
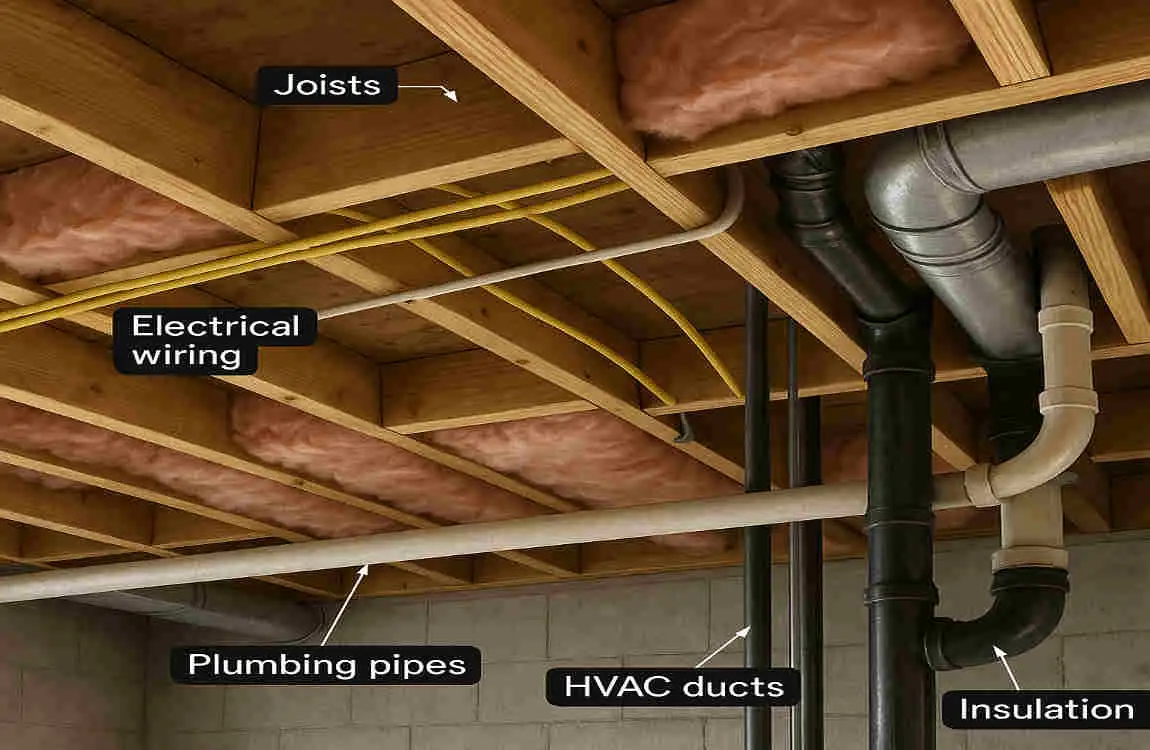
So, what exactly is an unfinished basement ceiling? Picture this: It’s the exposed underside of your main floor, with wooden beams (called joists) running across, maybe some pipes, wires, or ducts hanging down. Unlike a finished basement with drywall or drop ceilings, this setup is raw and open. No fancy coverings—just the bones of your house staring back at you.
These ceilings often come from basic construction methods. Builders use wooden joists spaced about 16 inches apart, supported by the foundation walls. Common materials include lumber for the joists and, occasionally, metal hangers for added stability. In older homes, you might see rough-sawn wood or even concrete in some spots. The key point? It’s not sealed off, which means air, heat, and sound can travel freely through it.
Now, let’s chat about the challenges. Basements tend to be cooler than the rest of the house because they are located below ground level. In winter, cold air seeps in from the soil, making the space feel like an icebox. Come summer, humidity builds up, leading to that musty smell we all dread. Moisture is a significant issue—water can leak through walls or condense on cold surfaces, creating damp spots that invite mold growth.
Why do unfinished basement ceilings differ from finished ones? In a finished basement, you’d add drywall or panels, which naturally create a barrier. But with an unfinished one, everything’s exposed. This openness can be great for access—such as fixing plumbing—but it also means that heat from upstairs escapes easily, or noise from below echoes up. Imagine dropping a tool in the basement and hearing it rattle through the whole house. That’s the reality without insulation.
Temperature swings are another headache. Studies from Energy Star show that basements can be 10-15 degrees cooler than upper levels, forcing your heating system to work overtime. And moisture? If your basement floods occasionally or has high humidity, it can lead to condensation on the ceiling joists, which can cause warping of the wood over time.
Understanding these basics helps you see why insulation might be a game-changer. However, don’t worry—we’ll discuss the benefits next. For now, take a quick look at your own basement. Do you notice drafts or dampness? That could be your cue to keep reading.
Benefits of Insulating an Unfinished Basement Ceiling
Alright, let’s get to the good stuff. Insulating your unfinished basement ceiling offers several benefits that can significantly improve your home life. We’re talking real, everyday improvements that save money and reduce headaches. But should you insulate the unfinished basement ceiling? If energy savings and comfort are on your wish list, the answer might be a resounding yes. Let’s break it down.
Energy Efficiency: Cutting Down on Heat Loss and Gain
First up, energy efficiency. Insulation acts like a blanket for your home, keeping warm air in during winter and cool air in during summer. Without it, heat from your living spaces leaks down into the house basement, forcing your furnace or AC to run longer. The U.S. Department of Energy estimates that proper basement insulation can slash heating costs by 20-30%.
How does it work? Materials like foam or fiberglass create a barrier that slows heat transfer. In cold climates, this prevents chilly basement air from pulling warmth from upstairs. In hot areas, it blocks humid air from rising. Imagine your energy bill dropping— that’s the kind of win we’re after. You might even qualify for rebates through programs like ENERGY STAR.
Comfort Improvements: Keeping Temperatures Steady Upstairs
Comfort is enormous, right? An insulated ceiling helps maintain even temperatures throughout your house. No more cold spots on the floor above the basement or that drafty feel in the kitchen. It creates a more consistent environment, so you can lounge in your living room without cranking the thermostat.
Think about your family. Kids playing upstairs won’t feel the chill seeping through from the basement. And if you use the basement for storage, insulation keeps items from freezing or sweating in humidity. A study by the National Association of Home Builders found that insulated basements improve overall home comfort ratings by up to 25%. Doesn’t that sound appealing?
Soundproofing: Quieting Noise from Below
Noise can be a sneaky annoyance. If your basement houses a laundry room, workshop, or home theater, sounds travel up easily through an unfinished ceiling. Insulation absorbs those vibrations, acting as a sound barrier. Fiberglass, for example, can reduce noise transmission by 40-50%, according to acoustic experts.
Picture this: You’re trying to sleep, but the washing machine downstairs is rumbling away. With insulation, that noise fades into the background. It’s especially great for homes with basements used as play areas or offices. You get peace and quiet without major renovations.
Moisture and Condensation Control: Battling Humidity
Basements tend to collect moisture, but insulation helps mitigate this issue. Certain types, like closed-cell spray foam, resist water and prevent condensation on joists. This keeps mold at bay and protects your home’s structure.
Why does this matter? High humidity can lead to health issues, such as allergies. By controlling moisture, insulation creates a drier space. Data from the EPA shows that proper insulation and ventilation can cut basement mold risks by 60%. It’s not just about comfort—it’s about keeping your home healthy.
Increased Home Value: Boosting Appeal for Buyers
Let’s talk resale. An insulated basement signals to buyers that your home is efficient and well-maintained. Real estate statistics from Zillow indicate that energy-efficient upgrades like this can increase a home’s value by 2-5%, or even more in competitive markets.
Buyers love features that promise lower bills and fewer problems. If you’re selling, highlighting an insulated unfinished ceiling could set your listing apart. It’s a wise investment that pays off when you move.
Potential Cost Savings: Lower Bills and Less Maintenance
Ultimately, the savings accumulate over time. Beyond energy bills, insulation reduces wear on your HVAC system, meaning fewer repairs. A case study from HomeAdvisor revealed that homeowners save an average of $500 annually on utilities after installing basement insulation.
Maintenance drops too—no more dealing with warped joists from moisture or frequent mold cleanups. It’s a long-term win. So, reader, if these benefits resonate with you, insulating might be the right choice. But hold on—we’ll cover types next to help you choose.
Types of Insulation Suitable for Unfinished Basement Ceilings

Choosing the proper insulation is key to success. Not all materials are created equal, especially in a damp basement. We’ll examine popular options, their pros and cons, and offer installation tips. This way, you can pick what fits your setup. Remember, you should insulate the unfinished basement ceiling, depending on your specific needs.
Fiberglass Batts: Affordable and Easy to Handle
Fiberglass batts are like fluffy blankets made of glass fibers. They’re cheap and straightforward to install—just cut and fit them between joists. Pros?
Cons include itchiness during handling and potential sagging if not secured. For basements, use faced batts with a vapor barrier to fight moisture. Installation tip: Wear gloves and staple them in place. They’re ideal for dry basements on a budget.
Spray Foam: Top-Notch Sealing Power
Spray foam expands to fill gaps, creating an airtight seal. It’s pricier but excellent for moisture-prone areas—closed-cell versions are water-resistant and offer high R-values (up to 6 per inch).
Benefits include superior energy savings and mold resistance. Costs run $1-3 per square foot, but it pays off. Drawback? It requires professional installation due to the presence of chemicals. Use it if your basement has irregular joists or high humidity.
Rigid Foam Board: Sturdy and Versatile
These are solid panels of foam, like polystyrene. They’re durable, easy to cut, and provide sound insulation (R-4 to R-5 per inch). Pros: Moisture-resistant and great for basements with flooding risks.
Cons: They don’t flex well, so gaps need caulking. Apply them by screwing or gluing to joists. Ideal for even surfaces that require long-lasting protection.
Reflective Insulation: Bouncing Heat Away
Reflective insulation uses foil to reflect heat, like a space blanket. It works well in warmer climates by blocking radiant heat gain.
Pros: Lightweight and affordable. Cons: Less effective in cold areas without added layers. It’s best suited for basements with minimal moisture, and is installed by stapling it between joists.
Which Types Work Best for Basements with Moisture Issues
For wet basements, opt for spray foam or rigid boards—they seal out water more effectively than fiberglass. Always pair with dehumidifiers. Here’s a quick list of top picks:
- Spray Foam: Best for sealing and moisture control.
- Rigid Foam: Ideal for durability in flood-prone spots.
- Fiberglass with Vapor Barrier: A budget-friendly option if dryness is well-managed.
Key Considerations Before Insulating
Before you grab those tools, pause and think. Insulating isn’t always straightforward—several factors could make or break your project. Let’s unpack them so you can make an informed decision about whether to insulate the unfinished basement ceiling.
Condition of Basement Ceiling Joists and Structure
Start by inspecting your joists. Are they warped, cracked, or infested with pests? Insulation won’t fix structural issues; it could hide them. Have a professional inspect for rot or weakness.
Healthy joists ensure insulation stays put. If problems exist, fix them first—it’s cheaper than dealing with collapses later.
Moisture and Mold Risks: Waterproofing Comes First
Moisture is the enemy. If your basement leaks, insulating it could trap water, which in turn can breed mold. Always waterproof walls and floors before adding insulation.
Use sealants or drains to keep things dry. The CDC notes that mold exposure affects 20 million Americans annually—don’t risk it.
Building Codes and Local Regulations
Check your local rules. Many areas require specific R-values or vapor barriers for basements. Ignoring codes could lead to fines or failed inspections.
Contact your building department. It’s a simple step that saves headaches.
Accessibility for Future Maintenance or Electrical/Plumbing Work
An unfinished ceiling offers easy access to wires and pipes. Insulation might block that, so plan removable sections.
Think ahead—will you need to reach utilities often? Balance insulation with practicality.
Cost vs. Long-Term Benefits Analysis
Costs vary: DIY fiberglass might run $0.50-$1 per square foot, while professional spray foam costs $2-$4. Weigh the benefits against savings—expect a 3-5 year payback through lower bills.
Use this table to compare:
Insulation Type Initial Cost (per sq ft)Estimated Annual Savings Payback Period
Fiberglass Batts $0.50-1 $200-300 2-4 years
Spray Foam $2-4 $400-600 3-5 years
Rigid Foam Board $1-2 $300-400 3-4 years
Factor in your home size for a personalized calculation.
Potential Impact on Indoor Air Quality
Insulation can trap pollutants if not ventilated. Select low-VOC materials and install vents to maintain fresh air.
When Insulating Might Not Be Beneficial
Not every basement needs insulation. Sometimes, it’s more trouble than it’s worth. Let’s explore when to skip it and consider alternatives. This helps you answer whether you should insulate the unfinished basement ceiling, honestly.
Basements with chronic flooding are a no-go. Insulation absorbs water, which can lead to rot and mold. If yours floods often, focus on drainage instead.
Poor ventilation is another red flag. Sealing the ceiling without airflow traps humidity, worsening conditions. The EPA warns this can spike indoor pollutants.
If you use the basement frequently, such as for a workshop, insulation may lower the ceiling height or restrict access to it. That hinders usability.
Alternatives? Try insulating walls or floors instead. Or use area rugs upstairs for quick comfort. A dehumidifier can effectively handle moisture without requiring significant effort.
DIY vs Professional Installation
Tackling insulation yourself? It’s doable but not always simple. Unfinished ceilings involve climbing ladders and fitting materials snugly—skills like measuring and cutting are key.
Tools needed: Utility knife, stapler, safety gear. Follow these steps:
- Measure joist spaces.
- Cut insulation to fit.
- Secure with staples or wires.
- Seal gaps.
DIY saves money—expect to spend $500-1,000 for a 500 sq ft basement versus $2,000+ for professionals.
However, hire experts if the work is complex, such as spray foam or electrical work. They ensure codes are met and avoid mistakes. Pros are worth it for safety and quality.