Are you dealing with an outdated, leaking, or damaged basement window? Whether you’re renovating your basement or preparing for an egress window upgrade, knowing how to remove a basement window can save you time and money. Hiring a professional might seem more manageable, but a DIY approach can significantly cut costs. Plus, it’s a rewarding project to tackle for any homeowner.
Why Learn How to Remove a Basement Window?
Imagine this: You’re in the middle of a basement renovation, but the old window is cracked, drafty, or even letting in water. Replacing it could improve your home’s energy efficiency, increase safety, and make the space more livable. But hiring professionals can cost anywhere from $500 to $2,000, depending on the job’s complexity. On the other hand, doing it yourself can cost less than $200.
Here’s why learning how to remove a basement window DIY is worth it:
- Cost savings: You’ll avoid labor costs and only pay for tools and materials.
- Energy efficiency: Replacing old windows stops drafts and reduces heating/cooling costs.
- Preparation for egress windows: If you’re upgrading your basement to meet safety codes, removing the old window is the first step.
According to HomeAdvisor, basement finishing projects increased by 40% in 2025. This trend highlights the growing desire for functional, beautiful basement spaces. Ready to take on the challenge? Let’s dive into the tools, safety measures, and step-by-step process to remove your basement window.
Tools and Materials Needed for Basement Window Removal
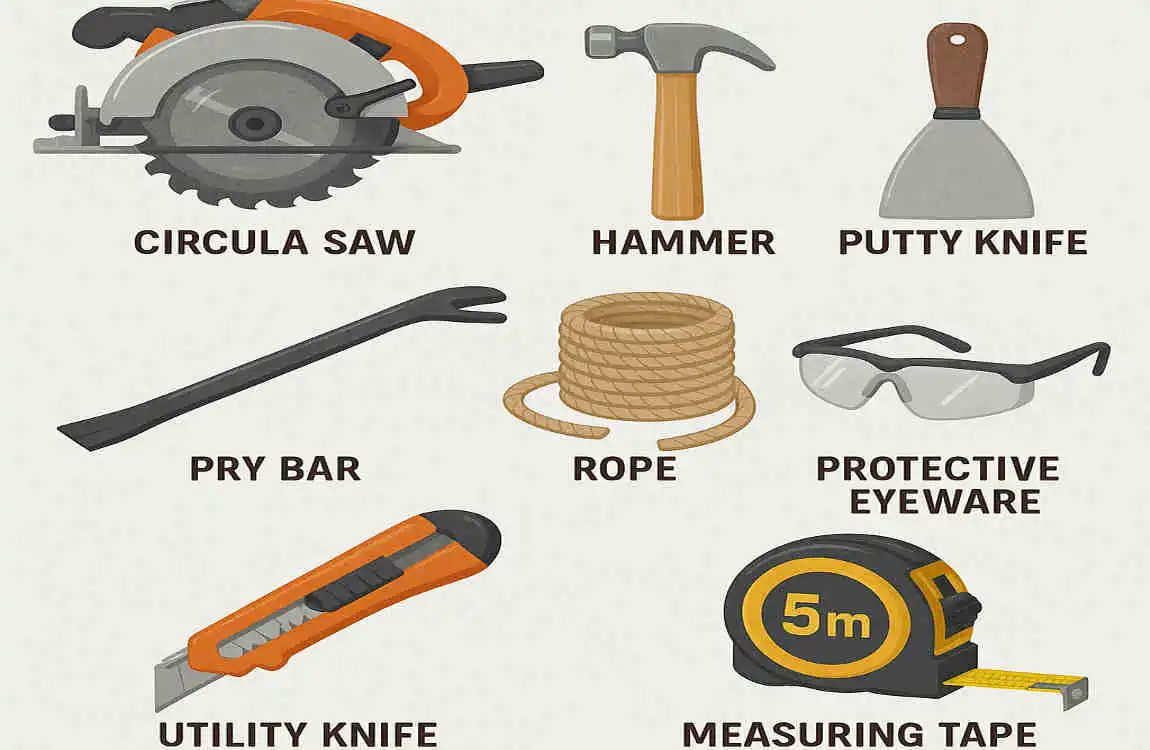
Before starting, you’ll need to gather the right tools and materials. Proper preparation not only makes the job easier but also ensures your safety. Below is a list of essentials:
Tools:
- Pry bar
- Reciprocating saw
- Drill
- Utility knife
- Hammer
- Measuring tape
Safety Gear:
- Gloves
- Safety goggles
- Dust mask
Materials:
- Wood shims
- Expanding foam (for sealing after removal)
- Tarp (to collect debris)
Budget Breakdown
Here’s a quick look at the estimated costs for tools and materials:
Item Purpose Estimated Cost
Pry bar & saw Frame removal $50
Safety gear Protection $30
Wood shims & foam Support and sealing $20
Safety Precautions Before Removing Your Basement Window
Removing a basement window comes with its fair share of risks, from structural damage to potential injuries. By following a few safety measures, you can ensure the project goes smoothly.
Key Risks to Consider:
- Broken glass: Shards can cause serious injuries.
- Structural issues: Removing a window from a load-bearing wall without proper checks can lead to damage.
- Moisture exposure: A poorly sealed opening can let water into your basement.
Safety Checklist:
- Turn off the power and water in the area. Many basements have electrical outlets or plumbing near windows, so ensure these are shut off to avoid accidents.
- Check local building codes. Some windows, especially egress windows, have specific requirements for size and placement.
- Ensure good weather conditions. Work on a dry day to prevent water damage during removal.
By taking these precautions, you’ll be ready to tackle removing a basement window without unnecessary setbacks.
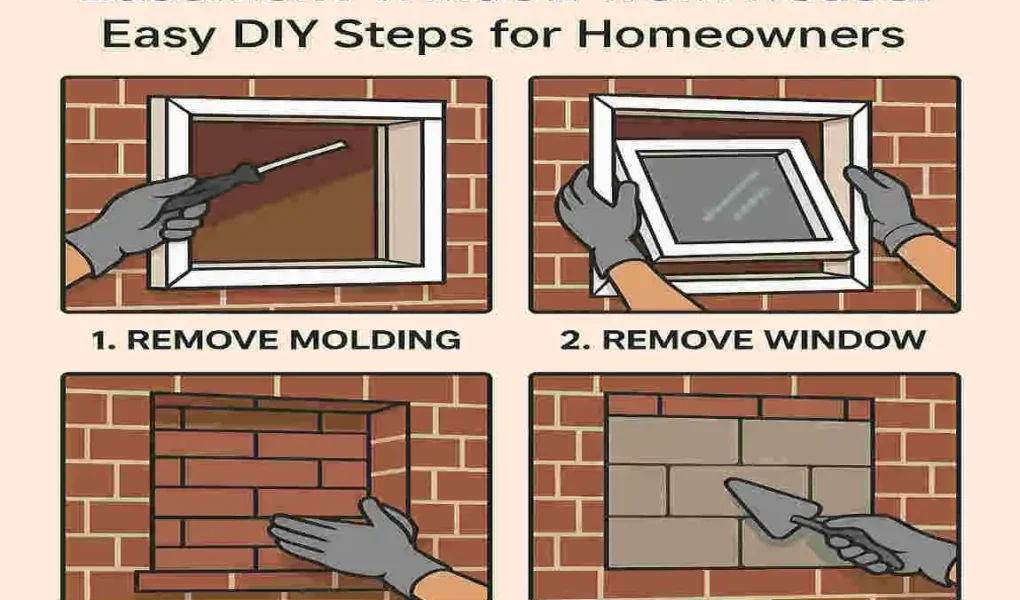
Step-by-Step Guide: How to Remove a Basement Window DIY
Now comes the main event—removing the basement window! Follow these detailed, step-by-step instructions to complete the project successfully.
Prepare the Window Area
Before you begin the removal process, take time to prepare the area.
- Clear the workspace: Move any furniture or objects near the window and lay down a tarp or drop cloth to catch debris.
- Score the caulk or sealant: Use a utility knife to cut through the caulk or sealant around the window frame. This reduces resistance when prying the frame loose.
- Remove interior trim: Use a pry bar to remove the trim around the window carefully. Be gentle to avoid damaging the surrounding drywall.
Disassemble the Window Frame
Once the area is prepped, it’s time to take apart the window frame.
- Remove screws and hinges: Use a drill to unscrew any fasteners holding the frame in place.
- Cut the interior stops: With a pry bar, gently cut away the interior stops (the small strips of wood or metal securing the window in the frame).
- Label parts: If you plan to reinstall the frame later, label each piece for easy assembly.
Break the Glass and Remove Shards Safely
This step requires extra caution to avoid injury.
- Tape the glass: Apply duct tape in an “X” pattern across the glass. This prevents large shards from scattering when you break it.
- Break the glass: Wearing gloves and goggles, use a hammer to break the glass carefully.
- Clean up shards: Use a vacuum to collect small glass fragments and dispose of them safely.
Cut and Pry Out the Frame
With the glass removed, focus on the frame.
- Cut through the frame: If the frame is metal or vinyl, use a reciprocating saw to cut through the nailing flange or exterior flange.
- Pry the frame loose: Insert a pry bar between the frame and the rough opening. Apply steady pressure to work the frame out without damaging the surrounding wall.
- Support with shims: Use wood shims to support the frame as you remove it to prevent it from collapsing.
Clean Up and Inspect the Opening
Once the frame is removed, inspect the opening for any issues.
- Remove debris: Clear out any leftover nails, screws, or debris from the rough opening.
- Check for damage: Look for signs of rot, mold, or structural damage around the opening.
- Measure for replacement: Take accurate measurements of the rough opening to ensure the new window fits perfectly.
Temporary Seal and Next Steps
To protect your basement while waiting for a new window installation, temporarily seal the opening.
- Cover the opening: Use plywood or plastic sheeting to cover the space.
- Apply foam sealant: Fill gaps with expanding foam to prevent drafts and moisture from entering.
At this point, you’re ready to transition to the next phase—installing a new window or upgrading to an egress window.
Common Mistakes to Avoid When Removing Basement Windows
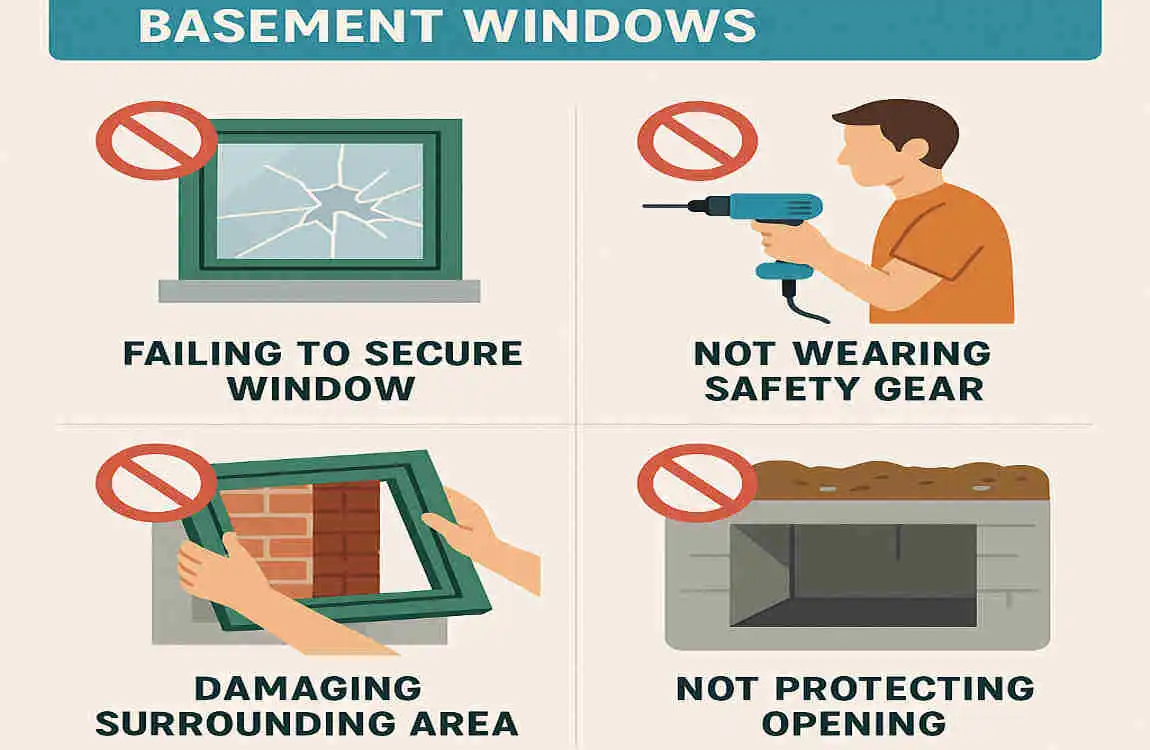
Even the most prepared DIYers can make mistakes. Here are a few common pitfalls to watch out for:
- Skipping waterproofing: Failure to seal the opening properly can lead to water damage.
- Rushing glass removal: Breaking the glass without proper precautions can cause injuries.
- Ignoring permits: Some areas require permits for window removal or replacement.
- Neglecting structural checks: Removing a window from a load-bearing wall without reinforcement can compromise your home’s integrity.
When to Call a Professional for Basement Window Removal
While DIY basement window removal is manageable for most homeowners, there are situations where professional help is necessary:
- Load-bearing walls: If the window is part of a load-bearing wall, consult a structural engineer.
- Historic homes: Older homes may have unique construction methods that require specialized care.
- Code compliance: Egress windows must meet local building codes.
Here’s a quick cost comparison:
DIY Professional
$100–300 $500–2,000
4–6 hours 1–2 days