Imagine walking into your kitchen and feeling that warm, welcoming vibe. Everything looks polished, from the countertops to the appliances. But then, your eyes catch those annoying gaps around your kitchen cabinets. They stick out like a sore thumb, right? Gaps in kitchen cabinets can make even the most stylish space feel unfinished and sloppy.
In this post, we’ll dive into why these gaps happen and, more importantly, how you can fix them. Whether you’re a DIY enthusiast or want a quick upgrade, hiding gaps in your kitchen cabinets is easier than you think. It boosts both the look and the functionality of your kitchen, giving you that perfect house finish you’ve been dreaming of.
Stick with me, and by the end, you’ll have all the tools and steps to transform your space. Ready to make your kitchen shine? Let’s get started.
Understanding Why Gaps Appear in Kitchen Cabinets
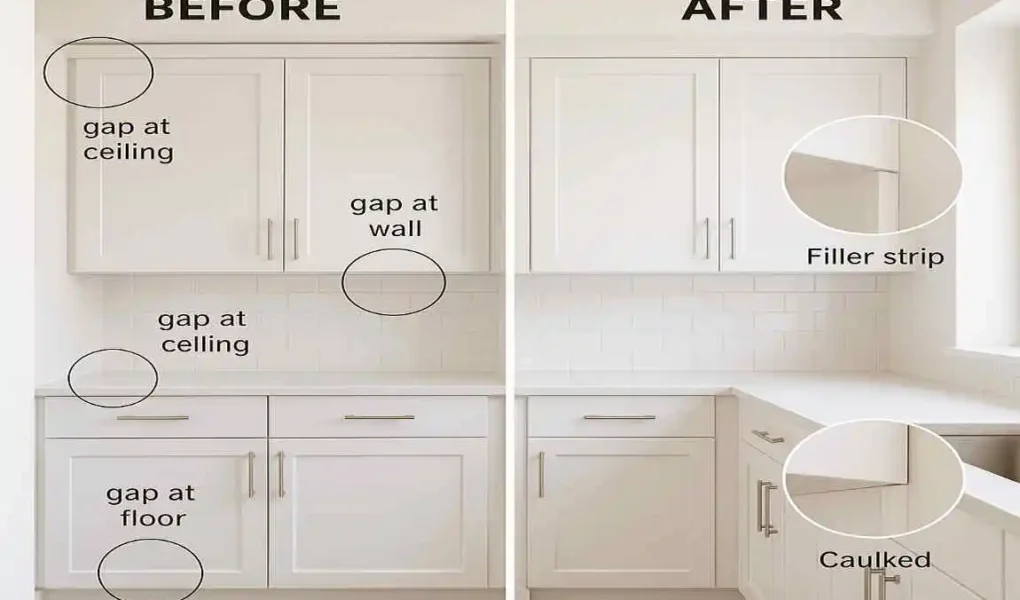
Gaps in kitchen cabinets don’t just appear out of nowhere. They often stem from everyday issues that many homeowners overlook. Think about it: your house isn’t static. Over time, things shift, and that can create spaces where you least expect them.
One significant contributor is poor measurement during installation. If the cabinets aren’t measured precisely to fit your walls or floors, gaps can form right away. Uneven walls are another common problem—older homes especially have walls that aren’t perfectly straight, leaving spaces between the cabinets and the wall.
Then there’s the settling of the house. As your home ages, foundations can shift slightly due to soil changes or weather. This subtle movement pulls kitchen cabinets apart from walls or each other, creating visible gaps. It’s like your house is breathing, but not in a good way.
These gaps aren’t just an eyesore. They drag down the overall look of your kitchen, making it feel less put-together. Plus, they can lower your home’s value if you’re thinking about selling. Buyers notice these details, and a kitchen with gaps screams “needs work.”
On the practical side, gaps in kitchen cabinets let in dust, pests, and even moisture. This can lead to more significant problems, such as mold or warped wood, over time. Addressing them isn’t just about beauty—it’s about keeping your kitchen functional and healthy.
So, why not tackle this head-on? You’ll thank yourself when your kitchen looks seamless and feels more inviting. Trust me, fixing gaps in your kitchen cabinets is a game-changer for that perfect house finish.
Tools and Materials Needed to Fix Gaps in Kitchen Cabinets
Before you roll up your sleeves, let’s talk about what you’ll need. Having the right tools and materials makes hiding gaps in kitchen cabinets a breeze. It turns a potentially frustrating job into something smooth and satisfying.
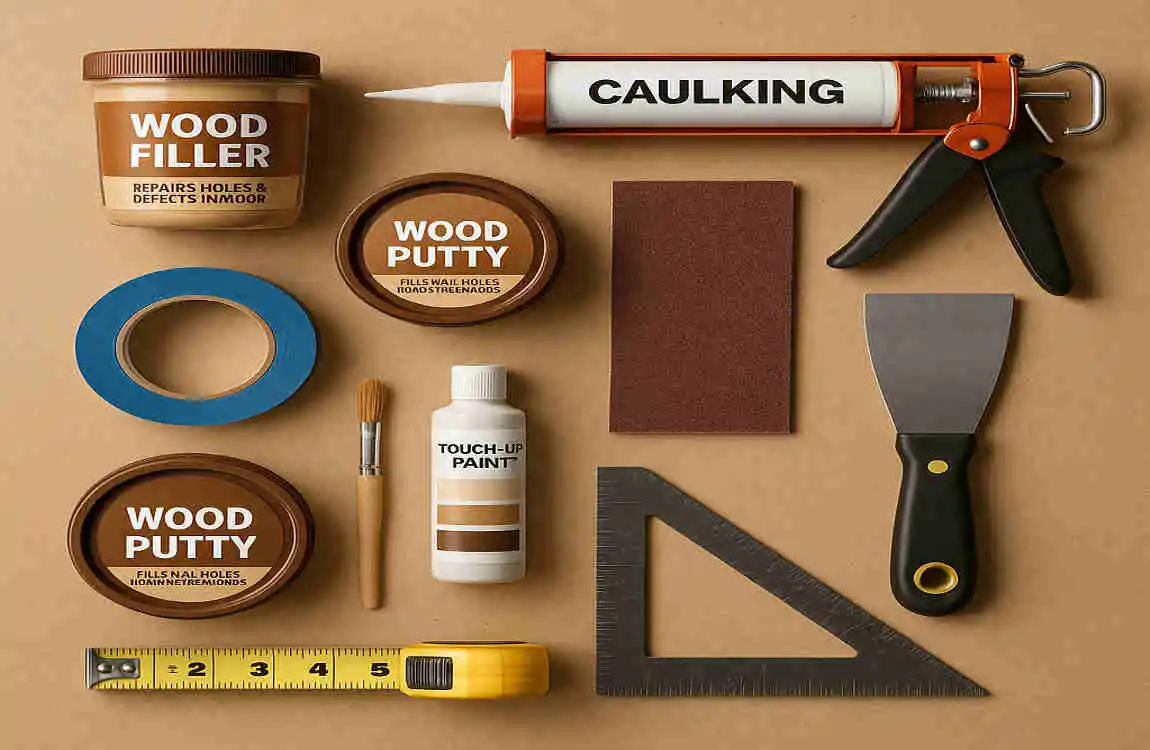
Start with the basics: caulk is your go-to for small gaps. Grab a tube of paintable silicone caulk—it’s flexible and blends well. For larger spaces, you’ll want trim molding or filler strips. These are thin pieces of wood that match your cabinet material.
Don’t forget wood putty for filling in dents or holes. It’s like a magic eraser for wood. You’ll also need sandpaper in various grits (from coarse to fine) to smooth everything out. And for a flawless finish, pick up some paint that matches your kitchen cabinets exactly.
On the tool side, a caulk gun is essential for precise application. Add a utility knife for cutting trim, a measuring tape for accuracy, and a putty knife for spreading fillers. A level ensures everything stays straight, and clamps can hold pieces in place while they dry.
Safety first, folks. Wear gloves to protect your hands from sticky materials, and use safety glasses when cutting or sanding. If you’re painting, a respirator mask keeps fumes at bay.
You may also read (should you paint the inside of cabinet doors in your home).
Investing in quality tools pays off. Cheap ones might break mid-job, but good ones give you that professional edge. Think about it—spending a little now saves you headaches later. With these in hand, you’re set to hide those gaps in your kitchen cabinets like a pro.
Here’s a quick bulleted list of essentials to make your shopping easier:
- Caulk and a caulk gun for sealing small gaps
- Trim molding and filler strips for bigger fixes
- Wood putty, sandpaper, and paint for finishing touches
- Utility knife, measuring tape, level, and clamps for precise work
- Safety gear: gloves, glasses, and a mask
Step-by-Step Guide to Hiding Gaps in Kitchen Cabinets
Now, let’s get to the heart of it. This step-by-step guide will walk you through hiding gaps in your kitchen cabinets. We’ll break it down into clear segments so that you can follow along easily. Remember, patience is key—rushing leads to mistakes.
Take your time, and you’ll end up with a kitchen that looks brand new. Ready? Let’s dive in.
Assess the Gap Size and Location
First things first: size up the problem. Not all gaps in kitchen cabinets are the same, so start by inspecting them closely. Grab a flashlight and get up close—look at the spaces between cabinets, walls, ceilings, or floors.
Differentiate between small gaps (under 1/4 inch) and significant gaps (over 1/2 inch). Small ones are quick fixes with caulk, while larger ones might need trim or fillers. Measure each gap with your tape—note the width, length, and depth.
Before measuring, clean the area. Wipe away dust or grease so your measurements are accurate. After, jot down notes or snap photos. This helps you plan materials and avoid surprises.
Why does this matter? Proper assessment prevents you from using the wrong fix, which could make things worse. Think of it as diagnosing before treating—get this right, and the rest flows smoothly.
Using Caulk for Small Gaps
For those tiny gaps in kitchen cabinets, caulk is your best friend. It’s simple, affordable, and gives a seamless look. But choosing the right one makes all the difference.
Select a paintable caulk that matches your cabinet color. Silicone-based products work best for kitchens because they are waterproof and flexible. Avoid cheap latex if your kitchen gets steamy—it might crack over time.
The application is straightforward. Cut the caulk tube tip at a 45-degree angle for control. Load it into the gun and apply a steady bead along the gap. Use your finger (dipped in water) or a tool to smooth it out, blending it with the kitchen cabinets.
Cleanup is easy—wipe excess with a damp cloth before it dries. Let it cure for 24 hours, then paint over it if needed. Voila! The gap disappears as if it were never there.
Pro tip: Practice on scrap wood first. You’ll get the hang of it quickly, and your kitchen cabinets will thank you.
Applying Trim or Molding for Larger Gaps
When gaps are too significant for caulk, turn to trim or molding. This adds a decorative touch while hiding imperfections in your kitchen cabinets. It’s like giving your kitchen a stylish upgrade.
Choose a trim that complements your cabinet design—simple quarter-round for modern looks, or ornate crown molding for traditional vibes. Measure the gap length twice to avoid waste.
Installation starts with cutting. Use a miter saw for angled ends if needed. Apply wood glue or adhesive to the back, then press the trim into place. Secure with finishing nails, but don’t hammer too hard— you don’t want dents.
Finish by filling nail holes with putty, sanding smooth, and painting to match. Step back and admire—those gaps in your kitchen cabinets are now invisible, and your space feels more polished.
Filling Gaps with Wood Putty or Filler Strips
For gaps that need more structure, wood putty or filler strips step in. These are great for uneven surfaces on kitchen cabinets.
Pick putty that matches your wood type—water-based for easy cleanup. For strips, cut thin wood pieces to fit precisely. Apply putty with a knife, pressing it deep into the gap. Let it dry, then sand until flush.
With filler strips, glue them in, clamp, and wait. Sand and paint over for an invisible repair. It’s satisfying to see rough spots turn smooth.
This method works wonders on cabinet sides or bases. Give it a try—you’ll love the professional feel.
Additional Techniques for Uneven Walls Behind Cabinets
Uneven walls behind kitchen cabinets can be tricky, but shims fix that. These thin wedges level things out before you hide gaps.
Insert shims where the cabinet meets the wall, tapping gently until aligned. Check with your level—adjust as needed. Once level, proceed with caulk or trim.
For pros, consider scribing the cabinet edges to match the wall’s curve. It takes skill, but the result is flawless. If walls are really off, consult an expert.
These tweaks ensure your kitchen cabinets sit perfectly, preventing future gaps.
Tips for Preventing Gaps in Kitchen Cabinets
Prevention beats cure, especially with kitchen cabinets. Start with precise measurements before buying or installing. Double-check wall and floor levels—use a laser level for accuracy.
Choose quality cabinets that fit your space well. Custom ones are ideal for odd layouts, reducing gaps from the get-go.
Do routine checks: Every few months, inspect for shifts and tighten screws. Maintain by cleaning regularly—dirt can worsen gaps over time.
Expert advice? If installing new kitchen cabinets, hire a pro for tricky spots. It saves time and ensures longevity.
Follow these, and you’ll keep gaps at bay for years.
Here’s a numbered list of quick prevention tips:
- Measure everything twice before installation.
- Opt for adjustable cabinets with built-in scribes.
- Use quality adhesives during setup.
- Schedule annual maintenance checks.
- Address house settling early with foundation pros.
When to Hire a Professional vs. DIY Fixes
Deciding between DIY and pros for fixing gaps in kitchen cabinets? Let’s weigh it out. DIY saves money—expect to spend $50-200 on materials. It’s rewarding if you’re handy.
But pros bring expertise, especially for complex gaps like those from structural issues. They might charge $300-800, but it’s worth it for flawless results.
DIY suits small gaps or simple trim. Hire experts for large-scale problems, uneven walls, or if you’re short on time.
To find reliable help, check reviews on sites like Angi or ask friends. Look for licensed cabinet makers with portfolios.
Bottom line: Know your limits. A pro can elevate your kitchen cabinets to perfection.
FactorDIYHiring a Professional
Cost Low ($50-200) Higher ($300-800+)
Time 1-2 days, flexible 1 day, scheduled
Skill Level Needed: Beginner to intermediate. None—experts handle it
Best For Small gaps, quick fixes , and Large or structural issues
Risks , Mistakes if inexperienced , Minimal, with guarantees
Outcome Satisfying if done right, Professional, long-lasting
Enhancing Kitchen Cabinet Appearance Beyond Gap Fixing
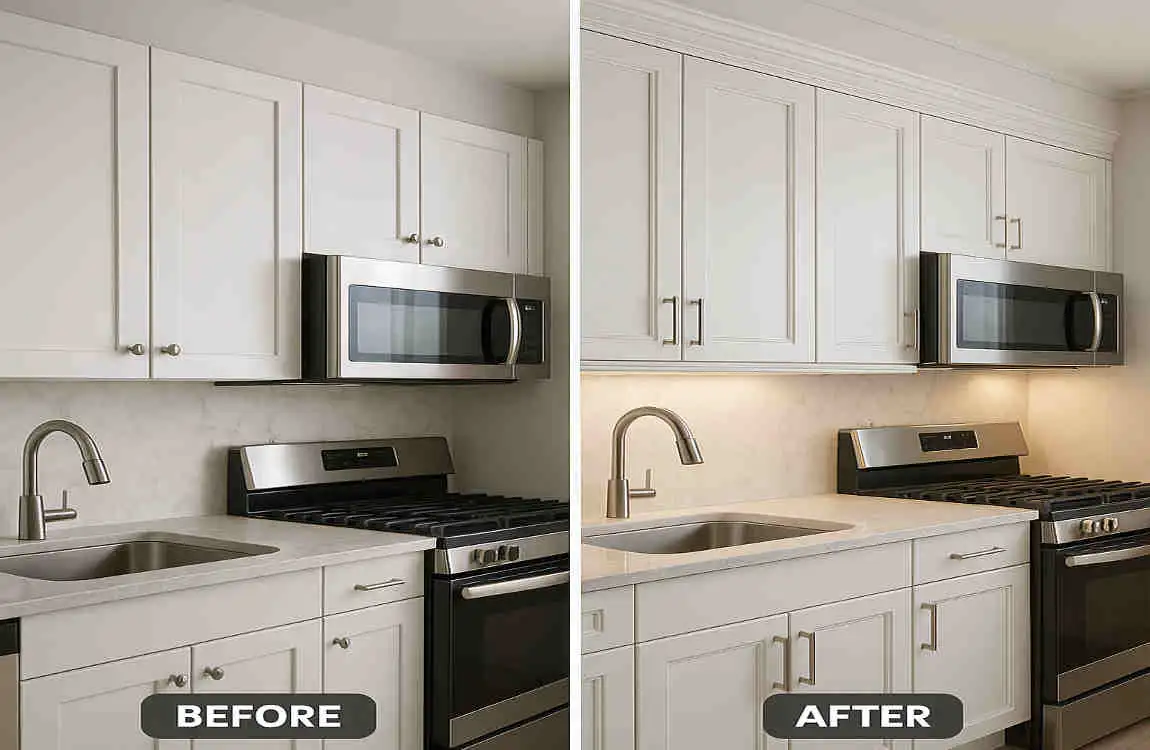
Once gaps are hidden, amp up your kitchen cabinets further. Painting is a game-changer—choose durable, semi-gloss for easy cleaning. Sand first for a smooth base.
Refinishing adds shine: Apply a clear coat to protect wood and enhance grain. It’s like a spa day for your cabinets.
Add decorative elements, like crown molding or under-cabinet lights. These draw eyes away from any imperfections.
Coordinate hardware: Swap knobs for sleek pulls that match your style. It ties everything together for that perfect house finish.
You may also read (whats a spice kitchen a home guide to flavorful cooking spaces).