Is your basement floor starting to show signs of crumbling? Don’t worry, you’re not alone. Many homeowners face this common issue, but the good news is that with the proper knowledge and tools, you can fix it yourself.
Ignoring a crumbling concrete basement floor can lead to more severe problems down the line, including structural damage and a decrease in home value.
Understanding the Problem: Causes of Crumbling Concrete Basement Floors
Common Reasons for Concrete Damage
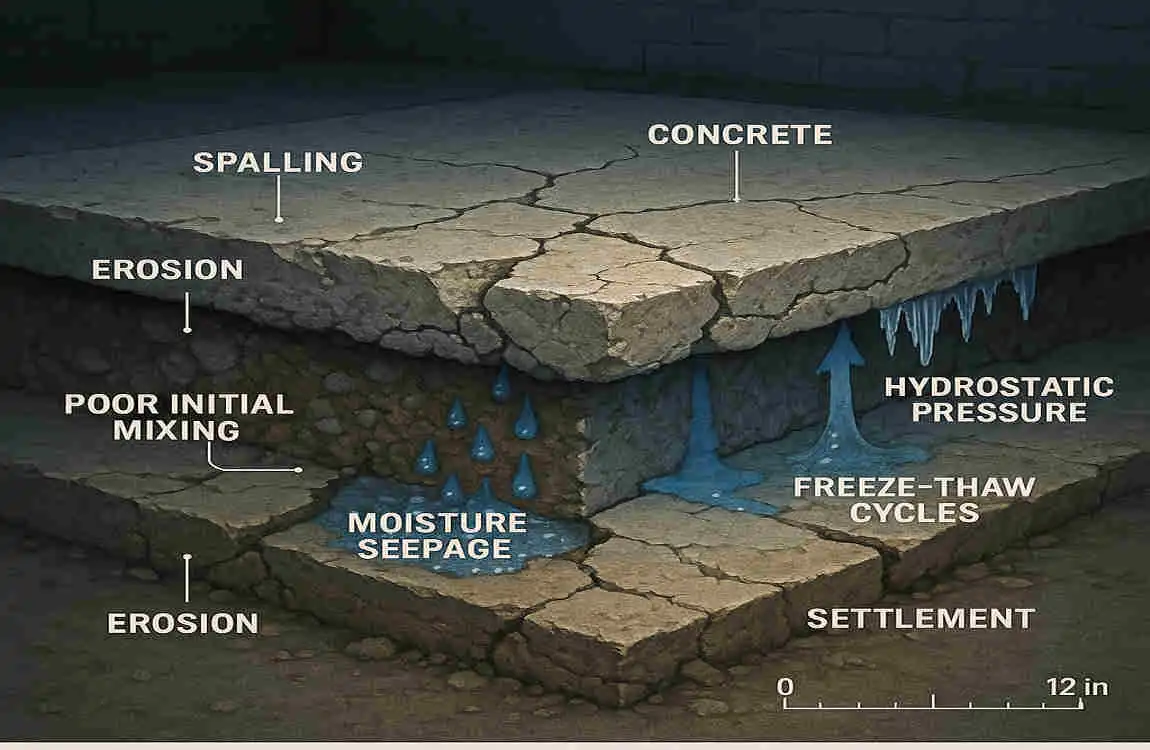
Concrete basement floors can crumble due to a variety of factors. Let’s take a closer look at some of the most common reasons:
Moisture Infiltration and Water Damage
One of the primary culprits behind crumbling concrete is moisture infiltration. When water seeps into the concrete, it can cause the material to expand and contract, leading to cracks and deterioration over time. This is especially common in basements, where the floor is in direct contact with the ground.
Poor Initial Installation
If your basement floor was not installed correctly in the first place, it may be more prone to crumbling. This could be due to factors such as improper mixing of the concrete, inadequate curing time, or insufficient reinforcement.
Soil Movement and Settling Foundation
The soil beneath your home can shift and settle over time, potentially causing your basement floor to crack and crumble. This is particularly common in areas with expansive soils or in houses built on unstable ground.
Freeze-Thaw Cycles
If you live in an area with cold winters, you may be familiar with the destructive power of freeze-thaw cycles. When water seeps into the concrete and then freezes, it expands, causing the material to crack and crumble.
Chemical Exposure and Wear Over Time
Over time, your basement floor may be exposed to various chemicals, including cleaning agents and de-icing salts. These substances can react with the concrete, causing it to deteriorate. Additionally, normal wear and tear can contribute to the crumbling of your basement floor.
How to Diagnose the Extent of Crumbling and Damage
So, how can you tell if your basement floor is crumbling and to what extent? Here are some signs to watch for:
- Visible cracks or crumbling along the surface of the floor
- Uneven or sunken areas of the floor
- Peeling or flaking of the concrete surface
- Musty or damp odors in the basement, which could indicate moisture infiltration
If you notice any of these signs, it’s essential to take a closer look and assess the extent of the damage. You can do this by:
- Examining the floor closely for cracks, crumbling, or other signs of damage
- Using a moisture meter to check for excessive moisture in the concrete
- Tapping on the floor with a hammer to listen for hollow sounds, which could indicate delamination or separation of the concrete layers
Signs to Watch for in Your Basement Floor
As mentioned earlier, there are several signs that your basement floor may be crumbling. Keep an eye out for:
- Cracks, especially those that are wider than 1/8 inch or that run through the entire thickness of the floor
- Crumbling or flaking of the concrete surface
- Uneven or sunken areas of the floor
- Musty or damp odors in the basement
- Water stains or efflorescence (white, powdery deposits) on the floor or walls
If you notice any of these signs, it’s time to take action and start planning your repair project.
Safety Precautions Before Repairing
Before you begin repairing your crumbling concrete basement floor, it’s crucial to take some safety precautions. After all, your well-being is the top priority.
Personal Protective Equipment Recommendations
When working with concrete and repair materials, it’s essential to wear the proper personal protective equipment (PPE). This includes:
- Safety glasses or goggles to protect your eyes from debris and chemicals
- A dust mask or respirator to prevent inhalation of concrete dust and other particles
- Gloves to protect your hands from chemicals and rough surfaces
- Sturdy shoes or boots with slip-resistant soles to prevent falls
Assessing Structural Safety Before Starting Repairs
Before you start repairing your basement floor, it’s crucial to assess the structural safety of your home. If the crumbling concrete is causing significant structural damage, it is advisable to consult with a professional engineer before proceeding.
Some signs that you may need to call in a professional include:
- Large, deep cracks that run through the entire thickness of the floor
- Significant unevenness or sinking of the floor
- Visible damage to the foundation walls or other structural elements
If you’re unsure about the safety of your home, it’s always better to err on the side of caution and seek professional advice.
When to Call a Professional Engineer
In some cases, the damage to your basement floor may be beyond the scope of a DIY repair. If you notice any of the following, it’s time to call in a professional engineer:
- Large, deep cracks that run through the entire thickness of the floor
- Significant unevenness or sinking of the floor
- Visible damage to the foundation walls or other structural elements
- Concerns about the overall stability and safety of your home
A professional engineer can assess the extent of the damage and provide recommendations for repairs. They can also help you navigate any necessary permits or building codes.
Step-by-Step Guide: How to Fix Crumbling Concrete Basement Floor
Now that you’ve assessed the damage and taken the necessary safety precautions, it’s time to start repairing your crumbling concrete basement floor. Follow these steps for a successful repair project.
Preparing the Area
Clearing the Basement Floor
The first step in repairing your basement floor is to clear the area of any furniture, appliances, or other items. This will give you a clean slate to work with and prevent any damage to your belongings.
Removing Loose or Crumbling Concrete Material
Next, remove any loose or crumbling concrete material from the floor. You can do this using a hammer and chisel, a concrete saw, or a jackhammer, depending on the extent of the damage.
Be sure to wear your PPE and work carefully to avoid damaging the surrounding concrete. Once you’ve removed the loose material, use a wire brush or broom to sweep away any debris.
Cleaning the Surface for Better Adhesion
To ensure a strong bond between the old and new concrete, it’s essential to clean the surface thoroughly. Use a pressure washer or a stiff-bristled brush and water to remove any dirt, dust, or other contaminants from the floor.
If there are any oil or grease stains on the floor, you may need to use a specialized concrete cleaner to remove them. Follow the manufacturer’s instructions carefully and allow the surface to dry completely before proceeding.
Tools and Materials Needed
Before you begin repairing your basement floor, ensure you have all the necessary tools and materials on hand. Here’s a list of what you’ll need:
- Hammer and chisel
- Concrete saw or jackhammer (if necessary)
- Wire brush or broom
- Pressure washer or stiff-bristled brush
- Concrete cleaner (if necessary)
- Epoxy or concrete patching compound
- Trowel or putty knife
- Concrete resurfacer or mortar mix
- Wire mesh or rebar (if necessary)
- Concrete overlay or resurfacer product (if necessary)
- Safety glasses or goggles
- Dust mask or respirator
- Gloves
- Sturdy shoes or boots
Repairing Minor Cracks and Surface Damage
If your basement floor has minor cracks or surface damage, you can repair it using an epoxy or concrete patching compound. Here’s how:
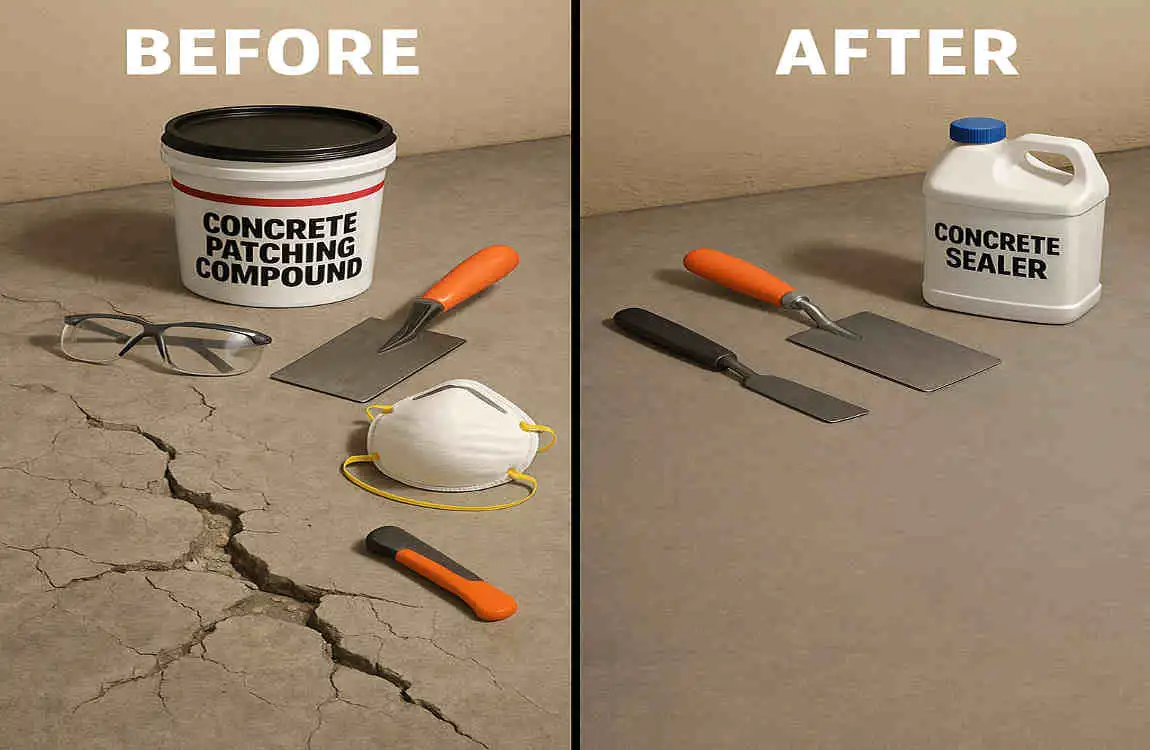
Using Epoxy or Concrete Patching Compounds
Epoxy and concrete patching compounds are both effective for repairing minor cracks and surface damage. Epoxy is a two-part adhesive that hardens when mixed, while concrete patching compounds are pre-mixed and ready to use.
Choose the product that best suits your needs and follow the manufacturer’s instructions for mixing and application. In general, you’ll want to apply the repair material using a trowel or putty knife, spreading it evenly over the damaged area.
Detailed Instructions for Mixing and Applying Repair Materials
When mixing and applying epoxy or concrete patching compounds, it’s essential to follow the manufacturer’s instructions carefully. Here’s a general overview of the process:
- Clean the surface thoroughly and allow it to dry completely.
- Mix the repair material according to the manufacturer’s instructions. This may involve combining two or more components or simply stirring a pre-mixed product.
- Apply the repair material to the damaged area using a trowel or putty knife. Spread it evenly and smooth out any excess.
- Allow the repair material to cure according to the manufacturer’s instructions. This may take several hours or even days, depending on the product and environmental conditions.
Curing Times and Techniques to Ensure Durability
To ensure the durability of your repairs, it’s crucial to allow the repair material to cure properly. This may involve:
- Keeping the area at a consistent temperature and humidity level
- Covering the repaired area with plastic sheeting to prevent moisture loss
- Applying a curing compound to the surface of the repair material
Follow the manufacturer’s instructions for curing times and techniques, and be patient. Rushing the curing process can result in weak or brittle repairs that may not withstand the test of time.
Addressing Larger Cracks and Holes
If your basement floor has larger cracks or holes, you’ll need to use a different approach. Here’s how to address these more significant issues:
Using Concrete Resurfacer or Mortar Mix
For larger cracks and holes, you’ll need to use a concrete resurfacer or mortar mix. These products are designed to fill in larger gaps and provide a strong, durable repair.
Choose a product that matches the color and texture of your existing concrete floor, and follow the manufacturer’s instructions for mixing and application.
Reinforcement Techniques (Wire Mesh, Rebar Insertion)
For particularly large or deep cracks and holes, you may need to use reinforcement techniques to ensure a strong and lasting repair. This can involve:
- Embedding wire mesh into the repair material to provide additional strength and stability
- Inserting rebar into the crack or hole to act as a structural support
Follow the manufacturer’s instructions for using these reinforcement techniques, and be sure to wear your PPE and work carefully to avoid injury.
Layer Application Process
When repairing larger cracks and holes, you may need to apply the repair material in multiple layers to ensure a thorough and effective repair. This can help provide a strong and even repair.
Here’s a general overview of the layer application process:
- Clean the surface thoroughly and allow it to dry completely.
- Mix the repair material according to the manufacturer’s instructions.
- Apply a thin layer of repair material to the damaged area, spreading it evenly with a trowel or putty knife.
- Allow the first layer to cure according to the manufacturer’s instructions.
- Apply additional layers as needed, allowing each layer to cure before applying the next.
- Once the final layer has cured, you can smooth out the surface using a trowel or float.
When and How to Resurface the Entire Floor
In some cases, it may be necessary to resurface the entire basement floor to achieve a uniform and durable repair. Here’s how to know when resurfacing is needed and how to do it:
Signs Resurfacing is Necessary
You may need to resurface your entire basement floor if:
- The damage is widespread and affects a large portion of the floor.
- The floor has significant unevenness or sinking.
- You want to achieve a uniform appearance and texture across the entire floor.
Choosing the Right Concrete Overlay or Resurfacer Product
When choosing a concrete overlay or resurfacer product, consider factors such as:
- Color and texture: Select a product that complements your existing floor or achieves the desired appearance.
- Durability: Look for a product that is designed for heavy traffic and wear.
- Ease of application: Consider a product that is easy to mix and apply, especially if you’re a DIYer.
Step-by-Step Resurfacing Instructions
Here’s a general overview of the resurfacing process:
- Clean the surface thoroughly and allow it to dry completely.
- Mix the resurfacing product according to the manufacturer’s instructions.
- Apply the resurfacing product to the floor using a trowel, squeegee, or sprayer, depending on the product and your desired finish.
- Smooth out the surface using a trowel or float, and create any desired texture or pattern.
- Allow the resurfacing product to cure according to the manufacturer’s instructions.
- Once the resurfacing is complete, you can apply a sealer or coating to protect the new surface and enhance its appearance.
Preventing Future Damage for Lasting Stability
Now that you’ve repaired your crumbling concrete basement floor, it’s essential to take steps to prevent future damage and ensure lasting stability. Here are some tips to help you do just that:
Improving Drainage and Waterproofing Basement Walls and Floors
One of the most effective ways to prevent future damage to your basement floor is to improve drainage and waterproofing. This can involve:
- Installing a French drain or other drainage system around the perimeter of your home
- Applying a waterproof coating to the exterior of your foundation walls
- Sealing any cracks or gaps in your basement walls and floor
By keeping water away from your basement, you can significantly reduce the risk of moisture infiltration and damage to your concrete.
Controlling Basement Humidity and Moisture Levels
Another critical factor in preventing future damage is controlling the humidity and moisture levels in your basement. You can do this by:
- Using a dehumidifier to remove excess moisture from the air
- Installing a ventilation system to improve air circulation
- Sealing any cracks or gaps in your basement walls and floor to prevent moisture infiltration
By maintaining a dry and well-ventilated basement, you can help prevent the growth of mold and mildew and reduce the risk of concrete damage.
Foundation Inspection and Maintenance Tips
Regular foundation inspection and maintenance can also help prevent future damage to your basement floor. Here are some tips to keep in mind:
- Inspect your foundation walls and floor regularly for signs of cracks, crumbling, or other damage
- Please address any issues promptly to prevent them from worsening
- Keep the area around your foundation clear of debris and vegetation to prevent moisture buildup
- Consider hiring a professional to perform a thorough foundation inspection every few years
By staying proactive and addressing any issues early on, you can help ensure the long-term stability and safety of your home.
Seasonal Care to Prevent Freeze-Thaw Damage
If you live in an area with cold winters, it’s essential to take steps to prevent freeze-thaw damage to your basement floor. Here are some tips to keep in mind:
- Keep your basement well-insulated in order to avoid cold temperatures from penetrating the floor
- Use a dehumidifier to remove excess moisture from the air and prevent ice formation
- Avoid using salt or other de-icing agents near your foundation, as these can react with the concrete and cause damage
- Consider installing a heated floor system to keep your basement warm and dry during the winter months
By taking these steps, you can help prevent the destructive effects of freeze-thaw cycles and protect your basement floor from future damage.
Tools and Materials You’ll Need
To successfully repair your crumbling concrete basement floor, you’ll need a variety of tools and materials. Here’s a comprehensive list to help you get started:
- Hammer and chisel
- Concrete saw or jackhammer (if necessary)
- Wire brush or broom
- Pressure washer or stiff-bristled brush
- Concrete cleaner (if necessary)
- Epoxy or concrete patching compound
- Trowel or putty knife
- Concrete resurfacer or mortar mix
- Wire mesh or rebar (if necessary)
- Concrete overlay or resurfacer product (if necessary)
- Safety glasses or goggles
- Dust mask or respirator
- Gloves
- Sturdy shoes or boots
You can find most of these tools and materials at your local hardware store or home improvement center. For specialized equipment, such as a concrete saw or jackhammer, you may need to rent from a tool rental company.
Cost Estimates and Timeframes
The cost and timeframe of repairing your crumbling concrete basement floor will depend on several factors, including the extent of the damage, the size of your basement, and whether you choose to do the work yourself or hire a professional. Here are some general estimates to help you plan:
Typical Costs for DIY vs Professional Repairs
- DIY repairs: $50-$200 for materials, depending on the extent of the damage and the products you choose
- Professional maintenance: $3-$10 per square foot, depending on the complexity of the job and the contractor’s rates
Please note that these are rough estimates, and your actual costs may vary. Be sure to get multiple quotes from contractors and compare prices before making a decision.
Estimated Time Required at Each Repair Stage
- Preparing the area: 1-2 hours
- Repairing minor cracks and surface damage: 2-4 hours
- Addressing larger cracks and holes: 4-8 hours
- Resurfacing the entire floor: 8-16 hours, depending on the size of your basement and the complexity of the job
Again, these are just rough estimates, and your actual time requirements may vary. Be sure to allow ample time for each stage of the repair process and avoid rushing the job.