Owning a pool house is one of the great joys of having a backyard oasis. It offers a convenient spot to change, store equipment, and entertain guests without constantly running back and forth to your main home. However, that convenience comes with its own set of hidden plumbing systems. When things go wrong, pool house plumbing leaks can quickly turn your personal paradise into a stressful situation.
Water waste, structural damage to your decking, hidden mold growth, and skyrocketing utility bills are just a few of the headaches a hidden leak can cause. Even worse, many homeowners brush off dropping water levels as “normal evaporation” when, in reality, they are facing a genuine plumbing issue that needs immediate attention
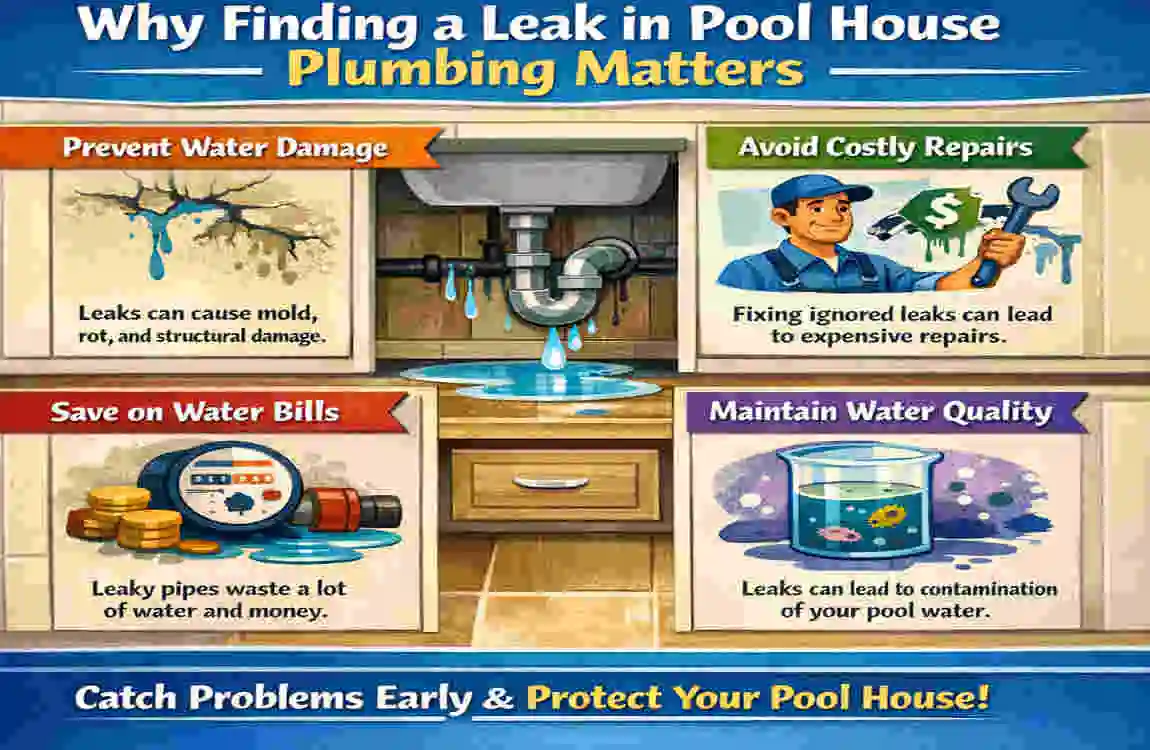
Why Finding a Leak in Pool House Plumbing Matters
A small drip near the pool house is no big deal. It is outside, right? Unfortunately, even the smallest leak can lead to serious consequences for your wallet and property.
The Financial and Structural Impact
Undetected leaks are silent money drainers. A pipe that loses just one drop of water per second can waste thousands of gallons over the course of a year. That wasted water translates directly into constantly rising water bills.
But the cost of the water is often the least of your worries. The structural damage caused by pooling water can be devastating. Water escaping from your pool house plumbing can wash away the soil beneath your foundation, leading to a weak foundation and severe settling. It can also cause deck damage, making your beautiful concrete or paver surround crack, sink, or heave. Inside the pool house, continuous moisture will rot away drywall, wooden studs, and expensive flooring.
Health and Safety Risks
Where there is unwanted water, mold and mildew are never far behind. Water damage inside the enclosed space of a pool house creates the perfect breeding ground for toxic mold. This compromises the air quality and poses serious health risks to your family and guests.
Additionally, puddling water creates slippery surfaces on your pool deck, increasing the risk of dangerous falls. Even more alarming are the potential electrical hazards. Your pool house is packed with electrical equipment—from breaker boxes to pool pumps and lighting. Water and electricity are a deadly combination, making early leak detection a matter of basic safety.
Connecting the Dots to Your Main Home
Your pool house plumbing does not exist in a vacuum. It is often connected to your home’s broader plumbing network. Pool house leaks can affect shared water lines, contribute to broader slab leaks, and even overwhelm shared drainage systems.
Early detection saves you money and protects the long-term value of both your swimming pool and your primary residence.
A Quick Real-World Example: Consider a homeowner living in a warm, sunny climate who recently noticed a persistent wet patch near their pool house door. At first, they blamed the garden sprinklers. But after a quick inspection, it turned out to be a cracked underground suction line. Because they caught it early, they avoided thousands of dollars in wasted water and prevented their entire pool deck from collapsing.
Signs Your Pool House Plumbing May Have a Leak
Before you can fix a problem, you have to know it exists. Your plumbing system will usually give you warning signs when something is wrong. You need to know what to look for.
Here are the most common red flags indicating you might have a plumbing leak:
- Constantly rising water bills: If your water usage spikes without you hosting a giant pool party or filling a new hot tub, a hidden leak is the most likely culprit.
- Visible wet spots, damp walls, or soft flooring: Check the area in and around your pool house. If the walls feel soft, the floor is spongy, or you see dark water stains, you have a moisture problem.
- Settling or cracking in the deck: Watch out for sudden cracks or uneven spots in the concrete around your pool house foundation. Water eroding the soil below causes this sinking effect.
- Puddling or soggy ground: If you have a patch of grass near the pool house equipment pad that is always muddy—even when it hasn’t rained—a buried pipe might be leaking.
- Reduced water pressure: If the sinks or showers inside your pool house suddenly have low pressure, or if you see constant air bubbles shooting out of the pool return jets, air is entering your plumbing line through a crack.
- Unusual sounds: Pay attention to your surroundings. A faint hissing, dripping, or gurgling sound near pipes or equipment often indicates a breach in the system.
- Musty smells: Trust your nose. A distinct musty smell or visible mold and mildew on walls or under the deck means water is gathering where it shouldn’t.
- Rapidly dropping pool water levels: While pools lose water to evaporation, a pool water level dropping faster than normal evaporation is a major warning sign.
If you notice two or more of these signs, it is time to put on your detective hat. You need to start investigating how to find a leak in the pool house plumbing using simple tests and visual inspections.
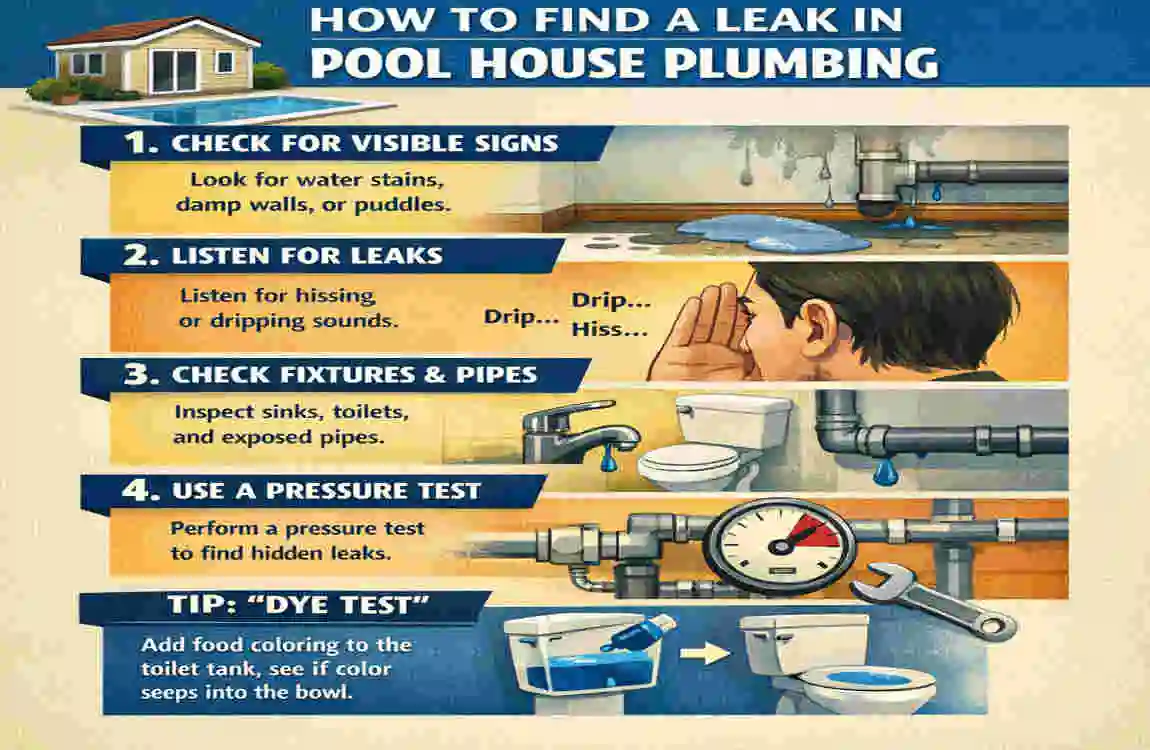
Run a Basic Leak-Check Around the Pool House
The first step in any plumbing investigation is a thorough visual and sensory walkthrough. You do not need any fancy equipment for this phase—just your eyes, ears, hands, and a good source of light.
Inspect the Equipment Pad
Start where the action happens. Walk over to your equipment pad and carefully inspect the pool pump, filter, pool heater, and all connecting valves. Are there visible drips? Do you see small pools of water gathering around the base of the machinery? Even a slow, steady drip from a pump seal can result in massive water loss over time.
Check the Inside Walls and Baseboards
Next, head inside the pool house. Look closely at the walls, especially near the bottom baseboards. Run your hands over the drywall. Does it feel cool and damp? Do you see any peeling paint or bubbling wallpaper? Press gently on the walls near plumbing fixtures to check for any sponginess or movement that shouldn’t be there.
Examine the Under-Deck and Plumbing Sleeves
If your pool house is raised, get down low and look under the deck. Pay special attention to the plumbing sleeves—the points where pipes pass through concrete or wood to enter the pool house. These transition areas are notorious for shifting and cracking over time.
Inspect Outdoor Faucets and Drains
Do not forget the simple stuff. Check any outdoor faucets, showerheads, floor drains, and garden hose connections attached to the pool house exterior.
Pro Tip: Use a strong torch or an LED flashlight during this step. Shine the light under the pool deck, behind the equipment pad, and into dark corners inside the pool house. Water reflects light, making a wet pipe or a hidden puddle much easier to spot.
This quick, hands-on check is the absolute most important first step in understanding how to find a leak in pool house plumbing before you move on to more advanced testing.
Isolate the Pool Plumbing from the Main House
When you are hunting for a leak, you need to shrink your search area. Because your pool house is likely tied into your main home’s water supply, you need to determine exactly which system is leaking.
Why Isolation is Important
If you share a single water meter for both your main house and your pool house, a leak anywhere on the property will spin the meter dial. By isolating the two systems, you can confidently say whether the problem is in the pool house plumbing or the main house plumbing.
How to Isolate the Systems
First, turn off the main pool pump so no water is actively circulating through the pool equipment. Next, locate the dedicated water-shutoff valve supplying fresh water to the pool house. Turn this valve completely off.
Now, check your main house water meter. Make sure no one inside the main house is using the washing machine, flushing toilets, or running sinks. If the water meter indicator is completely still, the leak is likely isolated to the pool house lines you just shut off. If the meter is still spinning, you might leak closer to the main house.
A Quick Warning About Complex Systems
Professional plumbers often isolate plumbing lines by closing specific isolation valves or by using temporary pipe caps to pressure-test individual sections.
Caution: If you suspect there is a complicated cross-connection between your house and your pool plumbing, or if you cannot easily find the shut-off valves, it is best to call a licensed plumber. You want to avoid accidentally damaging complex, interconnected water systems.
Mastering this isolation step is a major part of learning to safely and effectively find leaks in pool-house plumbing.
Use the Bucket Test to Confirm a Pool-Related Leak
One of the biggest debates pool owners have is: “Is my pool leaking, or is the water just evaporating?”
During hot, dry, and windy days, your pool can lose a surprising amount of water to natural evaporation. The bucket test is a simple, foolproof, and practically free way to distinguish standard evaporation from a real, active plumbing leak.
How to Perform the Bucket Test
Follow these clear, numbered instructions to get an accurate reading:
- Find a Bucket: Grab a clean, empty plastic bucket (a standard 5-gallon bucket works perfectly).
- Fill it Up: Fill the bucket with water straight from your pool.
- Position the Bucket: Place the bucket on the second step of your pool stairs, or right on the edge of the deck if your pool doesn’t have stairs. The goal is to submerge the bottom of the bucket in the pool water so that the water inside the bucket matches the pool water’s temperature.
- Mark the Water Lines: Use a piece of electrical tape or a dark wax pencil to mark the water level inside the bucket. Then make a second mark on the outside of the bucket to record the pool’s current water level.
- Wait it Out: Leave the bucket exactly where it is for 24 to 48 hours. Make sure to turn off your pool pump and any auto-fill valves during this time. Keep everyone out of the pool to avoid splashing.
- Compare the Results: After the waiting period, check your marks.
Interpreting Your Bucket Test
If the pool water level has dropped significantly more than the water level in the bucket, you almost certainly have a leak into the pool or the pool house plumbing lines.
If both water levels dropped at the same rate, you can breathe a sigh of relief. Evaporation is the main cause of your water loss.
Always view the bucket test as your very first diagnostic step when trying to find a leak in the pool house plumbing. It saves you from chasing ghosts!
Check for Visible Plumbing Leaks Inside the Pool House
If your bucket test confirms a leak, or if you notice issues specifically related to the pool house’s fresh water supply (such as sinks and toilets), it is time to move indoors.
What to Look For Inside the Structure
Walk into your pool house and do a slow, methodical sweep. You are looking for very specific clues:
- Wet spots, spreading water stains, or peeling paint on the walls and ceilings.
- Active drips coming from exposed pipes, toilet intake valves, or washing machine hose connections.
- Warped baseboards or lifted floorboards.
The Paper Towel Trick
Sometimes a leak is so slow that you cannot see the water drip. Grab a completely dry paper towel or a soft tissue. Run the dry paper towel firmly around all the pipe joints, under the sink P-traps, and around the base of the toilet. If the paper towel comes away damp, you have found a micro-leak.
Beware of Condensation
Pool houses get humid. It is very common for cold-water lines to sweat, creating condensation that drips onto the floor and mimics a plumbing leak. If you wipe a pipe dry and the moisture slowly fogs back up across the whole surface, it is likely just condensation. If water beads up at a single joint, it is a leak.
Key Areas to Inspect
- Get down on your hands and knees and look under all sinks and inside storage cabinets.
- Inspect the exact spots where plumbing lines enter the drywall or disappear into the floor.
- Look for rust, green copper corrosion, or crusty white mineral buildup on metal fittings—these are scars left behind by long-term, slow leaks.
Pro Tip: If you find a small drip or a damp spot, mark the exact location with a wax pencil or brightly colored tape. That tiny step will be a huge help to you or your professional plumber later on.
Remember, you do not need expensive, high-tech tools to spot an obvious, visible leak. This is a highly rewarding DIY step in finding a leak in the pool house plumbing.
Perform a Dye Test Around Critical Plumbing Points
Let’s say you know there is a leak, but you cannot find any obvious wet spots inside the pool house or at the equipment pad. The leak might be hidden underwater, right where the pool lines connect to the systems that feed the pool house. This is where the dye test comes in.
What is a Dye Test?
A dye test uses heavily concentrated, brightly colored dye to track water movement. Because water naturally pulls out of cracks or holes, the dye will follow the flow, leading your eyes straight to the invisible leak.
How to Do a Dye Test Safely
- Gather Your Supplies: Purchase a pool-safe leak detection dye syringe from a local pool supply store. If you are in a pinch, dark red or blue liquid food coloring works incredibly well.
- Calm the Water: Turn off the main pool pump. The water needs to be as still as glass for this to work. You do not want artificial currents blowing your dye away.
- Apply the Dye: Get into the pool (or lean over the edge) near the suspected leak. Slowly and gently squeeze a few drops of dye about an inch away from the suspected joint, valve, or fitting.
- Watch the Magic Happen: Keep a close eye on the cloud of color. If there is no leak, the dye will hang in the water and slowly dissipate. If there is a leak, you will see a sharp, distinct line of dye being aggressively sucked right into the crack or gap.
Common Trouble Spots to Test
You will want to squirt dye around the edges of the skimmer box, inside the return jets, and down by the main drain. You should also test around any union couplings or valve stems near the pool house wall if they happen to be submerged.
This method is incredibly useful for detecting issues in below-deck or hidden plumbing that feeds directly into the pool house systems.
Safety Note: Never try to flush out lines using harsh chemicals, and absolutely never point a high-pressure washer near electrical equipment or the delicate siding of your pool house walls while searching for leaks. Keep it gentle and controlled.
Consider a Pressure Test for Plumbing Lines
If the bucket test confirms a leak, but the dye test shows nothing, the problem is likely hiding deep inside the underground pipes connecting the pool to the pool house. To find this, you have to move to an advanced diagnostic step: pressure testing.
What is a Pressure Test?
Pressure testing is a professional-level method used to detect invisible leaks in long stretches of pool plumbing, including the pipes serving the pool house water features.
Here is a brief breakdown of how the process works: First, a technician will isolate each plumbing line (separating the suction, return, and drain lines). Then, they use special inflatable plugs to seal the ends of the pipes. Next, they attach a specialized pressure gauge to the line and pump it full of compressed air or pressurized water.
Once the pipe is pressurized to a specific PSI (pounds per square inch), they turn off the air and watch the gauge. If the pressure holds steady, that pipe is totally fine. If the pressure needle slowly drops, it indicates that air or water is escaping through a hidden crack or a broken, glued joint along that line.
Why You Should Proceed with Caution
While you can rent pressure testing equipment, this step is most often performed by licensed pool technicians or professional plumbers.
If you are not entirely comfortable handling pressurized systems, reading complex gauges, or working around potentially dangerous gas and electrical lines, this is the exact moment when you should call an expert. Over-pressurizing an old PVC pipe can cause it to shatter underground, turning a minor leak into a massive, expensive excavation project.
Think of pressure testing as the advanced phase of finding leaks in the pool house plumbing. It perfectly bridges the gap between your weekend DIY checks and full-scale professional repair services.
Listen for Hidden Leaks (Using Tools or Intuition)
Water under pressure makes noise. When water forces its way out of a tiny crack in a pipe, it vibrates the surrounding material, creating sound waves. Sometimes, the secret to finding a hidden pool house plumbing leak—whether it is buried underground, trapped inside a wall, or hidden under a concrete deck—is to shut up and listen.
Using Your Intuition and Basic Tools
Pick a quiet time of day, ideally early in the morning or late at night. Turn off the pool pump, the pool house AC unit, and any background music. Walk the path between your pool and the pool house. Lean close to the walls and listen intently for a faint hissing, spraying, or rhythmic dripping sound near plumbing exits.
You can also use a remarkably simple trick: the screwdriver stethoscope. Take a long, flathead screwdriver. Press the metal tip directly against a plumbing valve or a pipe protruding from the wall. Press your ear firmly against the hard plastic handle. The metal shaft will amplify water vibrations, allowing you to “listen” directly to the inside of the pipes.
Professional Listening Gear
If your screwdriver trick doesn’t work, don’t worry. Professionals use highly sensitive acoustic leak-detection equipment. These look like high-tech headphones attached to ground microphones. A plumber can walk over your solid concrete deck, and the microphone will pick up the exact sound of water spraying underground, pinpointing the leak down to the square inch.
We strongly encourage you to call a technician if you suspect a hidden leak but cannot locate it visually or with basic listening tests.
Listening carefully and using simple, everyday tools can absolutely be a vital part of learning how to find a leak in pool house plumbing on your own.
When to Call a Professional for Pool House Plumbing Leaks
We love a good DIY project, but there is a clear line between weekend maintenance and a plumbing disaster waiting to happen. Knowing when to step back and hand the reins to a professional is crucial.
When DIY is Not Enough
You should pick up the phone and call a licensed plumber or pool technician in the following situations:
- The leak is located deep under the pool deck: Unless you own a jackhammer and know how to pour concrete, leave underground pipe replacement to the pros.
- You see major structural damage: If your pool house foundation is sinking or the walls are rotting, a plumber needs to stop the water supply, and a contractor needs to assess the building’s safety.
- Electrical issues are present: If you see puddles near the breaker box, or if your pool lights are flickering, stop immediately. Water and electricity require certified professionals.
- You face recurring problems: If you patched a pipe last month and it is leaking again today, your temporary fixes are failing. It is time for a permanent solution.
The Professional Advantage
What does a professional do differently? First, they bring advanced leak-detection tools (like thermal imaging cameras, acoustic sensors, and sonar) that can detect leaks without tearing up your yard. Second, they provide accurate, upfront repair estimates and a clear timeline to get your pool house back in working order. Finally, they offer service warranties, giving you peace of mind that if the pipe breaks again, they will return to fix it.
If you are feeling overwhelmed, do not hesitate to reach out. Our team specializes in comprehensive pool-house plumbing inspections, pinpoint leak detection, and long-lasting repairs. We take the guesswork out of the process.
Simple DIY Fixes vs. When to Leave It to the Pros
Understanding how to find a leak in pool house plumbing is only half the battle. The other half is deciding who will fix it.
Some plumbing problems are incredibly simple and can be solved in under 5 minutes. Others require permits, heavy machinery, and years of training. Making the wrong choice can void your equipment warranties and lead to bigger messes.
Here is a handy breakdown of what you can tackle yourself, and what you should absolutely leave to a professional.
Quick Fix Reference Guide
Plumbing IssueRecommended Action (DIY vs. Pro)Difficulty Level
Loose hose connection on the pump. DIY Fix: Hand-tighten the union nut or use a strap wrench. Do not over-tighten! Very Easy
Dripping sink pipe inside pool house DIY Fix: Tighten slip-joint nuts under the sink or replace the rubber washer. Easy
A worn O-ring on the pump lid is causing air to leak. DIY Fix: Remove the old O-ring, apply silicone pool lube to a new one, and replace. Easy
Hairline crack in exposed PVC pipe DIY Fix (Temporary): Clean the area, dry it completely, and apply a waterproof marine epoxy or silicone sealant. Medium
Broken PVC pipe buried underground. Call a Pro: Requires digging, cutting, priming, and gluing new PVC lines under pressure. Hard
Crack in the actual pool shell or slab. Call a Pro: Requires structural assessment, specialized hydraulic cement, or resin injection. Expert
A leak is occurring near the electrical panel. Call a Pro: Hazard. Requires shutting down the main power and certified repair. Dangerous / Expert
Embrace the easy fixes! Replacing a worn O-ring can save you $150 in service call costs. But respect the complex repairs. Working on gas lines for a pool heater or tearing up concrete to fix an underground pipe requires professional expertise.
Remember, knowing how to find a leak does not obligate you to fix it yourself.
How to Prevent Future Leaks in Pool House Plumbing
Once you have gone through the stress of finding and fixing a leak, you will never want to do it again. The best way to deal with plumbing leaks is to stop them before they even start.
Your Preventive Maintenance Checklist
Establishing a routine is the key to plumbing health. Follow this checklist to keep your pool house dry and safe:
- Regular Visual Inspections: Make it a habit to inspect all visible plumbing inside and around the pool house once a month. Catching a tiny drip early prevents a massive flood later.
- Manage Your Landscaping: Keep aggressive plants, shrubs, and large trees far away from your underground plumbing lines. Seeking water, tree roots can easily crush or pierce PVC pipes.
- Be Gentle with Hardware: When doing routine maintenance, avoid over-tightening valves, threaded fittings, and pump lids. Over-tightening cracks the plastic housings. Hand-tight is usually just right.
- Schedule Routine Checkups: Hire a professional to conduct a thorough plumbing inspection every 1 to 2 years. They can spot wear and tear that the untrained eye will miss.
Seasonal and Material Considerations
If you live in a climate with harsh winters, properly winterizing your pool house is non-negotiable. Failing to blow the water out of your lines before the first freeze will cause ice to expand and shatter your pipes. Always check for freeze-thaw damage first thing in the spring.
Furthermore, if you are doing upgrades or renovations, insist on using high-quality fittings and durable materials. Cheap plastic degrades quickly under harsh UV sunlight and pool chemicals.
Think of us as your long-term maintenance partner. We can help you implement these preventive measures so you can spend less time worrying about leaks and more time enjoying your pool house.
Real-Life Example: Catching a Leak Before Disaster Strikes
Let’s look at a real-world scenario to show how all these steps come together.
Meet the Johnson family. Last summer, Mr. Johnson noticed two strange things: his monthly water bill had jumped by nearly $60, and a dark, soft water stain was slowly climbing up the exterior wall of his beautiful new pool house.
Instead of ignoring it, he decided to figure out how to find a leak in the pool house plumbing using simple methods.
First, he ran the Bucket Test on the pool. After 24 hours, the bucket and the pool had lost the same amount of water. This told him the pool itself was fine.
Next, he went to Step 2 and isolated the plumbing. He shut off the water valve feeding the sinks and toilet inside the pool house. He then walked to his front yard and checked his main water meter. The little red triangle on the meter stopped spinning the second he shut off the pool house valve. He had found his culprit! The leak was definitely in the fresh water line feeding the pool house.
Mr. Johnson went inside and used the paper towel trick under the sinks and around the toilet, but everything was bone dry. The leak was hidden inside the wall cavity behind the dark stain.
Knowing this was beyond a simple DIY fix, he called a professional plumber. Because Mr. Johnson had already done the diagnostic work, the plumber knew exactly where to look. They carefully opened a small square of drywall and found a pinhole leak in a copper pipe joint. The plumber repaired the joint in under an hour.
Because the homeowner acted quickly and systematically, he prevented a massive mold outbreak, saved his drywall from total ruin, and got his water bill back to normal immediately.
Final Checklist: How to Find a Leak in the Pool House Plumbing
If you suspect a problem, do not panic. Simply follow this easy-to-read checklist to track down the issue systematically:
- Do a visual walk-through: Check the pool house interior, exterior, and the equipment pad for drips, puddles, and water stains.
- Isolate pool plumbing from the main house: Turn off valves to see if your main water meter stops spinning.
- Perform the bucket test: Compare pool water loss to a bucket of water to rule out natural evaporation.
- Inspect visible plumbing: Use a dry paper towel to check for hidden moisture on joints, sinks, and valves.
- Conduct a dye test: Gently squeeze pool-safe dye near submerged fittings, skimmers, and return jets to spot suction leaks.
- Listen for hidden leaks: Turn off the noise and listen for hissing, or use a screwdriver to listen to vibrations in the pipes.
- Consider a pressure test: If the leak is underground, hire a technician to isolate and pressurize the lines.
- Call a professional: Do not hesitate to call for help if the leak is hidden, requires concrete removal, or involves electrical systems.
- Implement preventive maintenance: Keep roots away, winterize your pipes, and schedule annual checkups.
How to Find Leak in Pool House Plumbing: FAQ
What are common signs of a pool house plumbing leak?
Look for rising water bills, wet spots or damp walls, puddles near the equipment pad, reduced water pressure, unusual sounds near pipes, and a faster-than-normal drop in pool water level.
How can I quickly check if my pool is leaking?
Perform the bucket test by comparing water loss in a bucket of pool water to the pool itself over 24–48 hours. More loss in the pool means a leak.
Can I find leaks myself or do I need a professional?
You can spot visible leaks, run the bucket and dye tests, and listen for sounds yourself. For hidden or underground leaks, or if you’re unsure, call a professional.
How do I isolate pool house plumbing from the main house?
Turn off the water supply to the pool house and check if your main water meter stops moving. This helps confirm if the leak is in the pool house plumbing.
What tools do I need to find a leak?
Basic tools include a flashlight, paper towels, leak detection dye or food coloring, and optionally a screwdriver for listening to pipes.
When should I call a plumber for pool house leaks?
Call a pro if the leak is underground, near electrical systems, causing structural damage, or if DIY methods don’t locate the problem.
How can I prevent future leaks?
Regularly inspect visible plumbing, keep tree roots away, avoid over-tightening fittings, schedule professional inspections, and winterize pipes in cold climates.