Maybe guests are coming over. Maybe your week got away from you. Or you may be tired of the mess building up in every room and want a real reset without giving up your whole weekend.
If that sounds familiar, you are not alone.
A full deep clean often feels like a giant project. You start in one room, get distracted by another, and before long, you have moved a pile of clutter from one chair to another and somehow spent an hour doing almost nothing. That is exactly why having a plan matters.
The good news is this: learning how to clean a house in 4 hours deep is absolutely possible when you stop cleaning randomly and start cleaning with a timer, a simple system, and a room-by-room order that actually works.
Essential Tools and Supplies for Your 4-Hour Deep Clean

Before you start, make sure everything you need is in one place. This may sound small, but it makes a huge difference. One of the fastest ways to lose momentum is to stop in the middle of cleaning and go hunting for paper towels, a scrub brush, or trash bags.
When you are trying to figure out how to deep-clean a house in 4 hours, preparation is part of the process. The more organized your supplies are, the faster and smoother your whole cleaning session will feel.
Your Must-Have Cleaning Kit
You do not need a closet full of products. Most homes can be deep-cleaned with a few reliable basics.
Here is a simple cleaning kit that works well for a 4-hour house blitz:
- Microfiber cloths for dusting, wiping, and polishing
- All-purpose cleaner for most hard surfaces
- Glass cleaner for mirrors and windows
- Vacuum with attachments for floors, corners, upholstery, and vents
- Broom and mop for hard floors
- Scrub brush or sponge for bathrooms and kitchen grime
- Magic eraser or melamine sponge for marks on walls, switches, and doors
- Trash bags for decluttering and quick disposal
- Rubber gloves to protect your hands
- Timer or phone timer app to keep you moving
- Baking soda for deodorizing and stain lifting
- White vinegar for mineral buildup and tile cleaning
- Paper towels or reusable pads for quick cleanup jobs
If you keep these items together in a caddy or bucket, you can move from room to room without wasting energy.
Budget vs. Pro Cleaning Kit
You can deep clean effectively on almost any budget. The difference usually comes down to speed, convenience, and how much scrubbing you want to do yourself.
Item Category Budget Kit Approx. $20–$35Pro Upgrade Approx. $80–$120Best For
Cloths and Wipes Basic microfiber pack Premium microfiber cloth set Faster streak-free wiping.
Cleaner, Generic all-purpose spray, Multi-surface concentrated cleaner, Better coverage and stronger degreasing.
Vacuum Basic upright or stick vacuum High-suction vacuum with attachments Faster dust pickup and furniture cleaning.
Scrubbing Tools: Standard sponge and brush, drill brush set, or ergonomic scrub tools. Bathroom and grout cleaning
Mop, Basic spray mop, or string mop. Reusable flat mop system. Quicker floor cleaning.
Specialty Add-ons: None, Magic erasers, lint roller, crevice tools, Better detailing in less time
The budget kit works. Truly. But if you deep-clean regularly, some upgrades can save time and reduce effort.
Eco-Friendly Swaps That Still Work
If you prefer a greener routine, you can still do a strong, deep clean without harsh chemicals. In many cases, simple ingredients work surprisingly well.
White vinegar helps break down water spots and soap scum.
Baking soda absorbs odors and lifts stains.
Reusable microfiber pads cut down on paper waste.
Refillable spray bottles help you avoid buying plastic over and over.
That said, natural does not always mean risk-free. Vinegar works great on many surfaces, but it is not ideal for natural stone like marble or granite. Always match the product to the surface.
Safety Notes You Should Never Skip
Fast cleaning should still be safe cleaning.
Never mix bleach with vinegar, ammonia, or other cleaners. That can create dangerous fumes. If you use any strong product, keep the room ventilated by opening a window or turning on the exhaust fan.
Wear gloves if your skin is sensitive. If you are using sprays in bathrooms or kitchens, give surfaces time to air out before staying in a closed room too long.
A good rule is simple: read labels, open windows, and keep it basic.
Set Yourself Up to Win
One reason people struggle with quick house cleaning is not the dirt itself. It is the constant stopping and starting. You walk into the bathroom, realize you forgot glass cleaner, go back to the kitchen, notice the dishes, start rinsing them, and suddenly your whole plan disappears.
Before you begin, gather everything into one portable kit and place it near your first room.
That one move makes it much easier to master how to deep clean a house in 4 hours without losing your rhythm.
Step-by-Step 4-Hour Schedule: How to Deep Clean a House in 4 Hours
This is the heart of the whole method.
The biggest secret to a fast, deep clean is not cleaning harder. It is cleaned in the right order. You want to remove clutter first, hit the dirtiest surfaces early, and work from top to bottom so you do not clean the same thing twice.
The schedule below gives you a clear path. Stick to the timer as closely as possible. The timer is what keeps a deep clean from turning into an all-day project.
30-Minute Prep Blitz – Declutter and plan
The prep phase sets the tone for the next three and a half hours. If you skip it, every room will take longer.
Minute 0–10: Do a Global Declutter Sweep
Walk through the main areas of your home with a trash bag and a basket or bin.
Pick up obvious trash first. Think of wrappers, junk mail, empty bottles, old receipts, and broken items that do not need more thought. Then grab anything that clearly belongs in another room and drop it into your basket. Do not stop yet; fully organize first. This is a speed round.
Use the one-touch rule. That means when you pick something up, decide right away: throw it away, put it in the basket, or place it where it belongs.
This simple rule helps you avoid touching the same item three or four times.
Minute 10–20: Pre-Soak and Pre-Treat
Now do the jobs that need sitting time.
Fill the kitchen sink with hot, soapy water if dishes need soaking. Spray the stove, microwave, bathroom shower, toilet bowl, and any visibly grimy spots that need a few minutes to loosen dirt.
This is one of the smartest tricks in quick house cleaning. Let the cleaner do some of the work while you move on to other tasks.
If your trash cans are full, empty them now. If laundry is piled up, start one load with towels or bedding if that fits into your plan.
Minute 20–30: Gather Supplies and Set Your Route
Now place your supplies where you can reach them quickly. Decide the order of your rooms. A good route is:
Kitchen, bathroom, living room, bedroom, hallways, and entryway.
That path works well because it starts with the rooms that usually need the heaviest cleaning and ends with the areas people notice during a walkthrough.
Here is a fast prep checklist you can follow before the real room-by-room cleaning starts:
- Throw away visible trash
- Collect clutter into one basket
- Start soaking dishes or greasy surfaces
- Spray bathroom and kitchen trouble spots
- Empty full trash bins
- Open windows if the weather allows
- Put on gloves if needed
- Set out your vacuum, mop, and cloths
- Choose your room order
- Set your first 30-minute timer
That is it. You are ready to move.
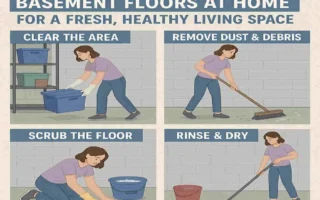
Room-by-Room Deep Clean Blitz
This is where your home changes fast.
The key is to stay focused on high-impact tasks. You are not organizing every drawer or detailing every hidden shelf. You are doing a practical deep clean that tackles visible mess, grime, dust, and odor while improving the feel of the whole room.
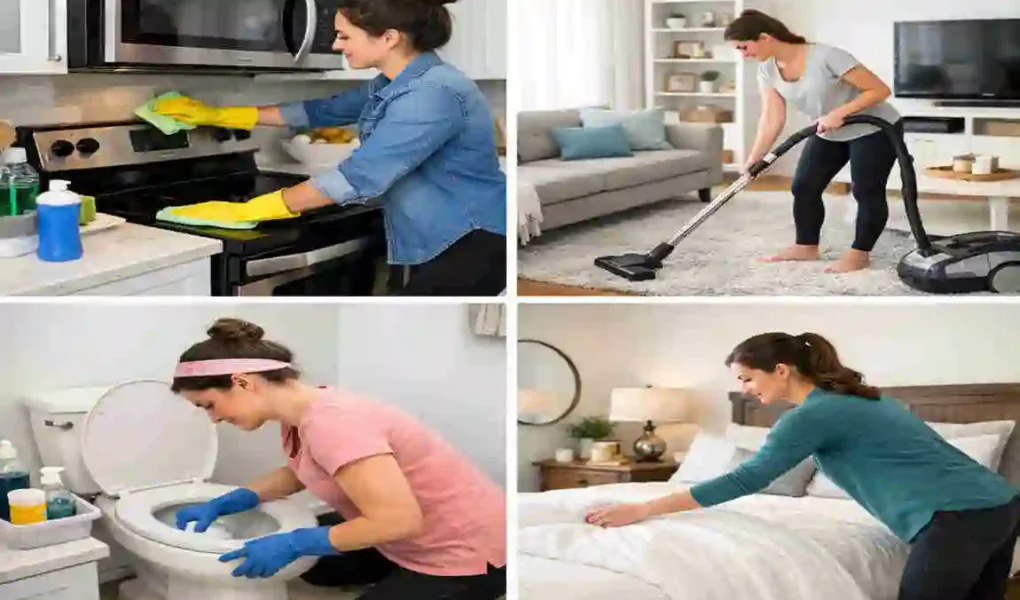
Kitchen Deep Clean – 30 Minutes
The kitchen is often the messiest room, but it also gives one of the fastest visual rewards when cleaned well.
Minutes 0–10: Counters and Appliances
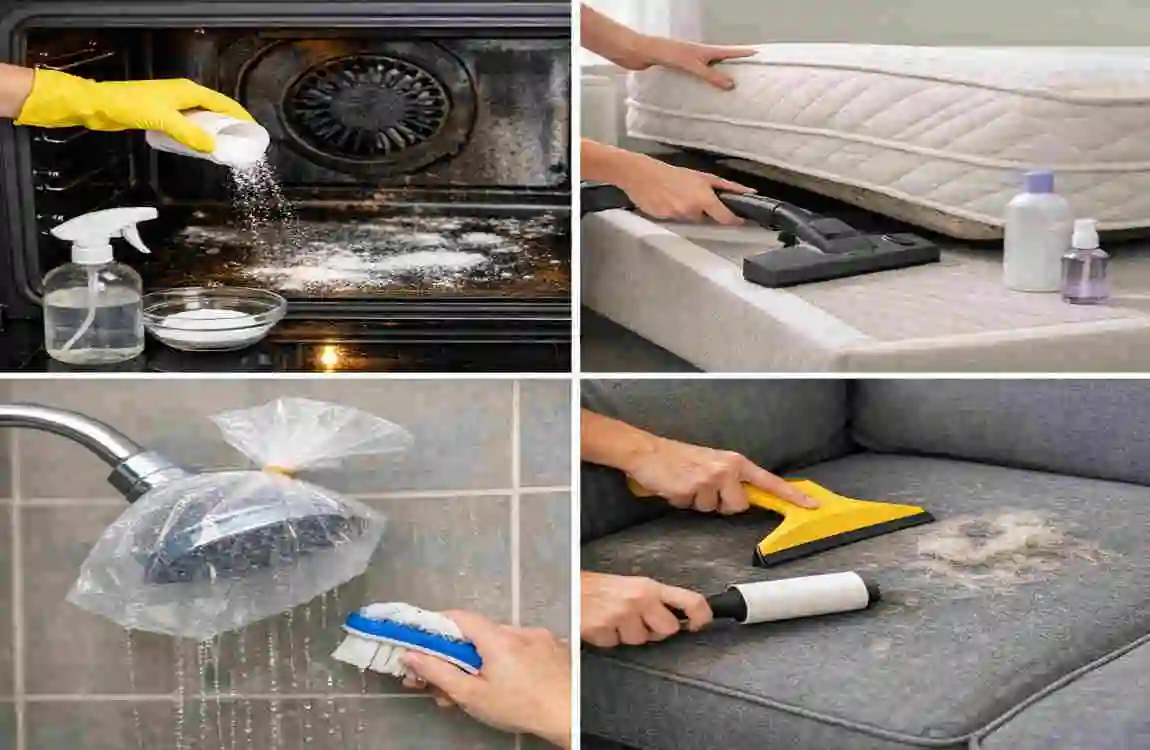
Start at the top and work your way down. Clear the counters fully if possible. Wipe down cabinets, backsplashes, and small appliances. Then clean the microwave inside and out. If there is baked-on splatter, heat a bowl of water for a minute first to loosen it.
Move to the stove. Spray the surface, knobs, and any greasy spots. Wipe crumbs and food bits into the trash. If the stovetop needs extra attention, use a baking soda paste and let it sit for a few minutes before wiping it down.
Do not forget refrigerator handles, cabinet pulls, and light switches. These spots collect fingerprints and grease fast.
Minutes 10–20: Sink and Floors
Now return to the sink. Drain the soaking water, scrub the basin, and rinse well. Wipe down the faucet and the surrounding area. A shiny sink makes the whole kitchen look cleaner.
Sweep or vacuum the floor next. Pay attention to edges, corners, and the space under the table. If time allows, mop high-traffic areas. Start from the farthest corner and work backward toward the door.
Minutes 20–30: Fridge Quick-Purge
Open the fridge and move fast. Toss expired food, wipe obvious spills, and straighten the shelves. You do not need to remove everything. Focus on what is visible and sticky.
This quick purge cuts odors and makes the space feel fresh without eating up your whole cleaning window.
A common mistake in kitchen deep cleaning is ignoring grout, corners, and the area around the trash can. You do not need perfection, but do not skip the spots your eye catches first.
If you are serious about cleaning a house in 4 hours, the kitchen should feel cleaner, brighter, and less crowded by the end of this half hour.
Bathroom Blitz – 30 Minutes
Bathrooms may be small, but they can hold a lot of grime. The good news is they respond well to a fast and focused deep clean.
Minutes 0–10: Toilet and Shower
Because you pre-sprayed earlier, the dirt should lift faster now. Start with the toilet. Clean the bowl, rim, seat, lid, base, and handle. Move quickly but thoroughly.
Next, scrub the shower or tub. Focus on soap scum, faucet buildup, and corners. If hard water stains are present, let vinegar or your bathroom cleaner sit a little longer before wiping.
Even if you do not scrub every inch, hitting the visible tile, glass, and fixtures will transform the room.
Minutes 10–20: Mirror and Sink
Spray and wipe the mirror until it is streak-free. Then clean the sink basin, faucet, countertop, and splash area. Remove toothpaste marks, hair, and product residue.
Take a few extra seconds to wipe the front of the vanity, drawer handles, and the top of the toilet tank. These spots are small but make the room feel polished.
If your bathroom has open shelving or a shower caddy, do a quick reset. Straighten bottles, toss empties, and wipe around them. It gives the space that clean, put-together look people notice right away.
Minutes 20–30: Floors and Towels
Pick up bath mats and dirty towels. Sweep or vacuum the floor, especially around the toilet and corners. Mop quickly. If the drain smells foul, sprinkle a little baking soda and rinse with hot water later.
Finish by hanging fresh towels and replacing the trash liner.
A clean bathroom does not just look better; it feels better. It smells cleaner and feels healthier. That is why this room matters so much in any room-by-room cleaning plan.
Living Room Rapid Refresh – 30 Minutes
Your living room is where clutter tends to collect quietly. Blankets pile up, shelves get dusty, remotes disappear, and crumbs settle where you do not notice them until the light hits just right.
Minutes 0–10: Dust and Vacuum
Start high. Dust ceiling fans, vents, curtain rods, and shelves first. Then move down to tables, media stands, frames, and lamps.
Use a lint roller on lampshades if they are dusty. It is faster than trying to wipe fabric clean and works surprisingly well.
Vacuum the main seating area, under cushions if needed, and visible floor space. If you have pets, use an upholstery attachment on couches and chairs.
Minutes 10–20: Surfaces and Shelves
Now reset the room. Fold blankets, stack magazines, throw away clutter, and gather items that belong elsewhere. Wipe coffee tables, side tables, and remote controls.
If your shelves are crowded, do not try to restyle everything. Just dust, remove obvious clutter, and line up the remaining items. A little order goes a long way.
This is also a good time to carefully wipe smudges from TV screens, if your cleaner is safe for them, or use a dry microfiber cloth.
Minutes 20–30: Upholstery and Finishing Touches
Spot-clean stains on upholstery if needed. A light sprinkle of baking soda can help freshen fabric and absorb odor, especially if you vacuum it up afterward.
Straighten pillows, open curtains, and let in light. If your floor still looks dull, do one more quick vacuum path across the center of the room.
The living room should feel open by the end of this stage. That is the goal. Not perfect. Just clearly refreshed.
Bedroom Deep Dust – 30 Minutes
A bedroom clean-up can make your whole home feel calmer. It is the room where visual clutter affects your mood more than you may realize.
Minutes 0–10: Strip Bedding and Dust
Remove old bedding if you are changing it. If fresh sheets are ready, put them on quickly after dusting. If not, at least smooth and reset the bed neatly.
Dust the room from top to bottom. Hit headboards, nightstands, lamps, dressers, window sills, and any flat surfaces. Bedrooms gather fine dust fast, especially around fabric and under beds.
If you have time, do a quick mattress check and rotate or flip it if needed. That is a nice bonus, not a must.
Minutes 10–20: Closet Purge and Surface Reset
Do not deep organize your closet. That will eat your time. Instead, use the five-item rule. Pick five things you no longer wear, need, or use, and set them aside for donation. That one habit keeps clutter from growing while staying realistic during a fast clean.
Put away shoes, clear the dresser top, and return loose items to their places. Dirty clothes go straight into the hamper.
This small reset quickly restores a sense of order.
Minutes 20–30: Windows, Baseboards, and Floor
Wipe mirrors and windows with glass cleaner or a dry microfiber cloth. Dust the baseboards if they are visibly dirty. You do not need to detail every inch, but a quick pass around the room helps a lot.
Vacuum or sweep the floor, especially around the bed and in corners. If vents are dusty, a used dryer sheet can pick up lint and leave a slightly fresher smell.
By the end of this half hour, your bedroom should feel quieter, lighter, and easier to relax in.
Hallways, Entryway, and Quick Multi-Purpose Areas – 30 Minutes
These spaces are easy to ignore because they are transitional. But they matter. They connect every room, and they are often the first thing people see when they walk in.
Minutes 0–10: Entryway Reset
Start with the door, doormat, and any visible shoe pile. Wipe fingerprints from the front door, light switches, and handles. Straighten coats, bags, or baskets.
If your entryway has a console table or bench, clear it off and wipe it down. The goal is to create an immediate sense of order.
Minutes 10–20: Hall Surfaces and High-Touch Spots
Wipe baseboards if needed. Dust frames, ledges, and narrow shelves. Clean obvious smudges from walls. A magic eraser works well for this, but test carefully first.
Hallways usually do not need intense scrubbing. What they need is a visual reset. Remove random items that drifted there and clean what people actually notice.
Minutes 20–30: Final Vacuum Paths and Stairs
Now connect the whole house. Vacuum or sweep the walkways between rooms. If you have stairs, start at the top and work down so dust does not fall onto already-clean steps.
This part ties the entire cleaning session together. Even if individual rooms are not perfect, clean pathways make the whole home feel finished.
That is one of the smartest parts of learning how to clean a house in 4 hours deep. You are not just cleaning rooms. You are creating a consistent, clean feeling from one space to the next.
Final 30 Minutes – Touch-Ups and Inspection
The last half hour is where your work starts to shine.
You have already done the hard part. Now you move through the house one more time to catch details, add freshness, and make sure each room feels complete.
Walk Through with Fresh Eyes
Step into each room as if you are seeing it for the first time. Look for anything that stands out right away.
Maybe there is a streak on the mirror. The trash bag may still be sitting by the door. The couch pillows need straightening. Small details like these have a big impact.
This is not the time for a new project. Do not open a junk drawer. Do not start reorganizing under the sink. Just finish what is visible.
Air Out the House
Open windows for a few minutes. Fresh air helps remove chemical smells, cooking odors, and stale indoor air. It instantly makes the home feel more alive.
If you like, add a gentle scent by lighting a candle later, using a diffuser, or simply placing clean linens in the room. You do not need an overpowering fragrance. Clean should smell fresh, not heavy.
Do a Spotless Home Victory Lap
Wipe away any remaining fingerprints from the doors, fluff the pillows, fold the throws, and check that the floors are dry and clear.
Take out one final bag of trash. Replace hand towels if needed. Make sure the sink is empty, and the kitchen counters stay clear.
This final pass matters because it changes the feeling from “mostly cleaned” to “finished.”
And that is the whole method. You now have a full, working system for deep cleaning a house in 4 hours without spiraling into chaos or losing your whole day.
Pro Hacks to Speed Up Your Deep Clean
Once you have done this method once or twice, it becomes much easier. You will start to notice where you tend to lose time and where you can move faster.
Here are some practical ways to make the process even smoother.
Use a Playlist or Audio Timer
Music helps with pace. A strong cleaning playlist can keep your energy up and stop you from drifting. Some people like to use 30-minute playlists for each room so the music becomes the timer.
If you prefer structure, use a phone timer with labeled blocks for each room. That keeps you moving even when a task gets annoying.
Clean Top to Bottom, Always
This is one of the biggest time-saving rules in any deep cleaning checklist.
Dust and debris fall downward. So if you vacuum first and dust later, you will create more work for yourself. Start high, then move lower, then finish with floors.
Carry Supplies, Not Individual Products
Use one caddy for everything. When supplies move with you, you waste less time and lose less focus.
Even a small tote with cloths, cleaner, gloves, and a scrub brush can make room-by-room cleaning much easier.
Avoid the Five Common Mistakes
A lot of cleaning frustration comes from the same few habits:
Cleaning without decluttering first.
You cannot clean surfaces well if they are covered in random items.
Starting too many rooms at once.
Finish one space before you mentally move to the next.
Cleaning bottom-up.
It leads to repeated work.
Spending too long on one stubborn spot.
Give it a fair effort, then move on. Progress beats perfection.
Using too many products.
More cleaning does not always mean more clean. It can leave residue and slow you down.
Adapt the plan for Bigger Homes.
If you live in a larger home or a two-story house, the same plan still works. You need to narrow your focus.
Choose the most used rooms first. Deep clean the main bathroom, kitchen, living room, primary bedroom, and entry. Leave guest rooms or less-used spaces for another day if needed.
You can also split the house into zones and repeat the 4-hour method on different days.
Add Seasonal Twists
In spring, focus more on dust, windows, vents, and allergens.
Before the holidays, pay closer attention to guest bathrooms, entryways, and living spaces.
If you have kids or pets, expect more floor cleaning, more fabric freshening, and more wiping of sticky, pawed, or smudged surfaces.
A 4-hour clean does not have to look the same every time. It just needs to follow a clear system.
FAQs: How to Deep Clean a House in 4 Hours
Is it really realistic to deep-clean a house in 4 hours?
Yes, for most homes, it is realistic to focus on high-impact cleaning rather than perfection. The goal is a practical deep clean of the most used spaces, not detailed organizing of every drawer and cabinet.
What if I have kids or pets?
You can still use this method. Just expect more time on floors, upholstery, smudges, and odors. If pet hair is heavy, vacuum soft furniture early. If kids leave clutter everywhere, spend a bit more time during the prep phase.
Can I use this plan in a small apartment?
Absolutely. In fact, apartments are often easier to deep-clean in 4 hours because they have less square footage. You may finish faster and use the extra time for laundry, balcony cleaning, or inside cabinets.
What are the best cleaners for hardwood floors?
Use a cleaner made for sealed hardwood, or a very lightly damp microfiber mop. Avoid soaking the floor. Too much water can damage wood over time.
What if my home is very messy?
If your house has a lot of buildup, treat this as a reset clean, not a final clean. Focus first on trash, dishes, bathrooms, and floors. Then schedule a second 4-hour session later for deeper detail work.
How can I maintain the results after the blitz?
A simple daily reset helps the most. Wipe kitchen counters, do a 10-minute evening pickup, keep laundry moving, and clean spills right away. Small habits protect the big clean.
What tools should I buy if I am on a tight budget?
Start with microfiber cloths, one all-purpose cleaner, glass cleaner, a scrub sponge, gloves, trash bags, and a reliable broom or vacuum. You do not need expensive products to get strong results.
How often should I do a 4-hour deep clean?
For many homes, once every month works well. If your household is busy, you may want a mini version every two weeks and a fuller deep clean once a month.