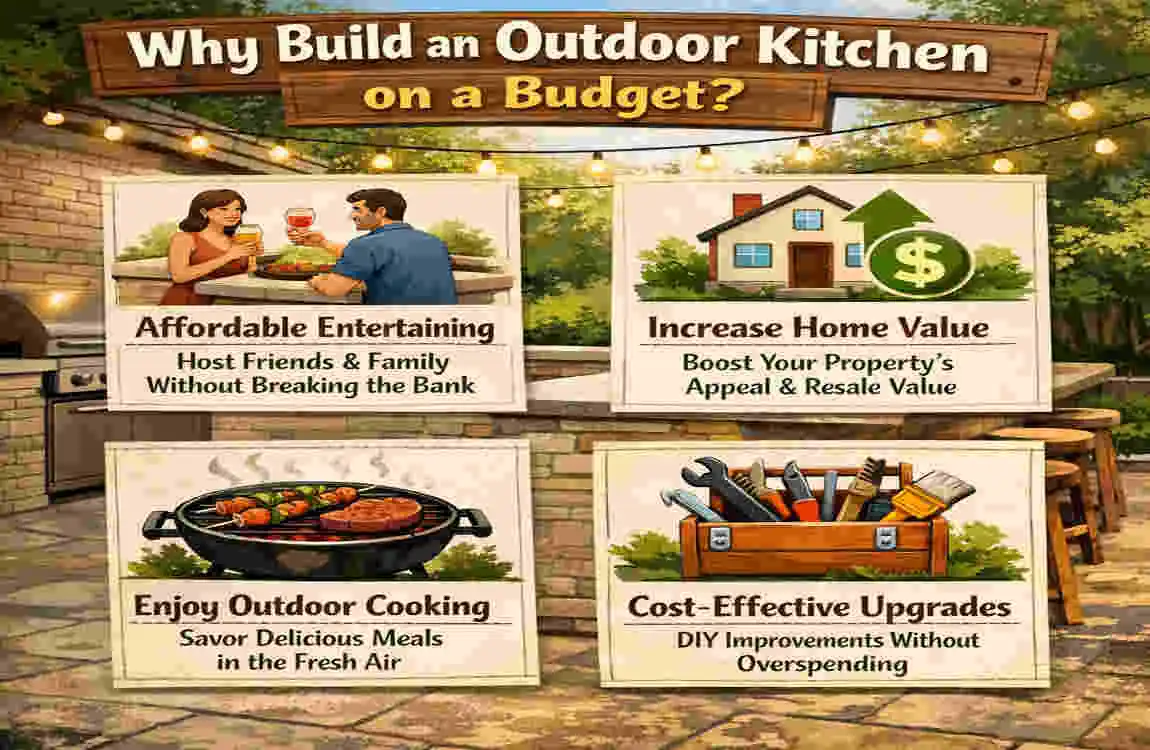
If you have been searching for how to build outdoor kitchen spaces without spending a lot, this guide will walk you through it in a clear, practical way. You do not need a luxury villa, a giant lawn, or a contractor-only budget. With smart planning, affordable materials, and a few DIY-friendly choices, you can create a space that looks beautiful and works well.
Why Build an Outdoor Kitchen on a Budget?
An outdoor kitchen is more than a grill sitting in the corner. It becomes a functional living space where cooking, serving, and gathering all happen in one place.
That matters because people today want homes that feel open, practical, and social. A good outdoor kitchen can help you enjoy your yard more often, host friends more comfortably, and reduce indoor heat during summer cooking.
It can also add value to your home. While returns vary by location and design, outdoor living upgrades often appeal strongly to buyers because they extend usable space. Even when resale is not your main goal, the lifestyle value is real. You get a place for family meals, Eid gatherings, birthday dinners, and quiet mornings.
The biggest myth is that building an outdoor kitchen always costs the same as a full indoor renovation. That is not true.
You do not need a 20,000-dollar setup to get a good result. A smaller layout, portable appliances, reclaimed materials, and a simple roof or shade can create a stunning space at a fraction of the price.
This also works for:
- Small yards
- Side patios
- Courtyards
- Rooftops
- Temporary or renter-friendly setups
In short, if you choose the right design and avoid expensive extras at the start, learning how to build outdoor kitchen spaces becomes much more affordable than most people think.
Planning Your Budget Outdoor Kitchen
Planning is the step that saves you the most money. A lot of people rush to buy a grill, tiles, or cabinets first. Then they realize the layout does not fit, the drainage is wrong, or the counter is too small.
Start with the plan, not the shopping.
Assess Your Space Carefully
Walk through your outdoor area and study it as a designer would. Measure the width and length. Look at walls, gates, water points, and electric outlets. Notice where the sun hits in the afternoon and where the wind blows smoke.
This part matters more than it seems.
For example, a grill station placed directly against a windy corner can become frustrating to use. A sink placed too far from a water source adds plumbing costs. A beautiful counter under direct afternoon sun may become too hot to touch in peak summer.
Use simple tools like a tape measure, graph paper, or a phone drawing app. You do not need advanced software. Even a rough hand sketch helps you understand how everything will fit.
Think about these questions:
- How many people will use the kitchen regularly?
- Will you mostly grill, fry, bake, or serve drinks and snacks?
- Do you need running water?
- Will you include storage?
- Do you want fixed seating nearby?
Set a Realistic Budget
Before you build anything, decide what “budget” means for you.
For one person, budget may mean a simple setup of 1,500 to 2,000 dollars. For another, it may mean keeping the project below 5,000 dollars while still adding counters, lights, and seating.
Here is a simple budget guide:
Component Budget Option Cost Estimate
Countertop Concrete pavers or tile top $200–$500
Grill / Cooking Unit Portable grill or built-in budget unit $300–$800
Sink Basic stainless sink with hose hookup $100–$250
Flooring Gravel or simple pavers $150–$600
Framing / Structure Cinder block or treated lumber $250–$900
Storage Open shelves or repurposed cabinets $100–$300
Seating DIY benches or stools $100–$300
Shade / Cover Shade sail or simple pergola $150–$600
Lighting Solar LEDs or string lights $50–$200
Total Basic Setup $1,500–$3,000
Total More Finished Setup $3,000–$5,000
This table helps you stay focused. It also prevents a common problem: spending too much on a single feature and running out of money for essentials.
Choose a Layout That Fits Your Budget
The layout changes everything.
A straight-line kitchen is the easiest and cheapest option. It works well along a wall or boundary line, keeping construction simple.
An L-shaped kitchen gives you more prep space and can feel more complete, but it costs more because it uses more material and often needs more planning.
A modular setup is another great budget option. You can start with one counter, one grill station, and one storage section. Later, when you have more money, you can add a sink, bar ledge, or extra cabinet.
Check Permits and Safety Rules
If you live in Lahore or elsewhere in Punjab, always check local building expectations before making anything permanent. Rules can vary by area, society management, and housing authority.
Here is a quick planning checklist:
- Confirm boundary wall rules
- Check gas line restrictions
- Ask about drainage discharge
- Keep cooking areas away from flammable materials
- Leave safe distance around the grill
- Confirm rooftop load limits if building above ground level
Do not skip this step. It is much easier to adjust a plan on paper than to rebuild part of the kitchen later.
Choosing Affordable Materials for Building an Outdoor Kitchen
The materials you choose decide three things: cost, durability, and maintenance.
If you are learning how to build an outdoor kitchen on a budget, focus on materials that can handle weather and still look good after regular use.
Best Countertop Options
Your countertop needs to resist heat, spills, and outdoor dust. It should also be easy to clean.
Concrete pavers are one of the best low-cost choices. They are affordable, easy to find, and work well for rustic or modern designs.
Outdoor tile is another budget-friendly option. Just make sure it is suitable for exterior use and installed on a stable base.
Butcher block looks warm and beautiful, but it usually needs more care outdoors. In hot and humid weather, it can wear faster unless sealed well and protected.
Best Flooring Options
Flooring does not have to be expensive to look attractive.
Gravel is often the cheapest option. It drains well and installs quickly, but it can move around underfoot.
Pavers give a more finished appearance and are still affordable. They are excellent for patios and work especially well in outdoor cooking areas.
Basic decking can also work, but it may cost more than gravel or pavers and usually needs maintenance over time.
Best Wall and Base Materials
Cinder blocks are a budget favorite for a reason. They are strong, easy to stack, fire-resistant, and good for base structures.
Stucco over block gives a cleaner and more polished look without pushing the budget too high.
Reclaimed wood can work for shelves, trim, or decorative fronts, but keep it away from direct heat and use weather protection.
Simple Roofing and Shade Solutions
A full roof is expensive, so many people start with shade instead.
A shade sail is affordable and modern-looking. It works well for patios and open yards.
A DIY pergola made from treated wood, metal pipe, or even PVC in very light-duty setups can create shade and visual appeal without a major budget jump.
Material Comparison Table
Material Best Use Pros Cons
Concrete pavers Countertops, flooring Cheap, durable, easy to replace Needs proper leveling
Outdoor tile Countertops, backsplashes Clean look, many styles Can crack if base shifts
Cinder blocks Base walls, frame support Strong, fire-safe, low cost Plain appearance unless finished
Stucco Wall finish Affordable, smooth finish Needs careful application
Reclaimed wood Shelves, decor, trim Warm look, low cost Needs sealing, not ideal near flame
Gravel Flooring Very low cost, good drainage Less polished look
Pavers Flooring, paths Durable and attractive Slightly higher labor
Shade sail Overhead cover Cheap, fast to install Not full weather protection
Buy Smart, Not Fancy
If you are in Lahore, you can often lower costs by sourcing from local hardware markets, tile shops, and salvage sellers rather than buying all-new showroom pieces. Compare prices, ask for bulk rates, and do not ignore clearance items.
Sometimes the best-looking outdoor kitchens are not built with expensive materials. They are built with smart combinations of simple materials used well.
Essential Tools and Supplies List
You do not need a workshop full of expensive gear to start building. Most budget outdoor kitchens use a basic set of hand tools and a few power tools.
The key is to buy what you will use again and rent what you only need once.
Must-Have Tools
Here are the most useful tools for building an outdoor kitchen:
- Tape measure for layout and spacing
- Level to keep surfaces straight
- Drill/driver for screws and assembly
- Circular saw or hand saw for cutting wood
- Shovel for digging and site prep
- Rubber mallet for pavers and leveling
- Trowel for mortar or concrete work
- Wheelbarrow or mixing tub for hauling materials
- Clamps for holding pieces in place
- Utility knife for trimming liner, fabric, or wrap
If you are pouring concrete or laying many blocks, renting a mixer may save time and effort.
Supplies You Will Likely Need
The exact supply list depends on your design, but most builds include:
- Gravel
- Sand
- Cement
- Cinder blocks or treated lumber
- Screws and anchors
- Metal brackets
- Tile adhesive or mortar
- Counter surface material
- Sink and faucet
- Hose connectors or plumbing fittings
- Exterior sealant
- Paint or stucco finish
- Lighting fixtures
Do Not Skip Safety Gear
A safe build is a smart build.
Wear gloves while handling blocks, wood, and metal edges. Use safety goggles when cutting or drilling. Wear a dust mask when sanding, mixing cement, or cutting tile.
Keep a basic first-aid box nearby and avoid working alone when lifting heavy items.
If you plan to use a gas line, electrical wiring, or a fixed plumbing connection, call a qualified technician for those specific parts. You can still save money by doing the framing and finishing work yourself.
Foundation and Framing – The Base of Your Outdoor Kitchen Build
A beautiful outdoor kitchen can fail quickly if the base is weak.
This is the part many beginners underestimate. They focus on tiles, decor, and appliances, but the real strength of the project starts below everything you see.
Prepare the Site First
Clear the area completely. Remove weeds, loose stones, old bricks, and soft soil. If the ground is uneven, level it as much as possible before you begin.
It also helps to lay a weed barrier if you are building on soil. This keeps grass and roots from growing up through gravel or paver joints later.
Try to create a slight slope for drainage. Water should move away from the kitchen, not collect under it.
Mark the Layout
Use stakes and string to mark the exact outline of the kitchen.
This lets you step back and check the size before you commit. Make sure you leave walking space in front of counters and enough room around the grill.
A useful rule is to allow at least comfortable standing and turning room, especially if more than one person may cook at the same time.
Build a Simple DIY Foundation
For many budget builds, a compacted gravel base with concrete footers works very well.
Follow these steps:
- Mark the outline of the kitchen frame.
- Dig trenches about 6 to 8 inches deep where the main support lines will sit.
- Add gravel and compact it firmly.
- Set form boards if needed for neat edges.
- Pour concrete footers using a simple mix ratio of 1:2:3 cement:sand:gravel.
- Check level and alignment before the mix sets.
- Let the concrete cure properly before adding weight.
If you are building on an existing patio slab that is still strong and level, you may not need full footers. But always inspect for cracks, sinking, or drainage problems first.
Choose Your Framing Method
For a budget project, the two most practical framing choices are:
Pressure-Treated Lumber
This is easier for many DIYers because cutting and screwing wood feels more familiar than masonry work.
Use treated wood rated for outdoor use. Build a simple rectangular frame, brace the corners well, and cover exposed sections with cement board or another weather-resistant layer before finishing.
Wood framing works best when it is kept off constantly wet ground and protected from direct flame.
Cinder Block Framing
Cinder blocks are one of the most affordable and durable options.
You can stack them to form the base, support counters, and create storage openings. They are also more fire-resistant than wood, which makes them especially useful near grills.
For many homeowners, this is one of the easiest ways to learn how to build outdoor kitchen structures that last.
Keep the Frame Practical
As you build the frame, plan space for:
- The grill opening
- Counter support
- Sink placement
- Shelf or cabinet space
- Gas cylinder storage if needed
- Ventilation openings around heat-producing appliances
Do not make the structure deeper or taller than necessary. Standard counter height usually feels most comfortable because it matches everyday cooking habits.
A Simple Tip That Saves Money Later
Before you close any frame, stand in front of it and act out the cooking motions.
Pretend to chop, turn, wash, and serve. This simple test tells you if the prep area is too tight, the grill is too close to the corner, or the sink is in an awkward place.
Small changes now can save a lot of regret later.
Installing Counters, Sink, and Appliances
Now the project starts to feel real.
This is the stage where your outdoor kitchen becomes something more than a structure. It becomes a working space.
Installing the Countertop
If you are using concrete pavers or outdoor tiles, the most important thing is a solid and level base.
Start by checking the top of your frame. Fix dips or uneven points before laying the surface. A small error here becomes very visible later.
Set pavers or tile carefully and keep the joints even. Use mortar or adhesive suited for outdoor use. Once the surface cures, seal the edges and top if the material requires it.
A slightly textured surface is often better outdoors because it hides dust better and is less slippery when wet.
If your budget allows only one major countertop area, place it next to the grill. Prep space beside the cooking zone is usually more useful than extra decorative space.
Adding a Basic Sink
A sink is helpful, but it does not need to be complicated.
For a simple budget build, many people choose a small stainless-steel sink with a hose-fed setup. This works well for washing hands, rinsing vegetables, and basic cleanup.
If you want a more permanent sink, plan for:
- Water supply
- Drain path
- Splash area
- Weather-resistant fittings
A simple freestanding or semi-fixed setup can give you most of the convenience without the cost of full plumbing work.
If freezing weather is rare in your area, maintenance is easier. However, you still need to protect fittings from leaks, direct sun damage, and loose connections.
Installing the Grill Station
The grill is usually the heart of the outdoor kitchen.
You can use a portable grill with a custom surround, or install a budget-built-in grill if your frame is designed for it.
No matter which option you choose, keep safety first.
Grill Safety Basics
- Use non-combustible material around the grill opening
- Leave clearance around heat zones
- Keep open flame away from curtains, wood trim, and plastic items
- Add ventilation if storing a gas cylinder nearby
- Never trap heat inside a tight enclosure
Gas grills are convenient and quick. Charcoal grills give a different flavor and often cost less upfront. The best choice depends on your cooking style and daily habits.
If you cook often and want convenience, gas may suit you better. If you mainly host occasional barbecues and want lower starting cost, charcoal may be the smarter option.
Wiring and Lighting on a Budget
Lighting makes a huge difference in how useful your kitchen feels at night.
The easiest budget option is solar LED lighting. It avoids complex wiring and helps you brighten pathways, counters, and seating areas.
String lights can create a warm atmosphere, while focused task lights near the grill make cooking safer.
If you need electrical outlets for blenders, mini-fridges, or other appliances, ask a qualified electrician to handle that part. Outdoor electrical work must be done carefully to avoid shocks, moisture issues, and long-term failure.
Simple Electrical Safety Tips
If you add power near the kitchen, remember these basics:
- Use outdoor-rated fixtures and outlets.
- Keep wiring protected from rain and direct splashes.
- Place lights where they help you work, not where they shine in your eyes.
- Avoid overloaded extension cords.
- Keep electrical points away from direct grill heat.
Think in Zones
One smart way to build an efficient kitchen is to divide it into zones:
- Cooking zone for the grill or stove
- Prep zone for chopping and serving
- Wash zone for sink and cleanup
- Storage zone for utensils, charcoal, and supplies
Even a small kitchen feels more premium when each task has a clear place.
Visual Transformation Ideas
If you want your space to look more finished without spending much, focus on a few details that create visual impact:
- Use one consistent countertop material
- Paint or stucco the base in a clean neutral color
- Add a simple backsplash strip
- Hide clutter with curtains or cabinet fronts
- Match stools, cushions, or planters for a coordinated look
This is often what turns a basic setup into a “stunning” one.
Adding Seating, Storage, and Finishing Touches
Once the main kitchen works, you can make it more inviting.
This part does not need a huge budget. In fact, some of the best finishing touches are low-cost and easy to add over time.
Budget Seating Ideas
You do not need expensive patio furniture to create a comfortable area.
Pallet benches are a popular DIY option. Add sanding, paint, and weather-resistant cushions, and they can look surprisingly polished.
You can also use simple metal stools, foldable chairs, or a narrow built-in bench along a wall. The goal is to create seating close enough for conversation, but not so close that it interferes with cooking.
Smart Storage That Saves Money
Storage keeps the kitchen useful.
Open shelves made from reclaimed wood or metal brackets work well for serving trays, spices, and tools. Wooden crates can become simple cubbies. Old cabinets can be refinished and reused if they are protected from weather.
Keep frequently used items easy to reach. Store flammable items carefully and away from heat.
Decor That Adds Warmth
A few finishing touches can completely change the mood of the space.
Consider:
- Potted herbs or small plants
- String lights
- Weatherproof cushions
- A washable outdoor rug
- A painted backsplash wall
- Hooks for tools and aprons
You can often complete this part for under $200 if you buy carefully and reuse what you already have at home.
Budget Breakdown and Cost-Saving Hacks
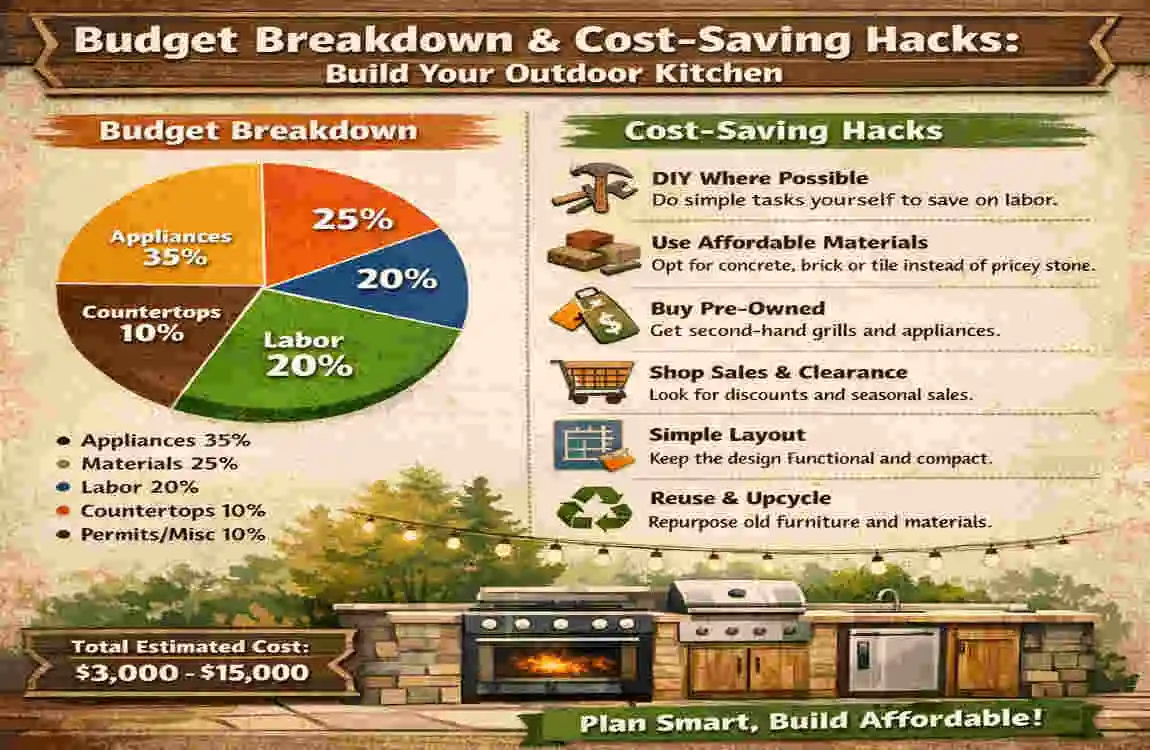
A 100-square-foot outdoor kitchen can vary widely in price, depending on finishes and appliances. The good news is that there are many ways to keep costs under control.
Sample Cost Breakdown for a 100 sq ft Outdoor Kitchen
Item Budget Range
Ground prep and base $200–$500
Frame and structure $300–$900
Countertop $250–$700
Grill or cooking unit $300–$1,000
Sink and fittings $100–$300
Flooring $200–$700
Lighting $50–$200
Seating and decor $150–$500
Storage $100–$300
Estimated Total $1,650–$5,100
Cost-Saving Hacks That Really Work
Here are some of the easiest ways to reduce cost without ruining the final result:
- Use pallets or reclaimed wood for benches and shelves
- Buy used appliances or furniture in good condition
- Choose a portable grill instead of a built-in unit at first
- Build in stages instead of doing everything at once
- Do your own demolition, painting, and basic framing
- Use gravel or pavers instead of expensive stone flooring
- Start with open shelves before installing full cabinets
- Shop end-of-season deals on outdoor furniture and lighting
If your budget is tight, begin with a mini outdoor kitchen. That could mean one cooking unit, one prep surface, and one storage shelf. You can always add a sink, pergola, or built-in seating later.
That is one of the smartest lessons for building outdoor kitchen spaces: build the core first, then upgrade in phases.
Common Mistakes to Avoid When Building an Outdoor Kitchen on a Budget
A tight budget does not mean you can ignore the basics. In fact, when money is limited, mistakes hurt even more.
Here are some of the most common problems people face:
Poor Drainage
If water collects under the kitchen, materials wear faster and the area becomes unpleasant to use.
Make sure the ground slopes properly and rainwater has somewhere to go.
Ignoring Local Weather
In Lahore and many parts of Pakistan, dust, strong summer sun, and monsoon rain all affect outdoor materials.
Choose finishes that can handle heat and moisture. Cover sensitive items when needed.
Skimping on Fire Safety
This is one area where you should never cut corners.
Use non-combustible surfaces near the grill. Keep gas fittings secure. Give heat room to escape.
Making the Counter Completely Flat
A tiny slope helps water run off. If needed, allow around 1–2% slope so rain does not pool on the counter.
Overbuilding Too Soon
Some people try to install every feature at once and run out of money halfway through.
Start with the essentials. A finished simple kitchen is better than an unfinished luxury plan.
Maintenance Tips for Your New Outdoor Kitchen
Once your kitchen is done, a little care goes a long way.
Clean the counters regularly so grease and dust do not build up. Wipe appliances after use. Sweep gravel or paver areas often to keep the space tidy and safe.
Check sealants, joints, and fittings every few months, especially after heavy rain or extreme heat. If you use wood anywhere, reseal it when needed.
During rainy periods, cover the grill and protect cushions or movable furniture. For gas or plumbing connections, inspect for leaks and wear before each season of heavy use.
Good maintenance keeps your budget project looking high-end for years.
Real-Life Examples and Inspiration
Budget builds can still look impressive.
A small $1,000 setup might include a portable grill, a single cinder-block counter, gravel flooring, and string lights in a narrow side yard.
A $2,500 project could add a tiled prep counter, sink, pallet bench, and paver flooring in a family courtyard.
A more complete $4,000 build might include an L-shape layout, stucco finish, shade sail, solar lighting, and custom open shelving on a rooftop or backyard patio.
The lesson is simple: your final result depends more on planning and consistency than on expensive materials.
As you plan your own project, ask yourself: What is my real budget, and which features will I use most often?
FAQ: How to Build Outdoor Kitchen
How much does it cost to build an outdoor kitchen on a budget?
A simple setup can cost around $1,500 to $3,000. A more polished, yet budget-friendly, version may cost $3,000 to $5,000, depending on size, materials, and appliances.
Can renters build an outdoor kitchen?
Yes, if the design is modular and removable. Portable grills, movable prep tables, freestanding shelves, and shade solutions work well for renters because they do not require major permanent changes.
What are the best materials for hot climates like Pakistan?
Cinder blocks, pavers, exterior tile, stucco, and stainless steel are usually durable. These materials handle heat better than many low-grade wood products or indoor-only finishes.
Is a sink necessary in an outdoor kitchen?
No, but it is very useful. If full plumbing is too costly, start with a small sink connected to a hose or place the outdoor kitchen close to an indoor sink for convenience.
Should I choose gas or charcoal for my outdoor kitchen?
Gas is easier to use and faster for cooking. Charcoal is often cheaper to start with and gives classic barbecue flavor. The better choice depends on how often you cook and what style of cooking you enjoy.
Do I need permits to build an outdoor kitchen?
That depends on your area and whether the build includes permanent plumbing, gas lines, roofing, or electrical work. Always check with local authorities or housing management before starting a permanent structure.