Have you ever plugged in your smartphone charger only to watch it instantly fall right back out of the wall? Or worse, have you ever noticed a tiny, terrifying spark when you plug in your vacuum cleaner? If you are nodding, you are experiencing the very common signs of a worn-out electrical receptacle.
As a homeowner, dealing with aging home components is just part of the journey. However, when it comes to electricity, ignoring the warning signs can lead to serious safety hazards. This is exactly why understanding the basics of electrical outlet replacement is so incredibly important for the safety and functionality of your modern home.
What Is Electrical Outlet Replacement?
In the simplest terms, electrical outlet replacement means removing an old, worn-out, or unsafe wall receptacle and replacing it with a brand-new one. Over time, the internal metal contacts inside your wall wear down from repeated use. When this happens, they lose their grip, creating loose connections that can lead to dangerous electrical arcing.
You might be surprised to learn that there are actually several different types of receptacles commonly found in today’s homes. You have your standard 15-amp duplex receptacles, which are the basic two-plug setups you see in bedrooms and living rooms. Then, you have Ground Fault Circuit Interrupter (GFCI) receptacles, which protect you from shocks in wet areas like kitchens and bathrooms.
Nowadays, as we embrace the technology of 2026, many homeowners are also upgrading to tamper-resistant (TR) outlets for child safety, or modern USB-enabled receptacles that let you plug your smart devices directly into the wall without a bulky adapter.
Ultimately, swapping these devices out is a routine home maintenance task. As long as the wiring behind your walls is in good condition, this does not have to be a massive, tear-down-the-walls electrical project. It is simply about keeping your connection points fresh, tight, and safe.
Signs It’s Time to Replace an Outlet
How do you know when your home is silently asking for an upgrade? Your walls will usually give you a few very clear warning signs. Keep a close eye out for the following issues:
- Cracked, broken, or discolored faceplates: If the plastic cover is chipping or turning a toasted yellow color, heat is likely building up behind the wall.
- Outlets that feel hot to the touch: A wall should never feel warm. If it does, you have a serious wiring issue or an overloaded circuit.
- Plugs that fall out easily: If the metal contacts inside cannot grip your plug securely, electricity can jump the gap (arcing), which is a major fire hazard.
- Flickering lights: If turning on a blender causes the room lights to dim or flicker, the receptacle or the circuit might be failing.
- Sparks or crackling noises: Hearing a buzzing sound or seeing a flash of light when you plug something in means you need an electrical outlet replacement immediately.
- Outdated, non-GFCI locations: If your home was built decades ago and you still have standard plugs near your kitchen sink or bathroom vanity, you need to upgrade to GFCI protection right away.
Every single one of these signs points back to electrical outlet replacement as a necessary, safety-driven solution. Do not ignore them!
DIY vs Hiring a Professional: When to Call an Electrician
Before you grab a screwdriver, we need to have a serious conversation about safety. Electricity is not something to play guessing games with. So, when is it okay to do this yourself, and when should you pick up the phone and call a pro?
Tasks that are generally safe for DIY include swapping out a single standard receptacle in a modern home with good wiring. If you open the wall and see bright, clean copper wires, a sturdy electrical box, and clear labels, you can likely handle the swap if you follow the safety steps closely.
However, there are major red flags that mean this job is not DIY-friendly. If you open the wall and see silver-colored wires, you have aluminum wiring. This requires specialized connectors and should only be handled by a pro. Furthermore, if multiple plugs on the same circuit are acting up, if your breaker trips constantly, or if you see melted wires and scorch marks inside the box, stop immediately.
You must also consider legal and insurance factors. In some regions, local building codes require a permit for any electrical work, even simple swaps. Furthermore, if an improper DIY job causes a fire, your home insurance company might void your coverage.
When in doubt, prioritize safety. Our team of experts is always ready to handle your safe electrical outlet replacement and any complex wiring repairs you might uncover.
Gathering the Right Tools and Materials
Having the right tools is the secret to making any DIY job smooth and stress-free. If you try to use a butter knife instead of a screwdriver, you are going to have a bad time. Gathering the correct gear ensures your electrical outlet replacement is efficient and, most importantly, completely safe.
Basic Hand Tools: You will need a solid set of Phillips and flathead screwdrivers. You also need a high-quality wire stripper and a pair of needle-nose pliers for bending the wire ends. The absolute most important tool you must buy is a non-contact voltage tester. This little pen-shaped device beeps and flashes red if a wire is live, saving you from a nasty shock.
Safety Gear: Do not skip this part! Wear insulated work gloves to protect your hands from sharp wire ends. Throw on some safety glasses to protect your eyes from falling dust or debris, and always wear thick, rubber-soled shoes to keep your footing.
Replacement Materials: Make sure you buy the correct replacement device. Match the amperage (usually 15-amp or 20-amp) to your old device. Choose between standard, GFCI, AFCI, weather-resistant for outdoors, or modern USB-built models. You should also pick up a fresh, clean faceplate to make your new installation look perfect.
The Step-by-Step Guide to Electrical Outlet Replacement
Now that you know the warning signs and have your tools ready, it is time to get to work. Please read through every single step carefully before you touch a tool. Divide these complex ideas into understandable segments, and take your time!
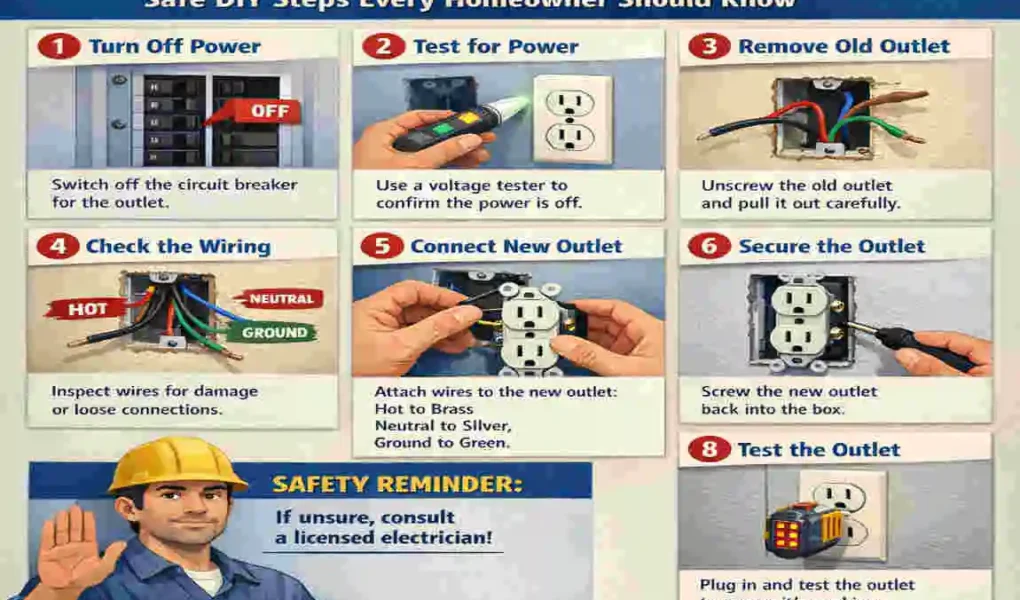
Turn Off the Power and Test the Outlet
Before starting any electrical outlet replacement, you must turn off the power. Walk over to your main electrical panel and locate the breaker that controls the room you are working in. Flip that specific breaker switch firmly to the “OFF” position.
Never, ever assume that simply turning off a wall switch makes the receptacle safe. Power can still flow through the box.
Once the breaker is off, walk back to the room and test your work. Take your non-contact voltage tester and stick the tip into both the left and right slots of the receptacle. If it beeps or lights up, the power is still on! Go back to the panel and try another breaker. You must treat every wire as live until your tester proves otherwise.
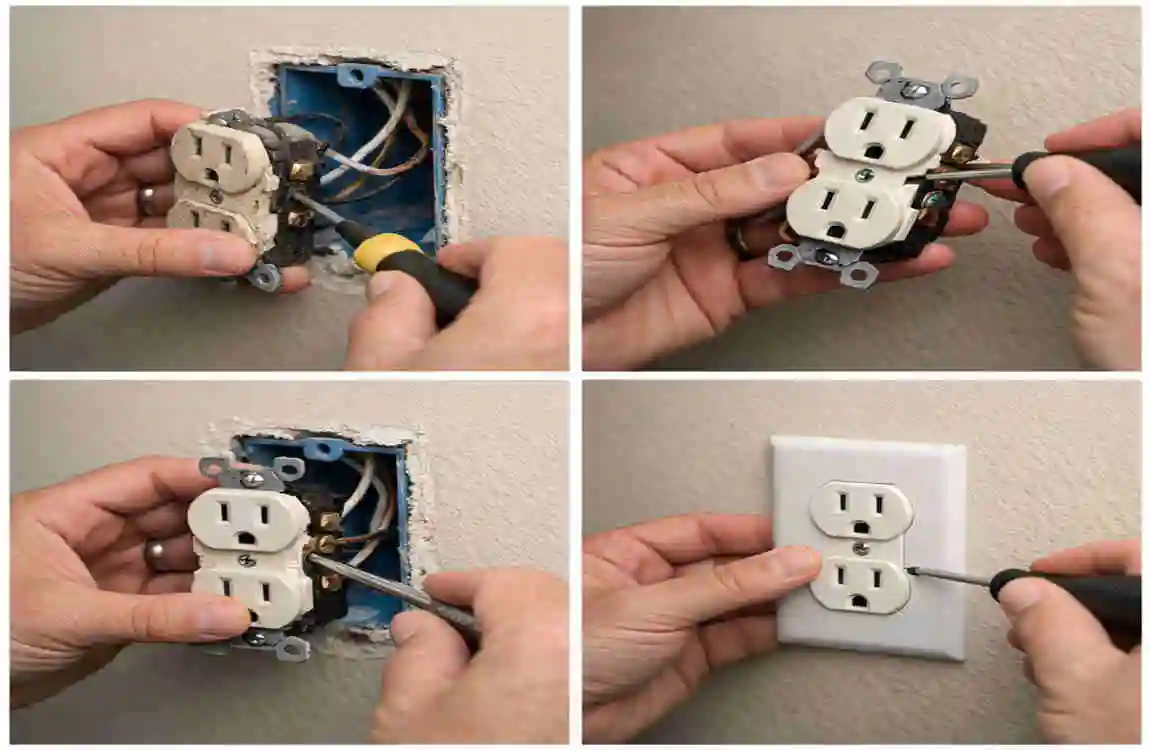
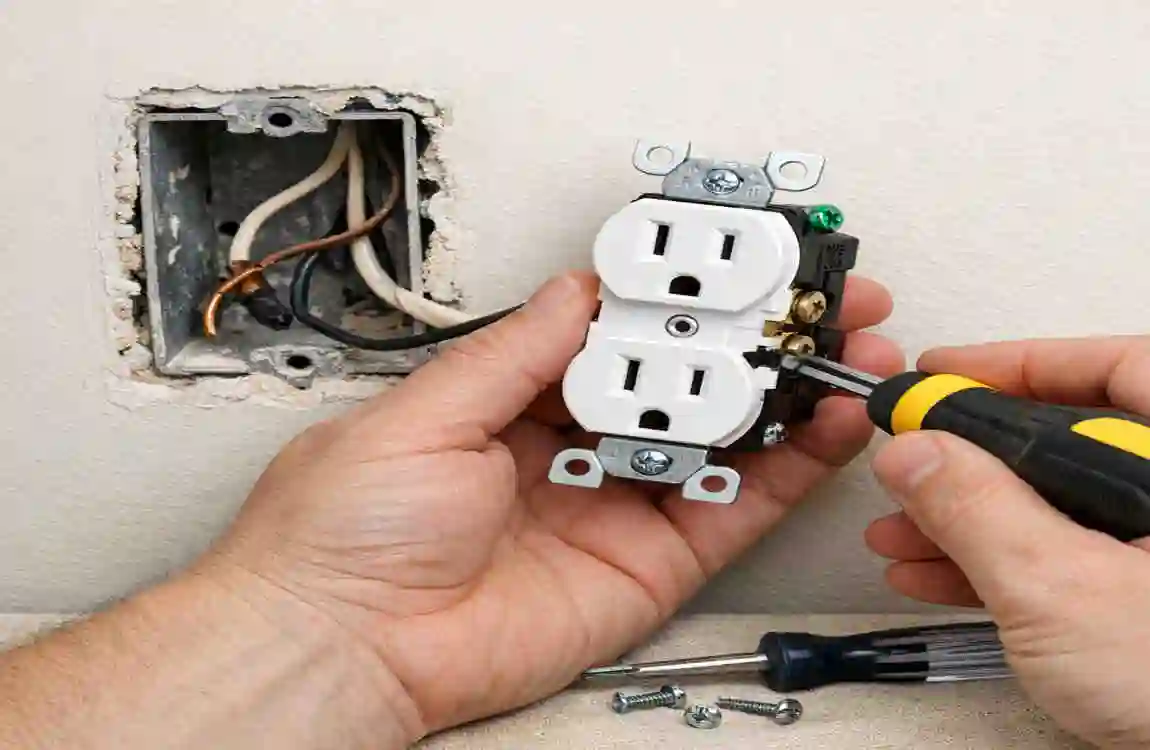
Remove the Old Outlet Safely
Once you are 100% sure the power is dead, grab your flathead screwdriver and carefully remove the small screw holding the plastic faceplate to the wall. Set the faceplate and the screw aside in a safe spot so you do not lose them.
Next, you will see two long mounting screws holding the metal device to the electrical box in the wall—one at the top, and one at the bottom. Unscrew both of them.
Now, grab the device’s metal tabs and gently pull it straight forward out of the wall. Do not yank it! You want to unfold the wires like an accordion. As you pull it out, check the wire colors. You will typically see a black wire (the hot wire bringing power in), a white wire (the neutral wire returning power), and a bare copper or green wire (the safety ground wire).
If you see any signs of severe damage here, such as melted wire sheathing or heavy burn marks, put the device down and call a licensed electrician immediately.
Label and Disconnect the Wires
During electrical outlet replacement, proper wire labeling prevents major headaches later. If you pull out a device and see four or five wires attached to it instead of just three, you are dealing with a multi-wire circuit. Take a piece of masking tape and label which wire goes to which screw before you disconnect anything.
To disconnect the old device, use your screwdriver to loosen the screws on the sides. Carefully unhook the wire loops.
Sometimes you will find that the wires are pushed into small holes on the back of the device rather than being hooked around the screws. This is called “back-stabbing.” To release these wires, you usually need to push a tiny flathead screwdriver into the release slot next to the wire hole, then firmly pull the wire free.
Even though you know the breaker is off, continue to work carefully and avoid touching the bare copper ends of the wires with your bare hands.
Inspect the Box and Wiring
Now that the old device is completely removed, grab a flashlight and peer into the empty electrical box inside the wall. This is a crucial inspection step for long-term home safety and insurance compliance.
Look closely at the back and sides of the box. Do you see any black scorch marks? Is the plastic box cracked, or is the metal box heavily rusted? Check the wire insulation (the colored plastic coating around the copper). Is it brittle, cracking, or flaking off?
If the exposed copper wire looks jagged or heavily oxidized (black or green), you may need to use your wire strippers to snip off the damaged end and strip a fresh half-inch of insulation.
If you discover that the electrical box is crumbling or the wires are too short to work with, it is time to stop your DIY project. Call a professional to upgrade the box and extend the wiring safely.
Wire the New Outlet Correctly
This is the most important step of your electrical outlet replacement wiring process. You must connect the correct color wire to the correct screw, or you will create a serious safety hazard known as “reverse polarity.”
Here is the golden rule for standard wiring:
- The Black wire (Hot) connects to the Brass (Gold) screw.
- The White wire (Neutral) connects to the Silver screw.
- The Bare or Green wire (Ground) connects to the Green screw.
Using your needle-nose pliers, bend the bare end of each wire into a small “J” shape or a shepherd’s hook. Hook the wire around the screw in a clockwise direction. Why clockwise? Because as you tighten the screw to the right, it will pull the wire tighter around the post. If you hook it counter-clockwise, tightening the screw will push the wire out.
Tighten the screws down very securely. You should not have any bare copper wire protruding from the device’s body, except for the ground wire. Avoid the common mistake of over-tightening to the point of stripping the screw threads, but ensure it is firmly locked in place.
Special Note: If you are installing a GFCI or AFCI outlet, pay close attention to the device’s back. You will see terminals labeled “LINE” and “LOAD.” The power coming from the breaker must connect to the LINE terminals. If you mix these up, the safety feature will not work!
Secure the Outlet and Reinstall the Faceplate
With your wires securely attached, it is time to put everything back into the wall. You cannot just shove the device backward; you risk pinching or breaking the wires.
Instead, gently fold the wires back into the box in an alternating zig-zag pattern, like an accordion. Push the device straight back until the metal mounting ears are resting flush against the wall or the edge of the electrical box.
Insert the long mounting screws at the top and bottom, and tighten them down. Make sure the device sits completely straight and does not wiggle.
Finally, choose your faceplate. Whether you are using a standard single plate or a modern, screwless decorator-style plate, ensure it sits perfectly flush against the drywall. Do a final visual check to ensure there are no gaps where tiny fingers or dust could slip inside.
Restore Power and Test the New Outlet
You have done the hard work, and now it is time for the moment of truth. Head back to your main electrical panel and firmly flip the breaker switch back to the “ON” position.
If the breaker instantly trips and snaps back to “OFF”, do not try to turn it on again! This means you have a short circuit, likely because a hot wire is touching a ground wire inside the box. You will need to turn the power completely off and check your connections again.
If the breaker stays on, walk back to the room. Use a simple plug-in outlet tester (a device with three small lights) to verify your work. When you plug it in, two yellow lights should glow, indicating that the wiring is perfectly correct. You can also plug in a small lamp to ensure it turns on brightly and consistently.
If you installed a GFCI, press the small “Test” button. The power should be cut off immediately with a click. Then, press “Reset” to restore the power. Remember, an electrical outlet replacement is never truly finished until the device is tested and proven 100% safe.
Common Mistakes to Avoid during Electrical Outlet Replacement
Even well-meaning homeowners can make simple errors that lead to major headaches. Avoid these common pitfalls to ensure your home stays safe:
First, never skip the voltage tester. Just because the overhead light went off does not mean the wall receptacle is dead. Always test!
Second, mixing up the hot and neutral wires is a frequent mistake. This creates reverse polarity. While a lamp might still turn on, the metal threads inside the lamp socket will remain electrically “hot” even when the lamp is switched off, creating a severe shock hazard.
Third, never forget the ground wire; do not leave it dangling inside the box. The ground wire is your home’s emergency escape route for rogue electricity. Without it, a power surge could travel through you instead of safely into the earth.
Finally, avoid overcrowding the box. If you have too many thick wires shoved into a tiny plastic box, heat will build up, melting the insulation. As professional electricians, our team avoids these mistakes every single time, ensuring your home is protected to the highest standards.
Electrical Codes and Safety Standards for Home Outlets
Following the rules is not just about passing an inspection; it is about keeping your family alive. The National Electrical Code (NEC) outlines the safety standards for homes in the US, and many countries follow very similar conceptual guidelines.
As we navigate home safety in 2026, the codes are stricter than ever for a good reason. For instance, the NEC requires GFCI protection in any wet zone. This includes kitchens, bathrooms, laundry rooms, unfinished basements, garages, and all outdoor locations. If water can splash on it, it needs a GFCI.
Furthermore, Tamper-Resistant (TR) devices are now the standard for general living areas. These features have internal plastic shutters that block children from sticking keys or paperclips into the slots.
When you follow code in your electrical outlet replacement, you keep your home safe, compliant, and ready to pass inspection if you ever decide to sell your property.
When to Upgrade More Than Just One Outlet
Sometimes, replacing a single worn-out receptacle is like putting a Band-Aid on a broken leg. You might open the wall and realize that the entire room is wired with outdated, ungrounded two-prong cords, or the terrifyingly brittle cloth-covered wiring from the 1950s.
In these situations, replacing one device reveals a much bigger issue. If your home has an outdated electrical panel, aluminum wiring, or no grounding, you should consider a whole-house inspection.
Upgrading multiple rooms at once offers incredible benefits. You get better safety, fewer annoying breaker trips, and the ability to power modern devices like massive flat-screen TVs and high-powered gaming computers safely. Moreover, tackling multiple upgrades at once often saves you money on labor compared to calling a pro out for piecemeal, one-by-one repairs over several years.
Our business proudly offers comprehensive electrical outlet replacement and full home safety inspections to give you ultimate peace of mind.
Cost Overview: DIY vs Professional Electrical Outlet Replacement
Deciding whether to DIY or hire a pro often comes down to budget. Let us break down the real costs and value associated with this project.
Comparison Factor: DIY Approach, Professional Electrician
Average Cost (Per Outlet) $5 to $25 (Materials only) $75 to $200 (Labor + Materials)
Time Investment 1 to 3 hours (including store runs) 15 to 30 minutes per device
Risk Level High (if untrained) Extremely Low
Tools Needed: You must buy testers, strippers, and related equipment. Pro brings all necessary equipment.
Warranty & Insurance None. You assume all liability. Fully insured, guaranteed work
While the DIY approach looks much cheaper on paper, you must factor in the hidden costs of hiring a professional. Avoiding a single crossed wire can save you from devastating fire damage, voided home insurance, or code-violation fines. Often, paying the Premium for a pro is entirely worth it for the safety guarantee and the service warranty alone.
Maintenance Tips to Extend Outlet Life
Once you have beautiful, brand-new receptacles installed, how do you keep them working perfectly for the next twenty years?
- Never overload them: Stop daisy-chaining massive power strips together. If you have six heavy appliances plugged into a single wall outlet, you are begging for a melted wire.
- Pull the plug, not the cord: When unplugging your vacuum, do not yank the cord from across the room. Walk over and pull the hard plastic plug. Yanking damages both the cord and the internal metal contacts of the wall device.
- Avoid damaged cords: If your phone charger cord is frayed and sparking, throw it away. Using damaged plugs puts immense stress on the wall device.
- Do visual checks: Walk around your house twice a year. Look for discoloration, test for loose plugs, and sniff for funny, burning smells.
Frame these habits as a vital part of your overall home maintenance routine. Proactive care is always cheaper than reactive disaster management!
How Homeowners Can Prepare for Professional Outlet Replacement
If you have decided that hiring a professional is the safest route for your home, you can save time and money by preparing your home before the electrician arrives.
Start by clearing the floor space. Move heavy couches, bookcases, and rugs away from the walls so the electrician has a clear, safe workspace. Next, make a detailed written list of every single receptacle that needs attention so the pro can tackle them all in one trip.
Ensure your main breaker panel in the basement or garage is completely accessible. Move the storage boxes out of the way so the electrician can quickly turn off the power.
Finally, do not be afraid to ask questions! When your electrician arrives, ask them about code upgrades, the benefits of AFCI protection, and whether your local city requires permits for the scope of work being done. A great contractor loves an engaged, safety-conscious homeowner.
FAQ about Electrical Outlet Replacement at Home
We know that electricity can be confusing, so we have gathered the most common questions homeowners ask us about keeping their power safe.
How long does an electrical outlet replacement take? For an experienced professional, swapping a standard device takes about 15 to 30 minutes. For a DIY beginner, expect to spend 45 minutes to an hour per device, especially if you take your time reading the instructions and testing the power repeatedly.
Can I replace an outlet myself if I am not an electrician? Yes, you can legally do so in most residential single-family homes, provided you are completely confident in your ability to follow safety steps, use a voltage tester, and correctly identify wiring. However, if you feel anxious or confused at any point, stop and call a pro.
Do I need a permit to replace an outlet? It entirely depends on your local city or county building codes. In many places, a simple one-for-one electrical outlet replacement is considered routine maintenance and does not require a permit. However, if you are running new wire or changing the circuit breaker, a permit is almost always required.
Why must I replace an outlet that still works? Even if a device still provides power, loose internal contacts create massive electrical resistance. This resistance generates intense heat that can quietly melt the plastic in your wall and ignite the wooden studs, causing a devastating house fire.
What is the difference between GFCI and standard outlets? A standard device provides continuous power. A GFCI (Ground Fault Circuit Interrupter) actively monitors the power flowing in and out. If it detects even a tiny drop in current (which means electricity is escaping to ground, perhaps through water or a person), it shuts the power off in milliseconds to prevent a lethal shock.