If your home’s stone exterior looks dull, dark, or simply outdated, you are not alone. Many homeowners love the strength and texture of stone, but not always the colour. The original finish may make your house look older than it is. The stone may be blends too much into the street. Or maybe you want a cleaner, brighter, more modern look.
The good news is that learning how to paint exterior stone on house surfaces is completely possible when you do it the right way. In fact, it can be one of the most effective ways to refresh your home without paying for a full exterior remodel. Compared with replacing stone or hiring a large masonry crew, painting is far more budget-friendly. A DIY project may cost a few hundred to a couple of thousand dollars, depending on size and materials. In contrast, a major exterior update can cost many times more.
This project is also a strong fit for current home design trends. In 2026, homeowners are leaning toward low-maintenance finishes, eco-friendlier paint options, and clean, modern exterior colours. Painted stone fits right into that movement. Soft greige, warm white, earthy taupe, and even deeper shades like charcoal or navy accents can give a house a fresh look while still keeping the natural character of the stone.
And yes, painting exterior stone can also help with resale appeal. Many real estate reports continue to show that curb appeal matters a lot. A cleaner, more polished exterior can make a home feel newer, better cared for, and more valuable in the eyes of buyers.
Why Paint Your House’s Exterior Stone? Benefits and Trends
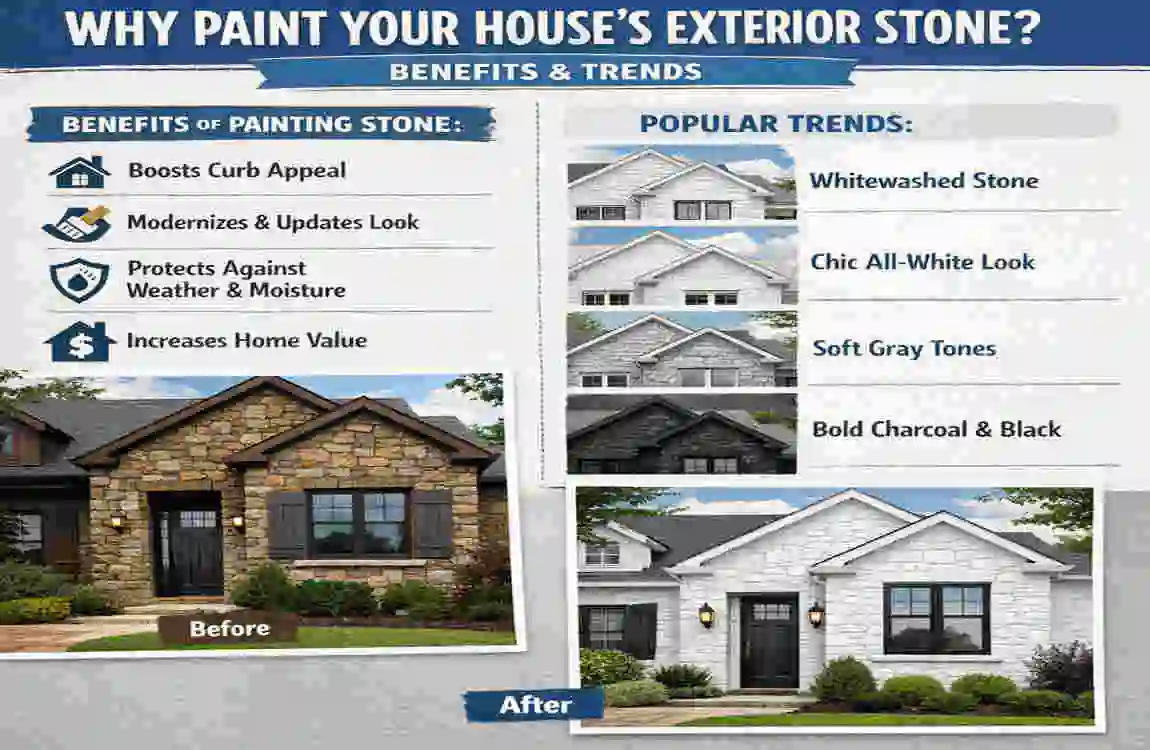
Painting exterior stone is not just about changing colour. It is about improving the overall feel of your home, protecting surfaces, and making the exterior look more intentional. Understanding the benefits makes it easier to decide whether this project is worth your time.
A Fast Way to Improve Curb Appeal
One of the biggest reasons homeowners paint stone is simple: it looks better. Old stone can sometimes appear stained, orange-toned, faded, or uneven. Even when the structure is sound, the visual effect can feel tired.
A fresh coat of paint can make the entire home look cleaner and more up-to-date. It can highlight trim, improve contrast, and make landscaping stand out. If your house currently disappears into the neighbourhood, painted stone can give it a stronger identity.
This is especially useful if you plan to sell your home in the near future. Buyers often make quick judgments from the curb. A refreshed exterior gives the impression that the house has been maintained well.
Potential Home Value Benefits
Curb appeal and value often go hand in hand. While every market is different, many real estate professionals agree that exterior improvements can offer a solid return. Painting stone will not magically solve every issue. Still, it can increase your home’s visual appeal enough to help it attract attention faster.
Some housing reports suggest that homes with updated, attractive exteriors can sell more quickly and sometimes for a better price than similar homes with dated finishes. In other words, this is not just a cosmetic change. It can also be a smart investment.
Added Protection Against Weather
Stone is durable, but exterior surfaces still face rain, sun, wind, dust, and changing temperatures. The right paint system adds a layer of defence.
A quality masonry primer and breathable exterior paint can help protect stone from:
- Moisture penetration
- UV fading
- Surface wear
- Minor staining
- General weather exposure
This matters even more in climates with strong sun, seasonal storms, or freeze-thaw cycles. The paint itself is not a replacement for proper masonry repair. Still, it can help extend the surface’s life and appearance.
2026 Design Trends Make Painted Stone More Popular
Right now, more homeowners are choosing painted masonry finishes because they want a clean, low-maintenance exterior. A few trends are shaping these choices in 2026:
Eco-Friendly Paints
Low-odour, low-VOC paints are getting more attention. People want products that are safer to use, less harsh on indoor and outdoor air quality, and easier on the environment. Many newer masonry paints now offer those benefits without giving up durability.
Matte and Soft-Sheen Finishes
High gloss is not the star for stone exteriors. Instead, softer finishes are popular because they look more natural and modern. A matte or low-lustre finish can make painted stone feel elegant rather than artificial.
Natural Modern Colours
Warm whites, greige, mushroom, clay beige, charcoal, and muted green-grey shades are all popular choices. These colours work especially well when paired with black windows, wood accents, or dark trim.
Busting the Big Myth: “Stone Should Never Be Painted”
You have probably heard this before: “Stone should never be painted.” That statement is too broad.
The truth is more balanced. Some stone surfaces should be handled with care, especially highly porous natural stone that can trap moisture. But many exterior stone surfaces, especially manufactured stone or previously sealed masonry, can be painted successfully if you prep them correctly and use breathable materials.
The real issue is not whether stone can be painted. The issue is whether it is clean, repaired, dry, primed, and coated with the right products.
If you skip those steps, paint can peel, trap moisture, or fail early. If you do them well, a painted stone finish can last for many years.
Pros and Cons at a Glance
Here is a simple breakdown to help you weigh the decision.
ProsCons
Affordable compared with replacing stone. Surface prep takes time
Big curb appeal improvement. Poor prep can lead to peeling
Wide range of colour options. Some porous stone needs extra sealing
It can help protect against the weather. Touch-ups may be needed over time
DIY-friendly for many homeowners. Not ideal during bad weather seasons
Modernise dated exterior finishes. Colour choice matters for resale
Is Painting Exterior Stone Permanent?
Not exactly permanent, but definitely long-lasting when done right. A high-quality exterior stone painting job can last 10 years or more before it needs major repainting. Touch-ups may be needed sooner in high-sun or high-moisture areas, but overall, this is not a one-season fix. It is a medium- to long-term upgrade.
If you want a visible change without the price of a full exterior rebuild, painting may be the sweet spot.
Tools and Materials You’ll Need for Exterior Stone Painting
Before you open a paint can, make sure you have the right supplies. Stone is textured, uneven, and sometimes highly absorbent. That means you need tools that can handle rough surfaces and paints designed for masonry.
Using the right products from the start makes the work smoother and helps the finish last longer.
Surface Prep Tools Matter More Than You Think
Most of the success in painting exterior stone on house projects comes from proper preparation. If the surface is dirty, dusty, chalky, or damp, the paint will not bond well.
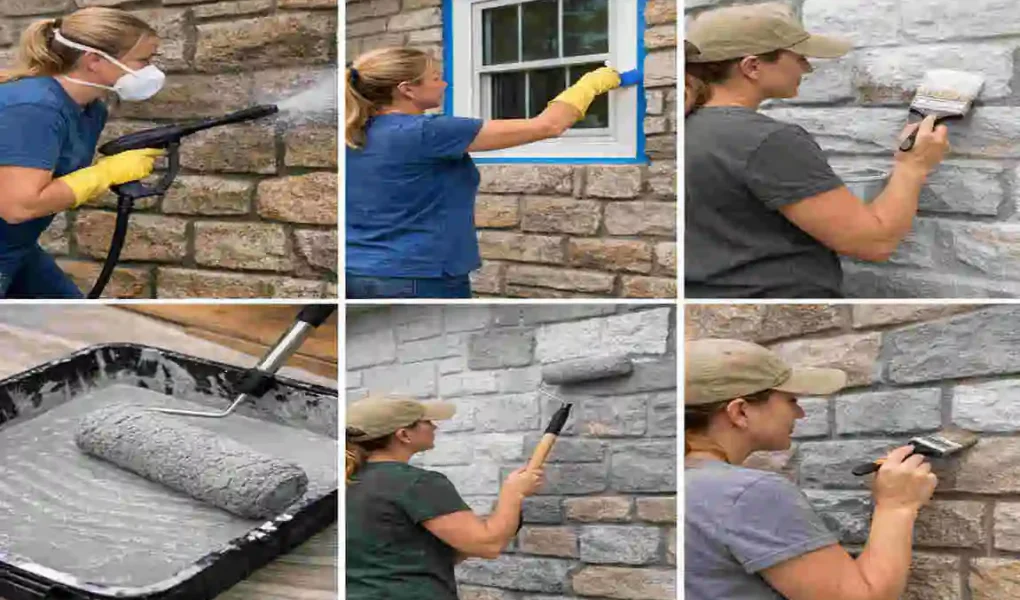
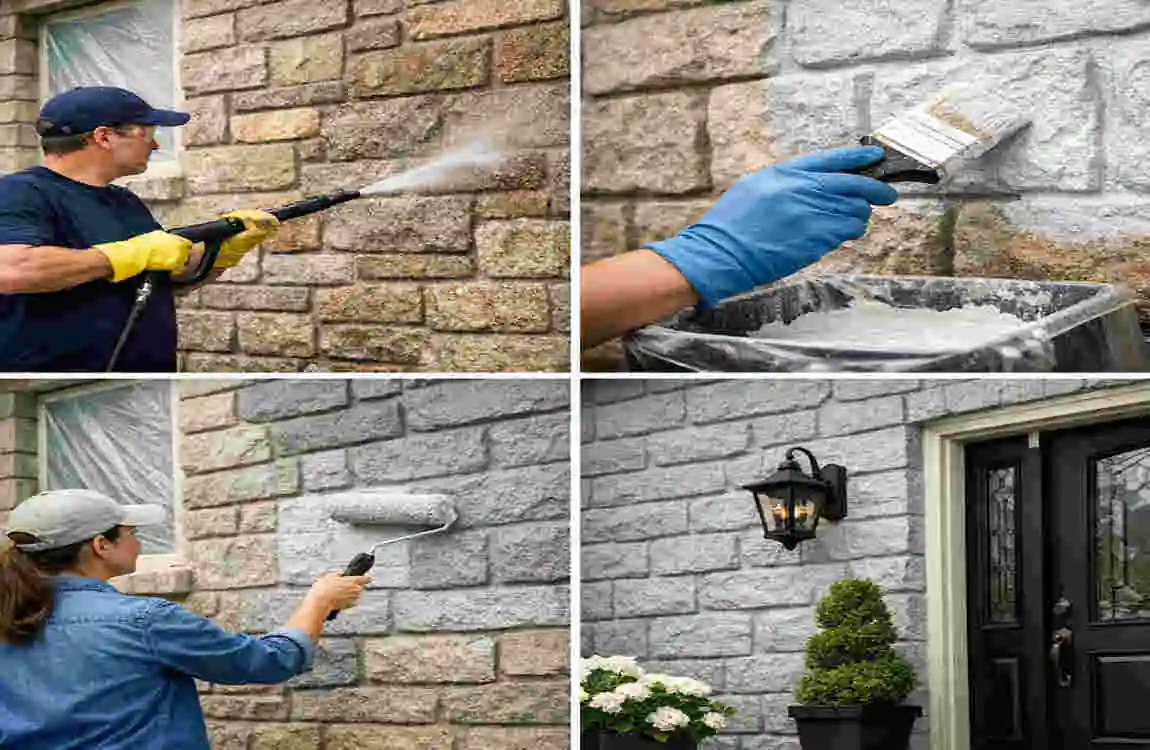
A pressure washer is one of the most helpful tools for this job. It removes dirt, mildew, loose debris, and years of built-up grime from the stone surface. A wire brush is also useful for scrubbing stubborn areas, old flaky paint, or mineral deposits.
Painter’s tape, plastic sheeting, and drop cloths will help protect windows, trim, lighting, doors, and landscaping.
Paint Application Tools for Rough Surfaces
Stone has texture, grooves, pits, and uneven edges. A regular wall roller will not do the best job. For most exterior stone painting jobs, a roller with a thicker nap works better because it reaches into the surface. Many homeowners use a sprayer for speed and coverage, then follow with a brush or roller to work the paint into the stone.
Ladders are often needed for upper walls or gables. Make sure yours is stable and rated for exterior work. Safety glasses, gloves, and a dust mask are also smart, especially during cleaning and priming.
Choose Paints Made for Masonry
This is one of the most important parts of the process. Do not use just any leftover exterior paint from the garage.
Stone needs a paint system that breathes while still resisting the weather. Good choices usually include:
- Masonry primer or sealer
- 100% acrylic exterior paint
- Elastomeric masonry paint for surfaces that need extra flexibility and water resistance
Acrylic paint is a popular option because it holds colour well, resists cracking, and allows some vapour movement. Elastomeric paint is thicker and can bridge small surface flaws, but it may not be ideal for every stone type. Always match the product to the stone’s condition and porosity.
Estimated Budget for Tools and Materials
Cost depends on your home’s size, the stone’s texture, and whether you already own some of the tools. On average, many homeowners spend around $0.50 to $1.50 per square foot on materials alone for exterior stone painting.
If you are buying everything from scratch, expect extra costs for prep tools, masking supplies, and safety gear. Even so, a DIY job is often much less expensive than hiring a professional crew.
Essential Tools and Materials Checklist
Here is a simple checklist to help you prepare:
- Pressure washer
- Wire brush or stiff scrub brush
- Painter’s tape
- Plastic sheeting and drop cloths
- Caulk and masonry repair filler
- Putty knife or trowel
- Ladder
- Gloves, goggles, and a dust mask
- Masonry primer or sealer
- 100% acrylic exterior paint or elastomeric masonry paint
- Roller with thick nap
- Extension pole
- Paint brushes for edges and joints
- Paint sprayer , if you want faster coverage
- Buckets, trays, and stir sticks
When you gather everything ahead of time, the job feels much less stressful. You will move through each stage with fewer interruptions and better results.
Step-by-Step Guide: How to Paint Exterior Stone on a House
Now let’s walk through the full process. This is where preparation meets technique. If you take your time and follow the steps in order, you can get a durable finish that looks polished and professional.
Assess and Prep Your Stone Surface
Before you paint anything, inspect the stone carefully. This step sets the tone for the whole job.
Walk around the house and look for:
- Cracks in mortar joints
- Loose or damaged stone pieces
- White powdery residue, also called efflorescence
- Mould, mildew, or green growth
- Areas with old, failing paint
- Moisture stains
- Crumbling grout or mortar
If you find damage, repair it first. Painting over cracks or unstable mortar will not solve the problem. It will just hide it for a short time.
For small mortar repairs, use a masonry patch or exterior mortar repair product. Follow product instructions closely and allow enough curing time. If there are major structural issues, it is better to call a masonry professional before painting.
Clean the Surface Thoroughly
Once the stone is sound, clean it. This is not a quick dusting job. Stone has a deep texture, which can prevent primer from bonding.
Use a pressure washer on a moderate setting, usually somewhere in the 1500 to 3000 PSI range, depending on the surface condition. Keep the nozzle moving and avoid blasting too closely at weak mortar joints. Your goal is to clean, not damage.
If you do not have a pressure washer, you can scrub by hand with a masonry cleaner and stiff brush, but it will take much longer.
Pay extra attention to:
- Lower walls near soil or splashback
- Shaded sides with mildew
- Foundation areas
- Spots under gutters or roof runoff
- Areas with old stains or chalky buildup
After washing, let the stone dry fully. This part is important. Stone can look dry on the outside while still holding moisture deeper in the surface.
Allow Proper Drying Time
Give the wall at least 2 to 3 full days to dry in good weather. If the climate is humid or cool, you may need more time. Painting too early is one of the most common reasons paint fails on masonry.
A dry surface helps primer bond properly and reduces the risk of trapped moisture.
Mask and Protect Surrounding Areas
Before you prime, cover anything you do not want painted. Mask windows, trim, doors, fixtures, vents, and nearby plants. Stone painting can get messy because the texture causes splatter and overspray.
This step may feel slow, but it saves cleanup time later and gives your finished project a sharper look.
Prime for Adhesion and Longevity
If you want the paint to stick well and last, do not skip the primer.
Stone is not like drywall or smooth wood. It often has uneven absorption, rough texture, and mineral content that can interfere with paint adhesion. A good masonry primer creates a more stable base and helps the topcoat cure evenly.
Choose a masonry-specific primer or sealer. These products are designed to grip mineral surfaces while improving coverage and durability. If your stone is very porous, one coat may not be enough. In that case, apply two coats.
Use a brush to work primer into joints and deep texture areas, then roll or spray the rest. Make sure you evenly cover all exposed stone. Thin, missed sections can cause visible colour inconsistency later.
Let the primer dry fully according to the product instructions. Do not rush this stage. Paint performs much better over cured primer than over a tacky base.
Think of primer as insurance. It may not be the exciting part of the project, but it protects all the work you are about to do next.
Choose and Test Your Paint Colour
Colour selection feels fun, but it can also be tricky. Exterior stone covers a large visual area, so the shade you choose has a huge effect on the house.
In 2026, some of the most popular painted stone colours include:
- Warm white
- Greige
- Soft taupe
- Mushroom beige
- Charcoal gray
- Muted sage-grey
- Deep navy accents for trim or doors
If you want broad resale appeal, neutral shades are often the safest choice. They freshen the house without making it look too personal or trendy. If you want a bold character, darker shades can look stunning, but make sure they fit the roof, trim, and neighbourhood style.
Always Test Before Committing
Do not choose a colour from a tiny sample card alone. Paint a few test patches on different parts of the exterior. Look at them in the morning, afternoon, and evening.
Stone reflects light differently from flat siding. Texture creates shadows, which can make colours appear darker or more dramatic than expected. A soft beige on a sample card may look much richer on the wall. A bright white may feel too stark in direct sun.
Testing also helps you check how the paint covers the stone and whether you need extra coats.
Take your time here. The right colour can make your house feel elegant, fresh, and timeless. The wrong one can make a big project feel disappointing.
Use Painting Techniques That Create Professional Results
This is where your project becomes visible. Once the prep and primer are done, painting moves much faster—still, technique matters.
Work in Good Weather
The best temperature range for most exterior masonry paint jobs is around 50°F to 85°F. Avoid painting in direct blazing sun when possible, and stay away from rainy or very humid conditions.
Bad weather can cause:
- Uneven drying
- Streaking
- Poor adhesion
- Bubbling
- Early peeling
Try to choose a stretch of stable weather with mild temperatures and low wind.
Use Thin, Even Coats
Do not try to finish the job in one heavy coat. Thick coats can trap moisture, drip, and dry unevenly across rough stone.
Instead, apply two to three thin coats. This gives you better control, stronger adhesion, and a smoother-looking finish. Thin coats also help preserve the stone’s texture rather than burying it under heavy paint buildup.
Spray, Then Back-Brush or Back-Roll
A paint sprayer can be a great time-saver, especially on rough stone. It can get into crevices and quickly cover large areas. But spraying alone is not always enough.
For best results, many painters use the back-brushing or back-rolling method. That means you spray a section first, then immediately go over it with a brush or roller while the paint is still wet. This pushes paint deeper into the surface and evens out coverage.
It also helps prevent a surface-only coat that looks good at first but wears unevenly later.
Keep a Wet Edge
Work in manageable sections and keep a wet edge as you go. In simple terms, do not let one area fully dry before overlapping the next section. This helps reduce lap marks and keeps the finish more uniform.
A good pattern is to start at the top of the wall and work downward. Gravity is on your side this way, and you can smooth drips before they dry.
Pay Attention to Joints and Deep Texture
Stone walls are full of edges, gaps, and grooves. These areas often need extra attention from a brush. If you rely only on a roller, you may leave tiny uncoated spots that show through later.
Take your time around:
- Mortar lines
- Corners
- Under ledges
- Around the window trim
- Foundation transitions
- Decorative stone shapes
This detailed work is what makes the final result look complete.
Let Each Coat Dry Fully
Read the drying and recoating time on the paint can and follow it. Even if the surface feels dry to the touch, it may not be ready for another layer. Stacking coats too quickly can weaken the finish.
If your first coat looks patchy, do not panic. Stone often absorbs unevenly at first. The second coat usually evens things out beautifully.
Finishing Touches and Cleanup
Once the final coat has dried, step back and inspect the full surface. Look for thin spots, drips, or areas that need a small touch-up.
Use a small brush to fix missed joints, edges, and detail sections. Remove painter’s tape carefully so you do not peel fresh paint. If the tape feels stuck, score the edge lightly first for a cleaner release.
Check Trim Lines and Transitions
Painted stone looks best when the lines near trim, doors, soffits, and windows are crisp. This is where your home starts to look polished rather than repainted.
Clean up overspray or stray marks while they are still manageable.
Dispose of Waste Responsibly
Do not pour leftover paint or wash water into storm drains or soil. Store extra paint in a sealed container for future touch-ups. Dispose of used plastic, dirty rags, and empty containers in accordance with local waste guidelines.
If you choose lower-VOC products, cleanup will usually be easier, and the odour will be milder, which is another plus.
Give It Time to Cure
Paint may dry in hours, but full curing takes longer. Be gentle around the surface for several days or even longer, depending on the product. Avoid aggressive washing or scraping during that period.
When the job is complete, you should have a fresh, durable finish that preserves the stone’s texture while dramatically improving the home’s look.
Common Mistakes to Avoid When Painting Exterior Stone on a House
Even a good paint and a good colour can fail if the process is wrong. The biggest mistakes usually happen before the paint goes on. If you avoid the issues below, you will have a much better chance of getting a finish that lasts.
The Most Common Problems Homeowners Run Into
Here are the mistakes that cause the most trouble:
- Skipping primer and expecting paint to bond directly to stone
- Painting over dirty or damp masonry
- Ignoring cracks, loose mortar, or efflorescence
- Using the wrong paint type instead of breathable, masonry-friendly products
- Painting in bad weather, especially high humidity or incoming rain
- Applying paint too thickly in one coat
- Rushing dry time between coats
- Forgetting foundation and high-contact areas that collect dirt and moisture
- Choosing very cheap paint that fades or peels early
- Testing no sample colours before painting the whole house
Why Skipping Prep Causes Early Failure
Many homeowners get excited and jump straight to colour. That is understandable, but stone is not forgiving. If there is dust, mildew, hidden moisture, or chalky buildup on the surface, paint will not hold well. It may peel in patches within a year or two.
Primer is just as important. Without it, the topcoat may soak unevenly into the stone and lose its grip.
Weather Mistakes Are More Serious Than They Look
Many people assume that if the rain has stopped, the wall is ready. That is not always true. Stone can stay damp for longer than it appears. Humidity also slows drying and can trap moisture under the coating.
If you want lasting results, plan around the weather rather than fight it.
Cheap Paint Can Cost More Later
Budget matters, but going too cheaply often backfires. Lower-quality paint may need more coats, fade faster, and peel sooner. With supply costs still changing in 2026, it is tempting to buy the lowest-priced product available. Try not to do that for a project like this.
A better paint system may cost more upfront, but it usually saves time, labour, and repainting costs later.
A Simple Before-and-After Reality
We have all seen houses where the original stone looked heavy, patchy, and dull. After proper prep and a thoughtful paint colour, the same home can look brighter, cleaner, and far more current. The difference is often dramatic.
That transformation happens because of the process, not just the paint. The more carefully you work through each stage, the more professional the result will look.
Maintenance Tips for Lasting Curb Appeal
Once you finish painting, a little maintenance goes a long way. The goal is not constant upkeep. It is simple, occasional care that helps the finish stay attractive for years.
Inspect the Exterior Once a Year
Walk around your luxury home at least once a year and look for chips, cracks, mildew, or worn areas. Catching small issues early makes touch-ups easier and prevents bigger repairs later.
Pay close attention to lower sections near the ground, shaded walls, and areas under roof runoff.
Clean Gently on a Routine Schedule
You do not need aggressive washing all the time. Usually, a light rinse and a gentle cleaner are enough to remove dirt and keep the surface fresh. Avoid harsh scrubbing unless necessary.
If you see mildew, treat it early before it spreads.
Plan for Touch-Ups Every Few Years
A quality job may last 10 years or more, but touch-ups can be helpful around the 5-year mark, especially on sun-exposed or weather-heavy sides of the home.
Keep a small amount of leftover paint stored properly for this purpose. It makes colour matching much easier.
Protect the Areas Around the Stone
Good maintenance is not only about the paint itself. Keep gutters working properly, direct water away from walls, trim back plants that trap moisture, and avoid repeated splashback near the foundation.
These small habits help your painted stone stay cleaner and last longer.
FAQs
How long does exterior stone paint last on a house?
A well-done paint job on exterior stone can often last 10 years or more. The exact lifespan depends on climate, prep quality, paint type, and maintenance.
Can I paint over old paint on exterior stone?
Yes, but only if the old paint is still sound. Remove loose or peeling sections, clean the surface well, repair damage, and use the right primer before repainting.
What is the best time of year to paint exterior stone?
Mild, dry weather is best. Aim for days with temperatures between 50°F and 85°F and avoid rainy, very humid, or extremely hot conditions.
Do I need primer before painting exterior stone?
Yes, in most cases you do. A masonry primer helps the paint stick better, improves coverage, and reduces the risk of peeling.
What kind of paint should I use on exterior stone?
Use a breathable masonry-safe paint, usually a 100% acrylic exterior paint or an elastomeric masonry coating, depending on the stone and site conditions.
Can I paint natural stone and manufactured stone the same way?
Not always. Manufactured stone is often easier to paint. Natural stone can be more porous and may require extra care, such as sealing or professional advice, depending on the material.
Will painting stone increase curb appeal?
In many cases, yes. A freshly painted stone exterior can make a home look cleaner, brighter, and more up-to-date, thereby enhancing both visual appeal and resale value.