Waking up to a cold draft, hearing outside noise too clearly, or spotting a crack in the glass can instantly make your home feel less comfortable. If that sounds familiar, learning how to fix a window in the house is one of the most useful DIY skills you can pick up.
A damaged window does more than look bad. It can let in dust, water, heat, cold air, and even higher electricity bills. In many homes, especially where summers are hot and winters feel sharper than expected, a weak or broken window quietly wastes money every single day. That is one of the main reasons DIY home repair has become more popular in 2026. People want practical fixes that save cash and improve comfort fast.
The good news is that many window problems are easier to handle than they first appear. A stuck sash, cracked putty, loose frame, missing weatherstripping, or even a broken pane can often be repaired with simple tools and steady hands. You do not always need to call a professional right away.
Why Learn How to Fix a Window in a House?

Knowing how to fix a window in the house gives you more control over your home. It helps you solve small problems before they turn into expensive repairs. A simple crack, minor draft, or loose seal may not seem urgent today. Still, over time, it can lead to higher utility bills, wood rot, water damage, or a full window replacement.
The biggest benefit is cost savings. A professional repair visit can quickly become expensive, especially if labor, transport, and materials are all added together. In many cases, a DIY window repair costs only a small part of what a contractor would charge.
Another major benefit is energy efficiency. Drafty windows let treated indoor air escape. That means your fan, heater, or AC has to work harder. In 2026, with energy costs staying high and homeowners focusing more on efficient living, fixing weak windows is one of the smartest low-cost upgrades you can make.
It also helps your home feel better every day. A repaired window reduces noise, blocks dust, improves security, and keeps rooms more comfortable. If you ever plan to rent out or sell the house, even small repairs can improve how your property looks and performs.
Here are some common signs that tell you it is time to fix broken house window problems:
- Cold or warm drafts near the frame
- Condensation or fogging between panes
- Cracked glass or chipped corners
- Difficulty opening or closing the window
- Rattling sounds when the wind blows
- Water leaks during rain
- Soft or rotten wood around the frame
You do not need a large workshop to begin. Most repairs only require basic hand tools and low-cost materials. But if the wall around the window is damaged, the frame is badly warped, or the crack affects a large structural unit, it is smarter to call a professional.
Tools and Materials Needed for DIY Window Repair
Before you start fixing a window in your house, gather everything in one place. This saves time, keeps you focused, and makes the job safer. Most window repairs do not need specialized equipment. A basic DIY kit is often enough.
You will usually need a screwdriver set, a utility knife, a putty knife, a measuring tape, sandpaper, and a caulk gun. For safety, always keep work gloves and protective goggles nearby. If you are handling broken glass, these are not optional.
Depending on the damage, you may also need replacement glass, glazing putty, wood filler, weatherstripping, silicone or acrylic caulk, paint, and a small brush. If the window is loose or crooked, a level can help you check alignment.
The budget for most basic repairs is usually manageable. A small draft-proofing job may cost very little, while replacing a glass pane or repairing a wooden frame costs more. Even then, the total is often far below the price of full professional repair.
Tools Checklist for How to Fix a Window in a House
Tool/Material: What It Does, Best Used For, Estimated Budget
Screwdriver set. Removes hardware and fittings, hinges, locks, and sash parts. Low
Utility knife: Cuts old sealant and tape. Removing caulk or putty. Low
Putty knife, scrapes and applies putty . Glass repair and cleanup, Low
Measuring tape, measures glass and frame, Replacement glass sizing, Low
Sandpaper Smooths rough wood or filler. Frame preparation Low
Caulk gun, applies caulk neatly, sealing drafts and gaps, low to medium
Glazing putty holds glass in place. Single-pane glass repair. Low
Weatherstripping Blocks air leaks. Draft-proofing sash edges. Low
Wood filler, repairs small frame cracks, wooden window restoration, low
Safety gloves and goggles protect hands and eyes. Any repair job is essential.
If you shop carefully, the full set can often be arranged within a modest DIY budget. Local hardware shops, home improvement stores, and online marketplaces usually carry all of these items.
A smart tip: buy a little extra caulk, sandpaper, and weatherstripping. These are useful for other parts of the house too.
Step-by-Step Guide: Quick DIY Steps to Fix a Window in a House
This is the part you came for. If you want to learn how to fix a window in your house properly, do not rush. A good repair is less about speed and more about careful preparation and clean finishing.
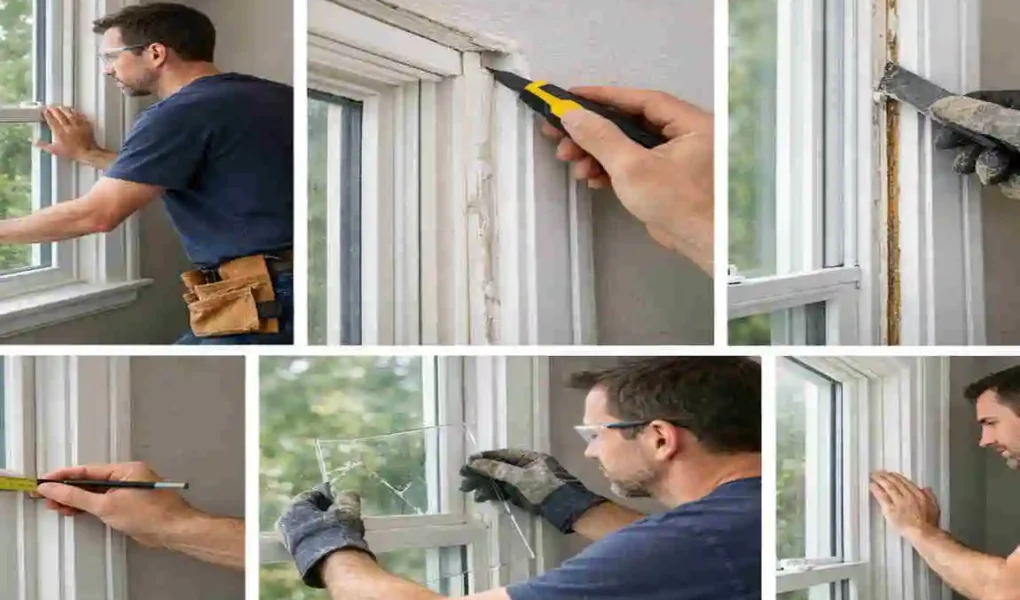
Assess the Damage
Start by understanding what is actually wrong. Many DIY mistakes happen because people jump straight into repair without checking the full issue.
Stand both inside and outside the house if possible. Open and close the window slowly. Look for cracks in the glass, peeling putty, missing weatherstripping, soft wood, rusty hinges, gaps around the frame, or signs of moisture damage. If the window rattles, the issue may be with loose fittings rather than the glass itself.
Use your hand to feel for air leaks around the edges. You can also hold a thin tissue near the frame on a windy day. If it moves, you have a draft. For alignment problems, use a level to see if the frame sits evenly.
For double-hung or sliding windows, inspect the tracks too. Dirt buildup can make a window feel broken when it only needs cleaning and lubrication. If the glass in a sealed unit looks foggy, it usually means the seal has failed.
This stage helps you choose the right repair method. A cracked pane needs a different fix than a rotten frame. A stuck sash needs a different solution than missing caulk.
Think of this step as your diagnosis. The better you inspect now, the smoother the rest of the job will go.
Gather Supplies and Prep Your Workspace
Once you know the problem, collect your tools and materials before touching the window. This makes the work faster and safer. It also stops you from leaving an open window halfway through the repair while you run to buy something you forgot.
Move curtains, furniture, and décor away from the area. Lay an old sheet, cardboard, or plastic cover on the floor to catch dust, paint chips, and broken glass. If children or pets are nearby, keep them out of the workspace.
Next, remove screens, locks, or decorative trim if they block your access. Keep screws and small pieces in a container so they do not get lost. If you are working with glass, wear gloves and goggles from now on.
If the old sealant or putty is hard and brittle, soften it gently with sunlight or careful scraping. Do not force anything yet. Window repairs reward patience.
This preparation step matters more than people think. A clean, organized work area lowers stress and helps you notice details. It also prevents damage to flooring and nearby walls.
When people ask about how to fix a window in a house, they often focus only on the repair itself. But the setup is what makes the repair manageable, especially for beginners.
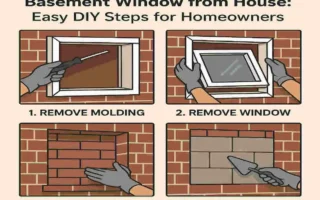
Remove the Old Glass or Damaged Sash
Now is the time to remove the broken or damaged part. This is the stage where you need the most care, especially if the glass is cracked.
If you are fixing a broken pane in a traditional single-pane wooden window, start by applying painter’s tape across the cracked glass in a crisscross pattern. This helps hold loose pieces together during removal. Then use your putty knife or utility knife to remove the old glazing putty around the glass. Work slowly around the edges.
Once the putty is gone, remove the glazing points or small fasteners holding the glass in place. Then carefully lift out the old pane. If the glass shatters, place the pieces directly into a sturdy box or wrap them in paper for safe disposal.
For sliding or double-hung windows, you may need to remove the sash rather than just the glass. Open the window partway, release the stops or clips, and tilt or lift the sash out based on the window type. If the screws hold the frame, remove them gently.
Check the hardware as you go. Sometimes locks, rollers, or hinges are worn out and should be replaced while the unit is open. It is easier to do everything at once than to reopen the same window later.
This step is often the moment when a repair starts to feel real. Take your time. You are not trying to win a race. You are trying to make the opening safe and ready for a strong repair.
If you want success with how to fix a window in house, safe removal is a non-negotiable part of the process.
Clean and Repair the Frame
With the old glass or sash removed, the frame becomes your focus. This part is easy to ignore, but it has a huge impact on how long the repair lasts.
Use a brush or cloth to remove dust, chipped putty, loose paint, and dirt from the frame. If the wood is rough or flaky, sand it smooth. Old caulk and leftover debris can stop the new materials from bonding properly, so clean thoroughly.
Now inspect the frame closely. If you find small cracks in wood, apply wood filler and smooth it with a putty knife. Let it dry fully, then sand again until even. If the frame has minor surface rot, remove the weak material before filling. But if the wood is deeply soft or crumbling in several places, the damage may be too severe for a basic DIY repair.
For metal or aluminum windows, check for rust, bent sections, or worn screws. Clean the frame and tighten any loose parts. For vinyl windows, inspect the corners and seals for warping or separation.
This is also the right moment to handle draft issues. Add or replace weatherstripping along the sash edges or where the window meets the frame. Many people only think about glass, but air leaks often come from the sides and joints.
A strong frame supports everything else. If the frame is not level, smooth, and dry, even the best new glass or sealant will struggle. In many DIY window repair jobs, the real fix is not the pane itself. It is the neglected frame around it.
Install New Glass or Reinforce the Window
This is where your repair begins to come together. If you are replacing glass, measure the opening carefully first. Measure width and height from inside edge to inside edge, then subtract a little space to allow for expansion and easier fitting. Even a small measuring mistake can cause trouble.
For single-pane wooden windows, place a thin layer of glazing compound into the frame first. Then set the new glass pane into the opening gently and press it into the putty. Add glazing points around the edges to hold it in place. After that, apply more glazing putty around the glass, shaping it neatly with a putty knife.
Aim for a smooth, angled finish so water runs off rather than collecting around the pane. It may take a few tries to make it look tidy. That is normal. Wipe excess material and keep the lines clean.
If the issue is not broken glass but a weak sash, loose hardware, or unstable frame, reinforce those parts now. Replace worn screws, install fresh fasteners, and adjust hinges or rollers. For sliding windows, test the movement after tightening the parts.
Vinyl and aluminum windows often use rubber gaskets or snap-in beads instead of putty. If that is your window type, remove the old securing strips and fit the new glass in accordance with the frame design. Press all seals firmly so there are no gaps.
This step is the heart of how to fix a window in a house. It restores the window’s shape, strength, and function. Go slow, check every edge, and do not force the materials into place.
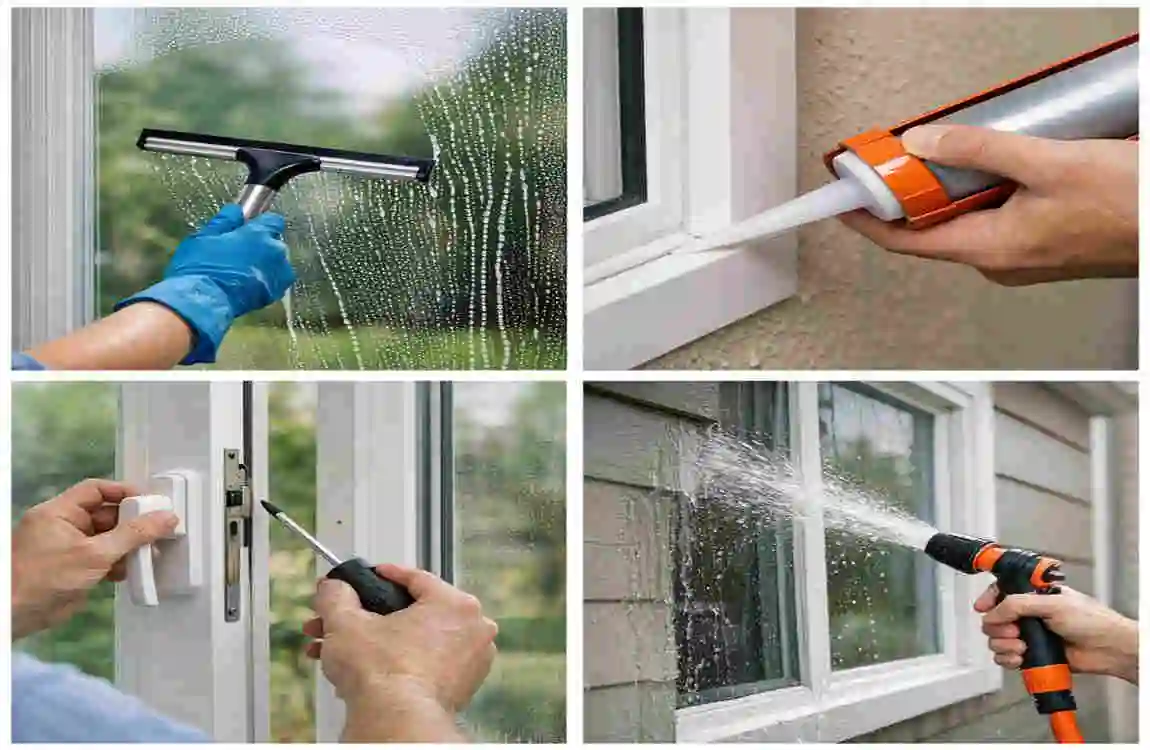
Seal and Caulk for Draft-Proofing
A repaired window still needs protection from air and moisture. That is why sealing matters so much. If you skip this part, you may still feel a draft even after replacing the glass or fixing the sash.
Use a quality caulk around the outer edges of the window frame where it meets the wall or trim. Apply a steady line, then smooth it with a wet finger or finishing tool for a neat seal. On the inside, seal small gaps where air may pass through joints.
Do not overfill. Too much caulk can look messy and crack later. The goal is a continuous, clean barrier that prevents air and water from entering.
For extra efficiency, add weatherstripping where the moving parts meet. This helps reduce rattling and noise, and makes the room feel more stable during hot afternoons or cold nights.
This step is one of the biggest reasons people search for how to fix a window in a house. They are not only trying to repair visible damage. They want a home that feels comfortable again. Sealing is what turns a basic repair into a draft-free repair.
If you want to save on energy bills, do not underestimate the value of this stage. A well-sealed window can make a room noticeably better almost immediately.
Test, Paint, and Maintain
The final step is simple but important. Test the window fully before calling the job done. Open it, close it, lock it, and check for smooth movement. Look closely for gaps, wobbling, or uneven spots in the seal.
If you repaired a wooden frame or applied fresh putty, let everything cure as needed before painting. Once dry, use paint or a protective finish to shield the material from the sun, moisture, and daily wear. This is especially useful for exterior-facing wood.
Set a reminder to inspect the window every few months. Clean the tracks, check for fresh cracks, and renew caulk or weatherstripping when needed. Regular maintenance keeps small issues from returning.
When you follow these steps, fixing a window in the house becomes much less intimidating. It turns into a practical weekend task that can improve comfort, efficiency, and peace of mind.
Troubleshooting Common Issues When Learning How to Fix a Window in a House
Even after a repair, some windows still need a little extra attention. That is normal. Old windows often develop multiple issues over time. If you are learning how to fix a window in a house, these common problems are worth knowing.
- The window still sticks:
- Check the tracks, hinges, or painted edges. Dirt, old paint, and swollen wood often cause sticking. Clean the tracks well and apply a small amount of lubricant where needed. If the frame is rubbing due to moisture swelling, light sanding may help.
- The glass looks foggy inside:
- If it is a double-pane unit, fogging usually means the internal seal has failed. A quick DIY defogging trick may improve appearance for a while. Still, full sealed-unit replacement is often the lasting solution.
- You still feel a draft:
- Inspect weatherstripping, lock alignment, and caulk lines. A window may look repaired, but it may still leak air from the side channels or the trim. Move your hand around the edges again to find the weak point.
- The frame has rot or moisture damage:
- In humid conditions, wood can absorb water, weakening it. Remove soft material, let the frame dry well, apply filler for minor areas, and finish with sealant or paint. Severe rot usually needs partial frame replacement.
- The lock no longer lines up:
- This often happens when the sash settles unevenly. Tighten screws, adjust the strike plate, or realign the sash before replacing the lock.
- Can you repair aluminum windows yourself?
- Yes, in many cases you can. Cleaning tracks, replacing seals, tightening parts, and fixing simple pane issues are often manageable. But heavy bends or frame distortion may need expert help.
The key is not to panic if the first fix is not perfect. DIY window repair often involves small adjustments after the main work is done.
Prevention Tips for Long-Lasting House Windows
Once you have learned how to fix a window in the house, the next smart step is to prevent it from breaking again. Good maintenance saves time, money, and frustration later.
Inspect your windows every season. Before summer, check for dried caulk and loose seals. Before winter or rainy periods, look for cracks, leaks, and weak paint. Clean tracks and frames regularly to prevent dirt buildup that can affect movement.
You can also improve performance with small upgrades. Energy-saving films, fresh weatherstripping, and better sealing around the trim can make older windows work much better. These low-cost improvements align well with current 2026 home-efficiency trends.
If you want a simple routine, follow this pattern:
- Every 3 months: Clean glass, tracks, and frames
- Every 6 months: Check caulk, seals, locks, and weatherstripping
- Once a year: Repaint exposed wood, inspect for moisture damage, and test for drafts
Some homeowners are also exploring smart window sensors and upgraded insulating films. You do not need high-tech solutions for every home. Still, even one or two modern improvements can make your windows easier to manage.
Prevention is always cheaper than repair. A little care goes a long way.
FAQs
How long does it take to fix a window in a house?
For a basic repair, it usually takes 1 to 2 hours. If you are replacing glass, repairing wood filler, or waiting for putty or paint to dry, the full project may stretch longer.
What is the average DIY cost to fix a broken house window?
A simple DIY repair often costs around PKR 1000 or a bit more, depending on the tools and materials you already have. Draft sealing jobs may cost less, while new glass may cost more.
Can I learn how to fix a window in the house without professional experience?
Yes. Many common window issues are beginner-friendly if you work carefully and follow a step-by-step process. Safety matters most, especially when handling glass.
Are aluminum and vinyl windows repairable, too?
Yes. You can often repair seals, tracks, rollers, and minor glass issues in aluminum or vinyl units. Serious bends or structural frame damage may need professional attention.
What is the easiest way to stop a draft fast?
Replace worn weatherstripping and apply fresh caulk around the frame. This is often the quickest way to improve comfort and energy savings.
If you want, I can also turn this into a fully SEO-optimized blog post with meta title, meta description, slug, and image alt text suggestions.