Picture your cat lounging safely outdoors year-round, curled up inside a warm, sturdy shelter while the cool breeze rustles the leaves above. If you love your furry friends as much as we do, you know that they crave fresh air and outdoor adventures. However, keeping them safe from harsh weather and unexpected predators is always a top priority.
Recently, there has been a massive surge in pet adoptions, alongside a growing awareness of feral cat welfare. Because of this, more and more pet parents are looking for creative ways to protect outdoor and stray cats. This rising demand makes tackling an easy DIY pet project the perfect solution. Learning how to build a cat house outdoors is simpler than you think, and the best part is that you can do it on a beginner-friendly budget of under $100.
Why Build an Outdoor Cat House?
You might wonder why you should spend your weekend working on a DIY project when you could simply buy a shelter. The reasons go far beyond just saving a few dollars. First and foremost, let us talk about the incredible health perks for your feline friends. Giving your cat access to a backyard cat enclosure or shelter promotes physical exercise and mental stimulation. Cats are natural hunters and explorers. Giving them a safe outdoor space allows them to watch birds, chase bugs, and stretch their legs. Furthermore, having an outdoor scratch zone significantly reduces indoor scratching, saving your expensive living room furniture from ruin.
From an environmental and trendy perspective, building your own shelter aligns perfectly with green pet parenting. You can easily use sustainable, recycled, or repurposed materials to construct your project. Right now, sustainable DIY pet spaces are massively popular on platforms like Pinterest and YouTube, especially for those who want to provide a feral cat shelter for stray animals in their neighbourhood. Helping stray cats survive cold winters or blistering summers is a deeply rewarding experience that brings communities together.
When you integrate a beautiful wooden structure into your yard, it transforms an ordinary lawn into a feline paradise. Plus, a resident cat naturally deters rodents and pests from ruining your garden.
Let us also consider the financial aspect. Store-bought, high-quality shelters can easily cost upwards of $200 to $300, and they often lack the personalised touches your specific yard needs. By choosing to build outdoor cat house structures yourself, you save a significant amount of money while gaining total control over the design.
This DIY approach is incredibly useful for pet owners with space constraints, such as urban pet parents living in bustling cities like Lahore. When your backyard space is limited, you need a custom solution that fits snugly into a tight corner or under a specific balcony. Building it yourself ensures that the shelter fits your exact measurements, making the most of whatever outdoor space you have available.
Materials and Tools Needed
Before you swing a hammer or cut a piece of wood, you need to gather your supplies. Preparing your workspace in advance prevents frustrating delays. You do not need to be a professional carpenter to gather these items. To make things incredibly simple, we have broken down exactly what you need to create your DIY cat shelter outdoors.
Take a look at this easy-to-read materials list to plan your budget:
Item Quantity Purpose Cost Estimate
Plywood sheets 2 (4×8 ft) Creating the base, walls, and roof $40
Straw or insulation foam 1 bale or pack , providing warmth and weather protection $15
Plexiglass or hinged door, 1 small sheet. Creating a weatherproof entry flap for $20
Screws, hinges, paint , Assorted Assembling parts and sealing the wood $15
Elevated platform wood 1×4 ft thick board , creating a flood-proof, raised base $10
Now that you have your materials, you need the right instruments to put them together.
Here is a list of the basic tools you will need:
- Hand saw or circular saw: For cutting your wood to the correct size.
- Power drill: To quickly drive screws and make ventilation holes.
- Hammer: For minor adjustments and tapping joints together.
- Measuring tape: To ensure all your cuts are perfectly accurate.
- Sealant gun: To apply waterproof caulk around the roof and joints.
- Safety goggles and gloves: To protect your eyes from sawdust and your hands from splinters.
When it comes to sourcing your items, you have plenty of local and digital options. If you are in a city like Lahore, local hardware spots like Paint Point offer great deals on sealants and wood. Alternatively, you can browse online marketplaces like Daraz for affordable hinges, screws, and tools delivered right to your door.
A quick safety note: Always ensure that any paint or sealant you purchase is labelled as non-toxic and pet-safe. Cats groom themselves frequently, and if they rub against wet, toxic paint, they could ingest harmful chemicals. Keep everything safe, simple, and pet-friendly!
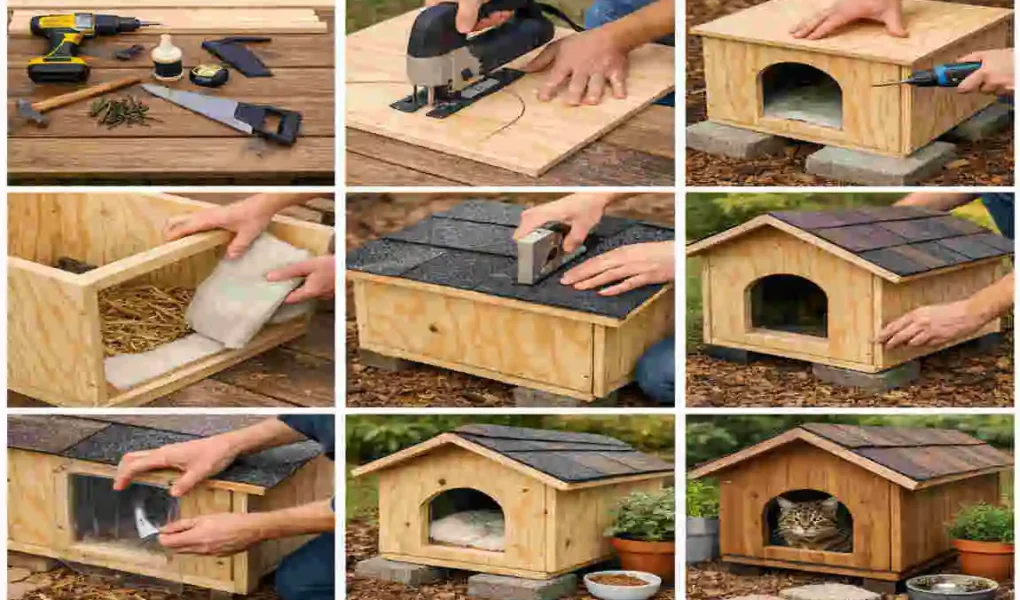
Step-by-Step Guide: How to Build a Cat House Outdoor
Are you ready to bring your project to life? Follow these ten detailed steps. We have broken down complex carpentry into simple, bite-sized tasks so anyone can succeed.
Plan Your Design and Location
The very first step in learning how to build a cat house outdoors is deciding where it will live in your yard. Location is everything. You want to choose a spot that is mostly shaded during the hot summer months but sheltered from harsh, freezing winds during the winter. Look for a quiet corner away from loud machinery, busy streets, or areas where neighbourhood dogs might frequent.
Once you find the perfect spot, take out your measuring tape. Check the dimensions of the area to ensure your planned house will fit. Next, sit down with a piece of paper and sketch out a simple A-frame design. An A-frame is excellent because the slanted roof naturally lets rain and snow slide right off. For a standard shelter meant to house one or two cats, a dimension of 4 feet long, 3 feet wide, and 3 feet tall is incredibly spacious and comfortable.
Before you finalise your blueprint, do a quick check of your local neighbourhood regulations or homeowner association rules. Some communities have guidelines about outdoor structures. Once you have a solid plan and the perfect quiet spot, you are ready to move on to the building phase!
Cut the Base and Walls
Now it is time to turn those large pieces of plywood into the walls and floors of your kitty sanctuary. Put on your safety goggles and gloves to protect yourself. Grab your measuring tape and a dark pencil, and carefully mark the dimensions you sketched out in step one directly onto the plywood sheets. Remember the golden rule of building: always measure twice and cut once!
Start by cutting the floor base. You want the floor to be slightly elevated from the damp ground, so keep your thicker elevated platform wood nearby. Next, cut the two side walls, the back wall, and the front wall. Because you are making an A-frame, your front and back pieces will look like large triangles at the top to support the sloped roof.
Here is a wonderful pro tip to increase the charm of your project: use a jigsaw tool to cut gentle, smooth curves along the rooflines or the entrance. Harsh, sharp angles can sometimes splinter, but rounded edges give the structure a softer, more professional look that appeals to cats. Once all your pieces are cut, take a piece of sandpaper and rub down the edges to remove any sharp splinters.
Assemble the Frame
With your wooden pieces cut and sanded, you can now start assembling the main frame. You will watch your pile of wood transform into a recognisable house in this step! Start by laying your heavy base piece flat on your workspace. Take your first side wall, hold it upright against the edge of the base, and use your power drill to drive wood screws through the bottom of the wall directly into the base.
Repeat this process for the back wall, the other side wall, and finally, the front wall. It is incredibly helpful to have a friend hold the walls steady while you operate the drill. To make the structure even stronger, place small wooden blocks or metal brackets inside the corners where the walls meet, and screw them in. This reinforces the corners and keeps the house standing strong even if a heavy storm hits.
Finally, attach the two roof panels. Make sure the roof has a noticeable angle. A flat roof will collect puddles of rainwater, which eventually leads to rotting wood. A nice, steep angle ensures excellent rain runoff, keeping the inside totally dry.
Insulate for All-Weather Comfort
A wooden box alone will not keep a cat warm in the dead of winter or cool in the blazing summer. Insulation is a critical step when you want to build outdoor cat house structures that actually protect animals. This is where your foam boards and straw come into play.
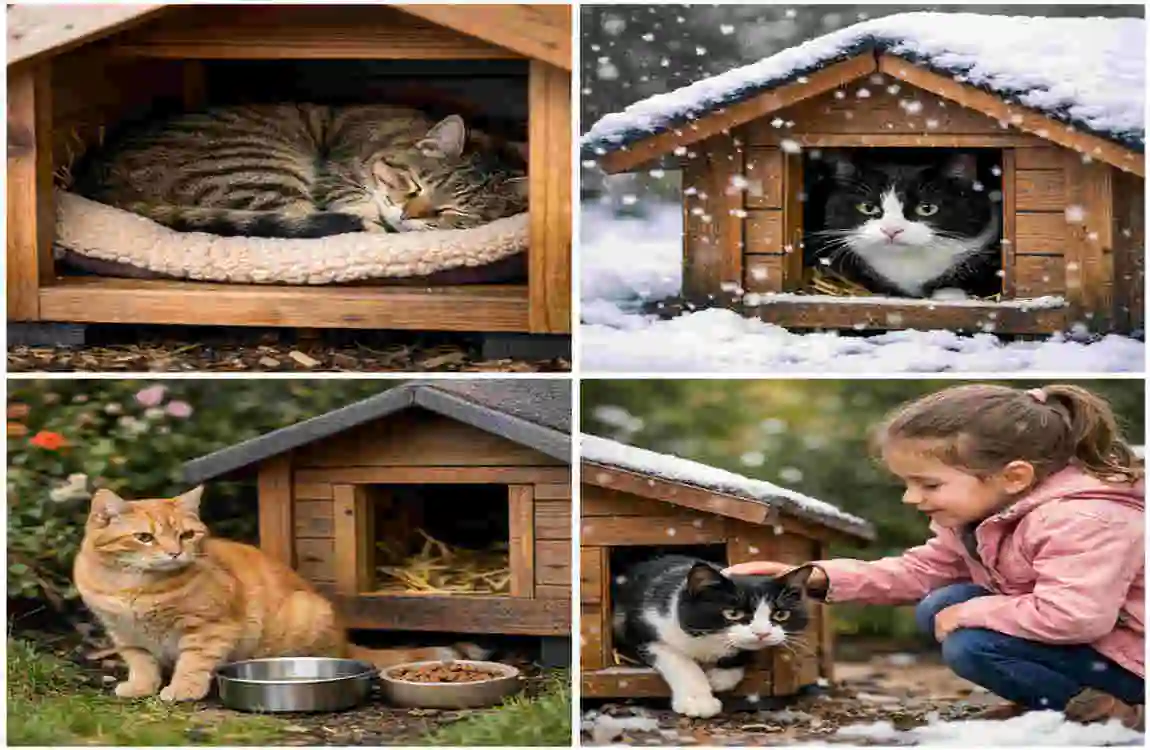
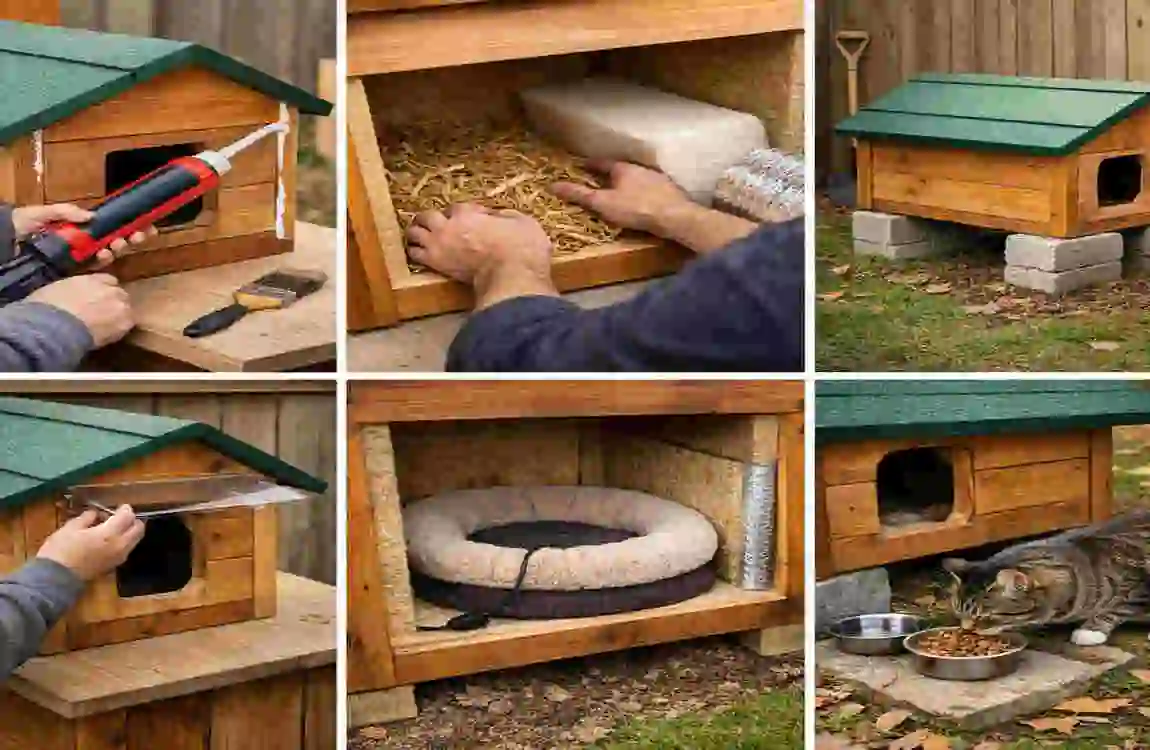
Measure the interior walls, floor, and ceiling of your wooden frame. Cut your foam insulation boards to match these measurements. Apply a strong, pet-safe adhesive to the back of the foam boards and press them firmly against the inner wooden walls. For the floor, you want something soft and moisture-wicking. Do not use blankets or towels, as they absorb moisture from the air and can freeze, making the cat colder. Instead, line the floor generously with fresh straw. Straw allows cats to burrow and traps their body heat wonderfully.
If you experience extreme weather, such as the intense winters or summers in Pakistan, consider adding a layer of Mylar blanket over the foam boards. Mylar is a brilliant material that reflects heat. In the winter, it bounces the cat’s body heat back to them. In the summer, if placed near the roof, it reflects the sun’s heat away from the shelter.
Build the Entrance and Door
Your cat needs a way to get inside, but you do not want to leave a giant, gaping hole that lets in freezing wind, rain, and potential predators. Creating a smart entrance is key. Go to the front wall of your house and mark out a small opening. A 6-inch by 8-inch rectangle is usually the perfect size. It is large enough for a chubby cat to squeeze through but small enough to keep out larger animals like dogs or raccoons.
Cut this opening out using your saw. Now, to make it weatherproof, you need a flap. You can take your small sheet of clear plexiglass, attach a simple hinge to the top of it, and screw the hinge just above the entrance hole. This creates a swinging door that the cat can push open, but that falls shut to block the wind.
If you are dealing with feral cats who might be scared of a heavy plastic door, you can staple thick, clear plastic strips (like a butcher’s curtain) across the door instead. For added security, consider building a small wooden tunnel that attaches to the outside of the door. A tunnel breaks the wind before it even hits the flap and makes cats feel hidden and safe from predators.
Add Ventilation and Windows
It might seem strange to poke holes in a house you just spent time insulating, but ventilation is absolutely vital for your cat’s health. Without proper airflow, the moisture from the cat’s breath will build up inside the shelter. Over time, this trapped moisture leads to mould, mildew, and a damp, freezing environment. During the summer, a lack of airflow can turn the shelter into a dangerous oven.
Grab your power drill and attach a medium-sized drill bit. Carefully drill three to four holes near the very top of the side walls, just under the roofline. Heat rises, so placing holes high up allows hot, stale air to escape efficiently.
To prevent spiders, mosquitoes, and other annoying bugs from entering through these ventilation holes, cut small squares of window screen mesh. Staple or glue the mesh securely over the holes on the inside of the house. You now have a shelter that breathes perfectly, keeping the interior air fresh, dry, and entirely bug-free!
Seal and Weatherproof
Your house is built, but raw wood acts like a sponge when it rains. To ensure this weatherproof cat house lasts for years, you must protect the exterior. Start by taking your sealant gun loaded with waterproof silicone caulk. Run a thick bead of caulk along every single exterior seam where two pieces of wood meet. Pay special attention to the top ridge of the roof and the corners of the walls. Smooth the caulk with your finger and let it dry completely.
Next, it is time to paint. Choose a high-quality, exterior-grade paint that can withstand heavy rain and harsh UV rays. Paint the entire outside of the house, applying at least two coats for maximum protection. Let the first coat dry fully before adding the second.
If you want absolute certainty that the roof will never leak, consider attaching a layer of rubber roofing material or asphalt shingles to the top wooden roof panels. A rubberised layer provides an impenetrable barrier against standing snow or torrential downpours. Run a quick water test with your garden hose once everything is dry; if the inside remains completely dry, you have succeeded!
Install Heating/Cooling Features
Now we want to take your feline haven from simply “okay” to “luxurious.” Depending on the season, you can install specific features to perfectly regulate the temperature. For those chilly winter nights, consider adding a solar-powered heat mat. These amazing mats absorb sunlight during the day and gently release warmth through the night. They are entirely wire-free, so you do not have to worry about running electricity across your wet lawn, which keeps your pets totally safe from shocks.
If a solar mat is out of your budget, simply ensuring a very thick layer of fresh straw bedding is often enough to keep a feral cat toasty.
When the scorching summer months roll around, you will need to adjust the house. Remove the thick winter straw to give the cats a cooler, harder surface to lie on. You can also purchase small, battery-operated, pet-safe cooling fans. Mount a small fan near one of the ventilation holes to pull fresh air through the house. By actively managing the heating and cooling features, your DIY cat shelter outdoor remains the favourite hangout spot all year long.
Elevate and Anchor Securely
Leaving a wooden cat house sitting directly on the grass is a recipe for disaster. Ground moisture will eventually seep into the bottom wood, causing it to rot, warp, and attract termites. Plus, if heavy rains cause your yard to flood, a ground-level house will quickly fill with water.
To prevent this, you must elevate the structure. Take the 1×4-foot-thick boards you bought and attach them to the bottom of the base to act as legs. If you prefer an easier route, simply place four large concrete cinder blocks or heavy bricks on the ground and carefully lift your cat house onto them. Raising the house just 4 to 6 inches off the ground makes a world of difference.
Furthermore, outdoor structures are vulnerable to strong winds. You do not want a heavy storm to flip the house over while a cat is inside. To secure it, drive heavy wooden stakes deep into the ground next to the house, and use strong nylon straps to anchor the shelter tightly to the stakes. This simple trick provides massive peace of mind during bad weather.
Decorate and Introduce to Cats
You have done the hard work, and now comes the fun part! It is time to add personal touches and invite your furry clients inside. Make the exterior inviting by painting your cat’s name above the door or creating a cute paw-print design on the sides. If the luxury house is elevated quite high, build a small, gentle wooden ramp leading up to the front door so older cats or tiny kittens can enter easily.
Introducing cats to a new space requires patience. Cats are naturally suspicious of new objects. Do not force them inside, as this will only scare them. Instead, make the inside smell familiar. Take a blanket or towel that your cat has recently slept on and place it inside the shelter. The familiar scent tells them the space is safe.
Toss a few of their favourite treats or sprinkle a generous amount of catnip right inside the doorway. Leave the flap propped open for the first few days so they can clearly see the exit. Let them explore the space on their own terms. Soon enough, you will peek outside and see them happily snoozing in their new, custom-built mansion!
Customisation Ideas for Your Feline Haven
The beauty of learning how to build a cat house outdoors is that you are never limited to a basic design. Once you understand the core steps, you can modify and customise the structure to fit your specific lifestyle, yard aesthetic, and the number of cats you care for.
If you are a generous soul who feeds multiple stray cats, a single A-frame might get a little crowded. Why not build a multi-cat expansion? You can create a long, rectangular condo-style house with an internal dividing wall. This allows two cats to share the same warm roof while maintaining their own private sleeping quarters. You can even stack boxes securely to create a two-story cat condo, complete with an external jumping platform!
Themed designs are another fantastic way to customise your project. If you love a farmhouse aesthetic, consider building the exterior out of reclaimed pallet wood. Pallet wood gives the shelter a beautifully rustic, weathered look that blends naturally into a garden setting. Just be sure to sand down any rough spots! On the other hand, if you prefer a sleek, contemporary style, you can frame the house using lightweight, modern PVC pipes and cover it with heavy-duty, colourful outdoor canvas.
For the tech-savvy pet parent, integrating smart upgrades elevates the backyard cat enclosure to a whole new level. Consider mounting a small, weatherproof, battery-operated smart camera inside the top corner of the house. This allows you to monitor feral cats from your phone without disturbing them, ensuring they are healthy and using the shelter. You can also install automated, timed dry-food dispensers right outside the door under a small roof overhang. This ensures the cats have regular meals even if you are away for the weekend. The customisation possibilities are truly endless!
Maintenance and Safety Tips
Building the house is only the first part of the journey; maintaining it ensures it remains a safe haven for years to come. Routine maintenance is absolutely essential for your cat’s health and the longevity of the structure.
Set a schedule to swap out the interior bedding. If you use straw, it needs to be completely removed and replaced with fresh straw every three to four weeks. Old straw can harbour tiny mites, fleas, or hidden moisture that makes the environment unhealthy. Once a month, take a quick walk around the shelter to do a visual inspection. Check the caulk and sealant around the roof joints. If you spot any peeling or cracking, apply a fresh layer of sealant immediately to stop leaks before they start.
Safety from predators is another major concern. To effectively predator-proof your shelter, ensure the entrance hole is kept small. Additionally, always make sure there are two exits if possible. While our guide focused on the main entrance, adding a small, secondary escape door on the back wall is a brilliant idea for a feral cat shelter. If a predator like a raccoon or an aggressive dog pokes its head into the front door, the cat needs a safe way to dart out the back.
Finally, keep a close eye on the health of the cats in the shelter. Discuss outdoor safety with your local veterinarian. They can provide excellent tips on seasonal flea and tick prevention, which is vital for any cat spending time in a backyard structure. A clean house and a healthy cat make for a perfect combination.
How to Build a Cat House Outdoor FAQ
What materials are best for an outdoor cat house?
The best materials include weather-resistant wood, plastic storage bins, or insulated foam boards. These materials help protect cats from rain, wind, and cold temperatures.
How big should an outdoor cat house be?
The house should be large enough for a cat to turn around and lie down comfortably, but small enough to keep heat inside. A space around 18–24 inches wide usually works well for one cat.
How can I keep the cat house warm in winter?
Add straw, foam insulation, or thermal blankets inside the house. Avoid using towels because they can absorb moisture and make the space colder.
Where should I place the outdoor cat house?
Place it in a quiet, sheltered area such as near a wall, under a porch, or behind bushes to protect it from wind and heavy rain.
How do I make the cat house waterproof?
Use waterproof wood sealant, plastic roofing, or a slanted roof design so rainwater runs off easily and the inside stays dry.
Should the cat house have a door?
Yes, a small doorway or flap helps keep wind and predators out while still allowing the cat to enter easily.
How high should the cat house be off the ground?
It’s best to raise the house 2–4 inches above the ground using bricks or wooden blocks to prevent moisture and cold from entering.